| To run ASP.NET pages, you need to have two things on your computer: Internet Information Server (IIS) and the .NET Framework Software Development Kit (SDK). These items are available for Windows 2000 and Windows NT 4 with Service Pack 6a. Without these items, your computer won't know what to do with ASP.NET files. It will treat them as unknown items and ask you which application should be used to open them, as shown in Figure 1.4. Figure 1.4. Without IIS and the .NET Framework SDK, your computer won't know how to handle ASP.NET files.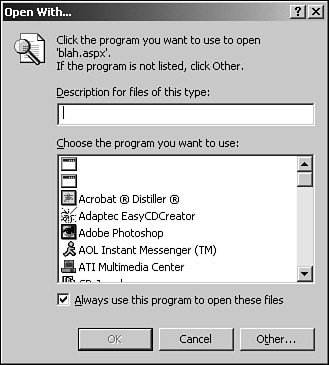
Recall that ASP.NET is a server-side technology, which implies that you need a Web server on your computer. Once you have one properly set up and running, visitors can request pages from your computer over the Internet. ASP.NET pages require a bit more work to handle, however, because Web servers don't understand them. In addition, you need the .NET Framework SDK, which provides the functionality to run ASP.NET pages, as well as supplying the .NET objects and classes. First, let's examine how to set up your Web server, and then we'll look at the .NET SDK. Installing Internet Information Server Internet Information Server is Microsoft's professional Web server that comes bundled with Windows 2000 and XP, or as a separate download for Windows NT Server. If you're running NT Server, download the NT Option Pack for free at http://www.microsoft.com/msdownload/ntoptionpack/askwiz.asp, and get started using IIS 4.0. If you have Windows 2000, you'll already have a copy of IIS 5.0, and for Windows XP, IIS 5.1. To set IIS 5.0 or 5.1 up, go to Start, Settings, Control Panel, Add/Remove Programs, and then select Add/Remove Windows Components. You'll see a window that allows you to add optional Windows components (see Figure 1.5). Figure 1.5. Installing and removing Windows 2000 components.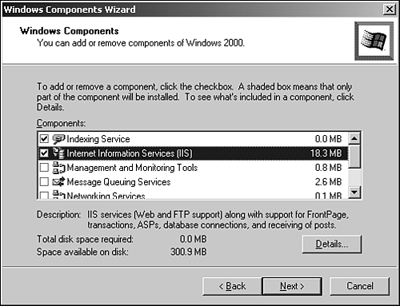
Select Internet Information Services (IIS) and click Next. Or you can click the Details button to install individual pieces of IIS, such as an FTP or SMTP service. You'd be fine just using the default options, but it doesn't hurt to install them all. Once you click Next, Windows 2000 (or XP) will gather some information and begin the installation process. Congratulations, you now have a Web server installed on your computer! Open your browser and type http://localhost, and your Web site will open. The page that comes up is a default page created by IIS. You can also access your server by typing http://computername, where computername is the name of your computer. If you don't know the name of your computer, using localhost will work fine. Note Getting a domain name for your site, like www.MySite.com, is a completely separate process that is well beyond the scope of this book. Check out Network Solutions (www.networksolutions.com) for more information.
Let's access the Internet Services Manager (ISM), which allows you to configure IIS's settings. Go to Start, Settings, Control Panel, Administrative Tools, and then select Internet Services Manager. Figure 1.6 shows this application. Figure 1.6. Configuring IIS with the ISM.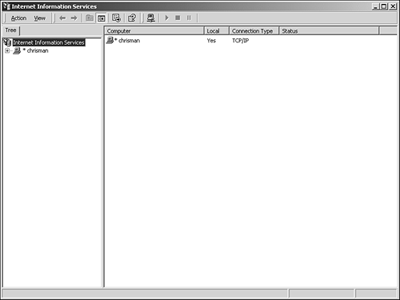
Tip There is a shortcut to reach the ISM. Go to Start, Programs, Administrative Tools, and you should see it there as well. If you don't see Administrative Tools in this list, right-click somewhere on the taskbar and select Properties, Advanced. In the menu at the bottom of the window that pops up, you can choose to display the Administrative Tools.
This application shows the directory structure of your Web site, and the FTP and SMTP sites if you chose to install them. Expand the Default Web Site menu and you should see a few directories and files already there. Right-click on Default Web Site and select Properties. There are a lot of options to play with, and you could spend a lot of time here. For now, you're only concerned with the Home Directory tab. Notice the Local Path box near the middle of this page, as shown in Figure 1.7. This defaults to c:\inetpub\wwwroot, also known as the root folder. When a visitor comes to your Web site, he's viewing the contents of this folder. Thus, if a visitor goes to www.yoursite.com, he's actually looking at whatever is in the c:\inetpub\wwwroot folder. Figure 1.7. Viewing the Home Directory properties for the default Web site.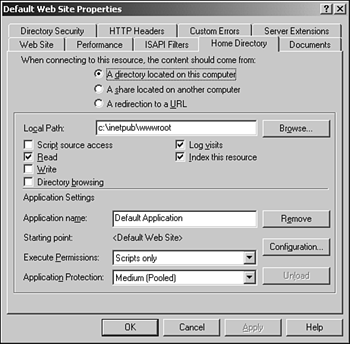
In fact, open My Computer from the desktop and go to your C: drive. You should see this directory now, if it wasn't there before. This is where you'll be placing all of your ASP.NET files.  | Click Cancel to go back to the ISM. All of the directories you see here are called virtual directories. (If you don't see any directories, don't worry because you'll create one in a moment.) A virtual directory is a folder on your computer that can be accessed through your Web site as though it were inside c:\inetpub\wwwroot. |
To create a virtual directory, right-click on Default Web Site, go to the New menu, and select Virtual Directory. You'll see a wizard like the one in Figure 1.8. Click Next and type in an alias. This is the name of the folder that Web site visitors will type to access part of your Web site. Click Next once you've entered an alias. On the next page, choose the directory on your computer. This can be any directory, anywhere on your computer. The next page lets you choose some options, but for now, just click Next and then Finish. Figure 1.8. The Virtual Directory Wizard lets you create virtual directories easily.
You should now see an item in the ISM with the alias that you created. If your directory name was images, you could now type http://localhost/images into your Web browser and view that directory's contents. In most cases, virtual directories will be placed in the root folder that is, at c:\inetpub\wwwroot. The interesting part is that the actual directory can be located anywhere on your computer, but visitors to your site can access it just as if it were at the root folder. Virtual directories are important for ASP.NET, as you'll see in the coming days. Installing the .NET Framework SDK The .NET Framework SDK contains the tools and applications that will allow ASP.NET pages to run. This includes the Common Language Runtime you learned about in "The .NET Framework" earlier today. This SDK is free at www.microsoft.com/NET, but be aware that it's over 100MB and can take more than 6 hours to download on a 56KB modem. You can also order the SDK on CD-ROM for a nominal shipping charge. Once you have a copy of the SDK, run the setup program. This process may take some time because Windows extracts files and gathers information (see Figure 1.9). Once Windows is done examining your computer, you should see a window similar to the one in Figure 1.10. Figure 1.9. Setting up the .NET Framework SDK.
Figure 1.10. The .NET Framework SDK setup screen.
Click Next and accept the agreement, click Next again to select the components you want to install, click Next again to choose the directory to install to, and click Next one last time to install the .NET Framework. After it's done, a shortcut to the .NET Framework SDK Overview will appear on your desktop (if one doesn't appear, you can access the .NET Framework by selecting Start Menu, Programs). Click on this and go through it to find out more about the SDK. This shortcut also contains a link to the .NET Framework SDK Documentation, so be sure to check that out as well. Create a text document called MyPage.aspx in your c:\inetpub\wwwroot folder. (.aspx means that this is an ASP.NET file. More on this in the next section.) Now try double-clicking on this file. You receive the window shown in Figure 1.4 again. What happened? Recall that ASP.NET is a server technology, which means it requires a Web server in order to run. Therefore, ASP.NET files must go through a server to function (such as IIS). Now open your browser and type http://localhost/MyPage.aspx. You'll see the empty ASP.NET page. Caution Simply opening the ASP.NET page in your browser by clicking on the File menu, selecting Open, and navigating to the file won't work either. This merely tries to open the file in the browser without going through the Web server. You must go through the server by using http://localhost. This is a common mistake among beginners.
Now you're ready to begin running ASP.NET pages! | 