Hack 56. Make Your Audio Sound Better
| < Day Day Up > |
|
Audio might take up only a small section of the audiovisual signal, but it has substantial impact on how your audience perceives your project. Have you ever watched a low-budget, independent movie and been distracted by a subtle audio problem? It could have been something as simple as the buzz of fluorescent lights, but the sound drew your attention away from the scene and suddenly you were thinking about the buzz. If there is a slight hum caused by an air conditioner, for example your audience can easily become distracted. Removing hum and other extraneous noise makes an appreciable difference in your audio… and it can be removed easily with the right tool. If you're producing a movie and you discover your audio has areas that need to be cleaned, don't fret. You have a few options at your disposal. The first, and easiest, option is to purchase Bias's SoundSoap (http://www.bias-inc.com/ products/soundsoap/; $99), which is available for both Macintosh and Windows. The second option is to use the audio filters available within your editing program. Finally, you can take your audio to a professional audio mixer and have her do the cleanup work for you. This last option might yield the best results, but your wallet will be a lot lighter afterward.
5.7.1. Cleaning Audio Using SoundSoapWhen it comes to removing audio noise, such as hums, buzzes, rumbles, and the like, there is no easier tool to use than Bias's SoundSoap. It works either as a standalone application or as a plug-in to a compatible DirectX or Virtual Studio Technology (VST) application, most which are audio editing programs, such as Bias's own Peak (http://www.bias-inc.com/products/peak/; $499) or Steinberg's Cubase (http://www.steinberg.com; $129 $799). Using the SoundSoap is similar in each case. If you are using SoundSoap in standalone mode, you need to open a media file to work with. Selecting File The default settings work perfectly fine, right out of the box. However, you can fine-tune which sounds are removed by using the Noise Tuner, Noise Reduction, Preserve Voice, Remove Hum, and Remove Rumble features. The Wash window in the top center of the interface indicates visually how much noise is being removed from the audio signal; blue represents your desired audio and red represents noise. The Noise Tuner function works like an old radio dial, where you can "tune into" the noise you would like to remove. You can play your media file by clicking the Play button on the bottom of the interface. While your file is playing, you can use the Noise Tuner to locate the noise you would like to remove. The amount of noise reduction can be altered using the Noise Reduction dial. It works in the same way as the Noise Tuner dial. When doing noise reduction, you will notice that it removes the "highs" of your audio, so it can dull your audio if you are not careful. If you are working with people talking and, well, you probably are you should turn on the Preserve Voice feature. Doing so removes extraneous audio that is outside of the human tonal range. This is especially helpful for on-camera interviews. Remove Hum and Remove Rumble are specific in what they remove from your audio. Using the Remove Hum feature removes the typical hum associated with electrical interference, such as poorly wired lighting. If you are using 120 VAC (North America), you should remove 60Hz hum; if you're using 220 VAC, you should remove 50Hz hum. Here's a quick-and-dirty guide: if you are using NTSC, remove 60Hz, and if you are using PAL, remove 50Hz. The Learn Noise button works best on small sections of audio, where only noise is present. If you have a scene in which there are two to three seconds without dialogue, you can play across that section and click the Learn Noise button. SoundSoap analyzes the audio and attempts to remove similar sounds from the rest of your scene. Figure 5-5 shows the SoundSoap interface with the Noise Tuner and Noise Reduction dials tuned and the Preserve Voice function enabled. Figure 5-5. Scrubbing audio clean using SoundSoap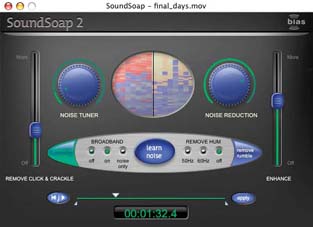 You can also mark specific areas by setting In and Out points, much as you would in a video-editing application. To set an In point, choose Edit When you are satisfied with the job SoundSoap has done, click the Apply button to save the changes to your media file. One approach to using SoundSoap is to find a section of your audio you would like to improve by marking In and Out points, find a small two-second section of noise-only audio, have SoundSoap learn the noise, make any changes you deem necessary (such as removing a hum), and finally, apply the changes to your file. 5.7.2. Removing Hums and Buzzes Using Your Editing SystemMost video-editing systems now include some level of support for audio editing. The audio-editing support often comes in the form of audio effects or filters. In order to remove distractions such as hums, hisses, and buzzes, you want to be able to suppress certain frequency ranges. A good approach to removing unwanted noise is to use high-pass or low-pass filters. These filters pass through either high or low frequencies, respectively. You might want to use more than a few of them to accomplish a cleaner sound. For example, if there is a rumble in your audio, you can apply a high-pass filter to help suppress the lower frequency. Or, if you discover there is a hiss in your audio, you can apply a low-pass filter to help block-out the hiss from the audio signal. Figure 5-6 shows Final Cut Pro's Low Pass Filter in use. Figure 5-6. Using a low-pass filter in Final Cut Pro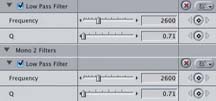 A notch filter is similar to high-pass and low-pass filters, but it blocks a specific frequency range instead of passing it through. The notch filter can also work well at removing audio noise. If it's available, you can also try using an equalizer (EQ) filter. Some editing systems, such as Premiere Pro, have a DeNoiser filter. Others, such as Final Cut Pro, have a Hum Remover filter. Ultimately, you should evaluate what filters are available on your system and experiment to see if they can accomplish what you want to do. 5.7.3. Hiring an Audio MixerThere are professional audio mixers in just about every metropolitan area around the world. Additionally, some very talented hobbyists are available. If you plan on having a professional mix and edit your audio, you should not attempt to alter the audio in any way. Almost every audio professional wants the purest audio they can use in order to work their magic. Before your session with the person who is going to mix your audio, you should find out which type of audio file he will need. Also ask if there are certain specifications he will need, such as whether he would like 48KHz or 44. 1KHz audio. Depending on the system he is using, you might have to provide an OMF, SDII, or AIFF file. You should make sure your editing system can provide the correct file format, or find an alternate solution, such as providing the audio on videotape. |

 Open Media File allows you to select a QuickTime-compatible file (which includes DV, AVI, WAV, MP3, and MP4) from your hard disk. SoundSoap then imports the file for you to use.
| < Day Day Up > |
EAN: 2147483647
Pages: 158