Hack 100. Weekend Project: Create a Documentary
| < Day Day Up > |
|
Using free footage and still photos from the Internet Archive, and a little creativity, you can make an historical documentary worthy of PBS. You have a camera, you have a system to edit on, and you have the time and the motivation to create a masterpiece. You do not, unfortunately, have a plot, a script, actors, or financing. However, an historical documentary will allow you to flex your creative muscles while using someone else's footage and photos. No actors need apply. 8.12.1. Choose a Subject and Research ItIt might seem like a simple and obvious step, but it is possible to do it wrong. It's important that you choose a subject that will engage you. If you don't care about your subject, it will show through in the finished product, assuming you can bring yourself to finish the project at all. It's also important to pick a subject about which you will be able to find ample material. Many have wondered why The History Channel airs so many documentaries about World WarII. It's because footage and photos of World War II are abundant, whereas if you want shots of Genghis Khan, you'll have to put men in funny hats on horses and get them yourself. The Internet Archive (http://www.archive.org) is a nonprofit digital library of video, audio, and text. They have a huge array of media, and it is quite possible to create movie without leaving your desk [Hack #35]. Browse through the archive, and look for something that you find interesting. Download any footage you think might be useful. If you don't think you've got enough moving pictures, don't worry. We'll pick up some still pictures shortly. You should research your potential subjects as you go. Sometimes even a perfunctory web search will reveal that a theme you thought was interesting really isn't, and something you thought might be boring fascinates you. Google (http://www.google.com) is your friend, in more ways than one. As you dig deeper into your potential subjects, use Google's Image Search (http://images.google.com) to find photos that you can use to complement the video you've already gathered. Photos are invaluable to documentaries; still cameras can often go places where video cameras can't. They're good for filling in blanks. When you've got your photos and footage gathered, make sure you also know enough about your topic to present it in an interesting way. You might want to create a storyboard [Hack #6] to help you visualize how your project is going to look. You might also want to log your footage, too [Hack #5]. After all, you didn't shoot this footage, so you'll need to familiarize yourself with it. 8.12.2. Add Motion to Your PicturesYou might notice that you've got more photos, and less video, that you thought. Many a documentary filmmaker has faced that dilemma, and the solution they found was motion control photography, which is also known as the "Ken Burns Effect."
This effect was originally created by panning and zooming on actual still photos with a motion picture camera, giving them a sense of motion. The effect is more easily created these days with digital photos and software. If you have the money and the time to master it, the professional choice is Adobe's After Effects (http://www.adobe.com; $699). However, if you're using a Mac, it's built right into Apple's iMovie (free with a new Macintosh, available as part of iLife suite; $79), with no plug-ins required. 8.12.2.1. Import your pictures into iPhoto.First things first: take the still photos you plan to use, and import them into iPhoto, by choosing File 8.12.2.2. Apply the effect in iMovie.Now open iMovie, and if you haven't already done so, create an iMovie project for your documentary. Then, import your video by choosing File Figure 8-32. Applying the Ken Burns Effect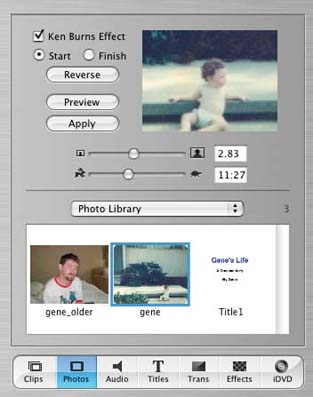 The drop-down menu allows you to choose albums from your iPhoto library, showing you the pictures from the chosen album in the box. When you click on a picture, it immediately begins previewing the effect we're after in the box in the top-right corner. To customize the effect, first click on the Start radio button. Now use the top slider to adjust the zoom for the start of the effect, and the bottom slider for the duration of the effect. You'll notice that when you move the cursor over the preview, it becomes a hand; you can also adjust on what part of the picture the zoom or pan starts and ends. When you're satisfied with your starting point, click the End button, and set the zoom and focus on which you want to effect to end. When you're satisfied, click Preview to make sure you're actually satisfied. Then click Apply, and iMovie will place the photo on your timeline. Click the Clips button, and drag the newly zoomed and panned photo into your clip library. Voilà! The Ken Burns Effect. 8.12.3. Add AudioThere are still some things missing from your documentary: music, and narration. If you're planning on distributing this documentary of yours, your best bet is to avoid the hassles of licensing and royalties and use free music [Hack #58]. If you're doing this for the pleasure of it, then raid your music library and use what you like. With the music taken care of, we move on to the narration. I can assure you, from personal experience, that you're going to feel silly when you record narration for your documentary. That doesn't matter: documentaries need narration. It's a fact of life, especially when using still photos. Get your timeline cut together, write what needs to be said, and practice a few times to get the timing right. You can capture your audio with iMovie and your Camera. 8.12.4. Add Your Titles and Put it to BedAfter your narration and music are done, you just need to add some titles. There's a lot of ways to go about this, from creating fancy slates in Photoshop and importing the images, to using cloth and sharpies [Hack #69]. Since we've already established that a) you have no financing, and b) you're using a Mac, we'll try a low-cost alternative. Open TextEdit, which is in the Applications folder, and create your first title slate. Make it as pretty as you like. When you're done, open Grab, installed Applications/Utilities. Choose Capture Figure 8-33. The titles go rolling by…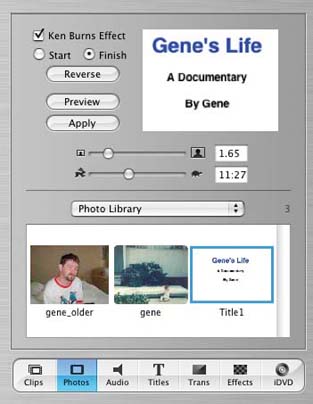 Congratulations; your documentary is finished! Output it, make some copies, and you're ready for distribution. Good luck on the festival circuit! Gene Sullivan |

 Import…, and browsing to where your pictures are. Once theyve been added to your photo library, create an album for your project and drag the photos into that album. Remember, keeping yourself organized is a good thing. You should be able to go right to your project's pictures without having to sort through vacation pictures.
 Import… and browsing to your video collection. Once your video is finished importing, click on the Photos button. Figure 8-32 shows iMovie in photo editing mode.
| < Day Day Up > |
EAN: 2147483647
Pages: 158
- ERP Systems Impact on Organizations
- Context Management of ERP Processes in Virtual Communities
- Distributed Data Warehouse for Geo-spatial Services
- Relevance and Micro-Relevance for the Professional as Determinants of IT-Diffusion and IT-Use in Healthcare
- Development of Interactive Web Sites to Enhance Police/Community Relations