Hack 94. Save Your Presentations to DVD
| < Day Day Up > |
|
With a little forethought, you can save your business presentations to DVD, as well as offer them online. You've just made the greatest presentation of your career. The members of the board are applauding, and the Chairman is patting you on the back and offering you the hand of his eldest child in marriage. But there's a little nagging voice in your ear: you didn't videotape the presentation, so there's no record of your triumph. Fortunately, it doesn't have to be that way. With a little planning, you can make a permanent record of your career triumph that you can send to friends, family, and people who couldn't make it. And you can also offer the presentation online so that your colleagues can relive the moment when you crushed that know-it-all from accounting with your devastating analysis of those third-quarter sales figures. 8.6.1. Solving Life's Little ProblemsYou're probably thinking that all you need to do is to stick a camcorder in the back of the room and hit Record. You could do that; the only problem is that the resulting video will look sub-par. Think about it: you're trying to record a screen in a darkened room filled with people, so it's not surprising that the results generally turn out to be disappointing. If the PC that you are presenting from has a Video Out port, you could connect the computer to the camcorder, but again, the results are often disappointing; the quality of the presentation often suffers after it has been compressed and recompressed several times. If you use PowerPoint to make your presentations, Microsoft offers a free application, called Microsoft Producer (http://www.microsoft.com/office/powerpoint/producer; free), that can export them to a web page, but that application can't save a presentation to DVD. So, in this hack, we'll make a high-quality video of the PowerPoint presentation on the PC and then combine this with an audio recording of the presenter. That way, the viewer gets to see the slides and hear the presenter talk. 8.6.2. Dealing with Audio and VideoFirst, let's handle the audio portion. If the presentation is to a live audience, connect the line output of the PA system to the audio input of your camcorder and record it. If this isn't possible, stick your camcorder somewhere close to the presenter, so the microphone picks up her voice. If you aren't presenting to an audience, you can record the audio using a separate microphone (or the one built into your camcorder) in a quiet room while you step through the presentation. If you want to capture the presenter in video as well, set the camcorder to take a tight shot of her making the presentation, but don't worry about capturing the presentation itself. We are going to capture and add that in a bit. Next, capture this video onto the PC and save the audio as a separate file, if the video-editing application you use can do this. If it can't, use an application such as VirtualDub (http://ww.virtualdub.org; free, open source) to save the audio as a WAV file. In VirtualDub, load the video and choose File 8.6.3. Capturing PowerPoint to VideoTo capture the presentation itself to video, we are going to use a screen-capture application; I use SnagIt from TechSmith (http://www.techsmith.com; $39). SnagIt is an application that can grab pretty much anything that appears on the computer screen. There's a fully functional 30-day demo available from the TechSmith web site, so you can try it out before spending any money.
8.6.3.1. Using SnagIt.The SnagIt application can capture a section of the screen and record it to a video file. Open your presentation application and set it to show the presentation in a window. From within PowerPoint, choose Slideshow Once SnagIt is running, as shown in Figure 8-7, select to record a video of the screen-capture profile. Then, select Fixed Region from the input drop-down box in the Capture Settings section. This sets SnagIt to grab a certain section of the screen, but we need to tell it how much to grab. Click the input properties button (the three dots to the right of the Input menu) and enter the values of 720 x 480 for creating an NTSC DVD, or 720 x 586 for a PAL DVD. Figure 8-7. Screen capture settings in SnagIt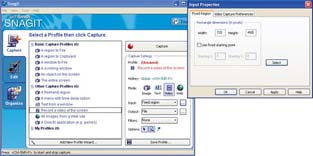 From the Input menu, make sure that the Include Cursor option is not selected. That way, the cursor won't be recorded to our video. Once you've configured your settings, click the Capture button. SnagIt will highlight the area of the screen that will be captured with a red box. Move the box over the presentation program window and left-click to select the area to grab. They won't match up, but you can resize the PowerPoint window by simply dragging the corners until the presentation just fits inside the dotted line. Figure 8-8 shows SnagIt about to capture the presentation. 8.6.3.2. Starting the video capture.To start capturing the video, click the Start button. Press the left arrow on the keyboard to step through the slides in time to the audio you produced earlier. Once the presentation is done, press Ctrl-Shift-P to stop the recording. You can now go back and watch the captured video in SnagIt. If you're happy with it, click Finish and save the file. If not, press Cancel and try again. To make the capture process as smooth as possible, close all other applications except PowerPoint and SnagIt, because the process of displaying a PowerPoint slide while simultaneously capturing the screen takes a lot of memory. It's also a good idea to keep the PowerPoint presentation as simple as possible: complex animations and transitions often don't capture very well. Figure 8-8. Capturing the presentation in SnagIt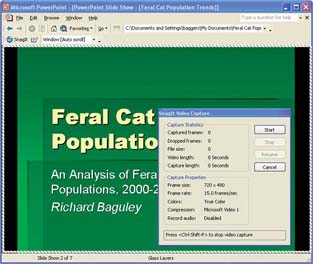 8.6.4. Finalizing the DVDOnce your capture is complete, go into your video-editing or DVD-authoring application and import both the video and audio files, matching them up so that they start simultaneously. If the application you use doesn't support having separate audio tracks, look for an option to add background music to your video; you can import the audio as a background track. Now you're ready to write the resulting video out to DVD ready to send out to friends, colleagues, and admirers the world over.
Many applications also allow you to save the resulting video in a format that you can stick on a web page. Some of these applications, such as Windows Media, Real, or QuickTime, can save the video as a movie file. You can then transcode the movie file [Hack #29] and distribute it as a streaming movie [Hack #83], a download, via email, or even to a cell phone [Hack #89]. 8.6.5. Hacking the HackIf you really want to get fancy, you could go a step further and add the video that you took of the presenter using a picture-in-picture effect. This is the sort of thing that you see on the news, where a small video plays behind the anchors shoulder. And if you want to get even fancier, you could switch between the two, so the viewer can see both your beautiful face and the presentation in all of their glory. Richard Baguley |
 Save WAV. This strips out the audio from the video and saves it as a separate file.
 Set Up Show and set the show type to Browsed by an individual (Window). This will stop the presentation from taking up the whole screen; we dont need it to do that. Start the presentation and leave the presentation application running in the background while you open SnagIt.
| < Day Day Up > |
EAN: 2147483647
Pages: 158