The Project
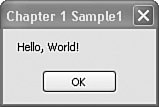
| Welcome to the Project section, the part of each chapter where you have an opportunity to get "hands on" with Visual Studio 2005 and Visual Basic. Development of the Library project, the main project focus of this book, formally begins in Chapter 3, "Introducing the Project," but there's still project work to do in the meantime. In this chapter, I'll introduce you to the sample source code provided with this book, and we'll take a stab at using it. Because most Project sections, including this one, will involve Visual Studio, make sure you have it installed and ready to use. Also, because each Project section is designed for you to use interactively with the supplied source code, I will assume that you have downloaded and installed the source code (see Appendix A, "Installing the Software," for instructions), and are viewing the source code with one eye while you read this section with the other. I will print sections of the source code in the book, but with tens of thousands of source code lines in the Library project, I will not be able to print every line here. You will certainly get a lot out of each Project section by simply reading them, but you will get even more if you have access to the full source code. In this chapter's project, we'll load a sample program into Visual Studio and run it. There are two ways to do this. The first way is just to open the existing project directly from the installation directory. Browse to the directory where you installed this book's source code, open the "Chapter 1" subdirectory, and double-click the Chapter1.vbproj file. This will open the project directly in Visual Studio, ready to use. The second way is to use the chapter-specific project templates to create new projects in Visual Studio. The Setup program for this book's source code modified your installation of Visual Studio, adding new entries in the New Project dialog window. Each of these new "project templates" can be used as the starting point for a new Visual Basic project. To load the Chapter 1 sample program using the template, start Visual Studio. The Start Page will appear, as shown way back in Figure 1-6. From the File menu, select New Project to display the New Project dialog box (see Figure 1-9). Figure 1-9. The New Project dialog boxso many choices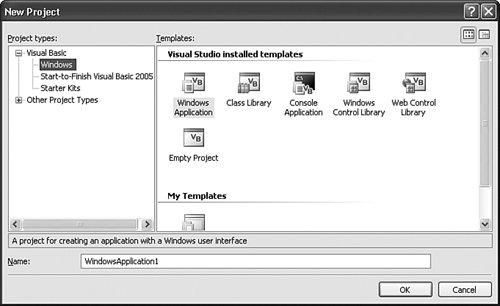 Your New Project dialog box may differ slightly depending on the features you chose to install with Visual Studio. The available projects are grouped by the description in the Project types field. For instance, Figure 1-9 shows the various default project types you can create in Visual Basic, including Windows Applications (standard desktop applications for the Windows platform, Class Libraries (a DLL of class-defined features), and Console Applications (command-line text-based applications). To create a new application, first select the project type, select the Template to use, and finally enter the name of the new project in the Name field. Clicking the OK button creates a new project. To use the sample Chapter 1 project, select the Start-to-Finish Visual Basic 2005 entry within the Visual Basic project type, and then select Chapter 1 Sample from the Template field (see Figure 1-10). Finally, click OK to create the new sample project. Figure 1-10. Selecting the Chapter 1 Sample project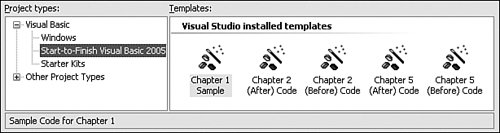 Once the project loads, access the program's main form by double-clicking on the Form1.vb file in the Solution Explorer (see Figure 1-11). Figure 1-11. The main form of the sample application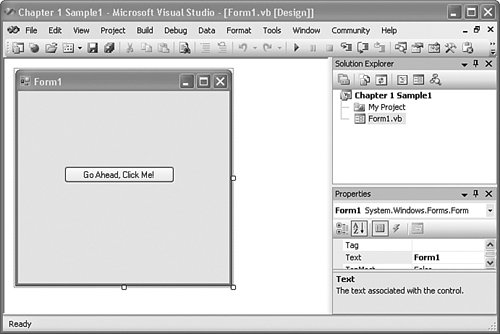 This default presentation of Visual Studio Professional Edition includes three editing components: (1) the main editing area, where the view of "Form1" appears; (2) the Solution Explorer panel, which provides access to all files included in the project; and (3) the Properties panel, which lets you edit various aspects of the currently selected item in the main editor area or elsewhere in the user interface. The sample project is pretty basic. It includes one form with a single action button. Clicking this button in the running application displays a simple message. Run the project by pressing the F5 key. When the main form appears, clicking on the Go Ahead, Click Me button to display the message in Figure 1-12 (goal, sweet goal). Figure 1-12. Hello again, world! So, how about all of that complex code I had to write to develop this multifaceted application? It's all there for the viewing. From the Solution Explorer panel, right-click on the Form1.vb entry, and select View Code from the shortcut menu. (As with most source code samples presented in this book, I have had to slightly adjust the code so that it displays properly on the printed page. Generally, this involves splitting a long logical line into two or more shorter ones.) Public Class Form1 Private Sub Button1_Click(ByVal sender As System.Object, _ ByVal e As System.EventArgs) Handles Button1.Click MsgBox("Hello, World!") End Sub End Class We'll get into the intricacies of such code in later chapters, but here is the gist.
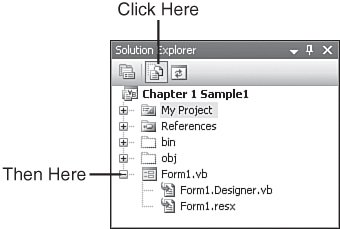
That's all of the code that I wrote for Form1.vb. It sure seems pretty short for all the work it does. There has to be more code hiding somewhere. And sure enough, there are actually half-a-dozen or so more files included in the project. Visual Studio hides these by default, since it manages some or all of the content in these files on your behalf. To view the files, click on the Show All Files button (the second toolbar button from the left in the Solution Explorer panel). Look at all those files! To see the additional files associated with Form1, expand it by clicking on the plus sign to its left (see Figure 1-13). Figure 1-13. Viewing hidden files through the Solution Explorer Double-click on the Form1.Designer.vb entry to see the code that Visual Studio automatically wrote for this form. (Dramatic pause.) Wow! Look at all of that scary code. Actually, it's not that bad. By the end of this book, you will have a firm grasp on all of it. Here in Chapter 1, it's not really necessary to comprehend it all, but there are a few interesting lines to note. I'm including line numbers to make it easier to find the matching code in Visual Studio. If you want to view line numbers in Visual Studio (Professional Edition instructions listed here):
If you're new to Visual Basic or .NET programming, don't worry now if all this code doesn't make sense; it will all become clear as you pass through the pages of this book. 1 <Global.Microsoft.VisualBasic.CompilerServices. _ DesignerGenerated()> _ 2 Partial Public Class Form1 20 <System.Diagnostics.DebuggerNonUserCode()> _ 21 Protected Overloads Overrides Sub Dispose _ (ByVal disposing As Boolean) These lines show attributes in action. These two attributes (DesignerGenerated and DebuggerNonUserCode) are somewhat like the Obsolete attribute discussed earlier, in that they provide some informational identity to the related code. DesignerGenerated modifies the entire section of Form1's code, while DebuggerNonUserCode only modifies the Dispose member. For clarity, both attributes include their full namespace paths. The Global keyword at the beginning of the DesignerGenerated attribute is actually a Visual Basic keyword that says, "Start at the very tippy-top of the namespace hierarchy; this is not a relative path." 2 Partial Public Class Form1 Did you see the word Partial right there on line 2? I know I did. Hey, wait a minute; "Public Class Form1" also appeared in the Form1.vb file, but without the Partial keyword. Visual Basic 2005 includes a new feature that lets you divide a single class (Form1 in this case) among multiple source code files by including the Partial keyword with at least one of the parts. Pretty cool, eh? It allows Visual Studio to add complex initialization code for your form (as found in this Form1.Designer.vb file) without it bothering your main source code file (Form1.vb). 3 Inherits System.Windows.Forms.Form The Inherits keyword defines the inheritance relationship between this new Form1 class and the previously written System.Windows.Forms. Form class. Form is the "base" class, while Form1 is the "derived" class; Form1 inherits all of the functionality of the Form class, including its initial look and feel. I'll discuss these class relationships in more detail in Chapter 8. 44 Friend WithEvents Button1 As System.Windows.Forms.Button Line 44 defines the Go Ahead, Click Me button that appears in the center of the form. All controls that appear on your form are separate instances of classes. (Friend is a declaration statement described in the next chapter.) The WithEvents keyword indicates that this instance of the Button class will respond to events, such as a user clicking on it with the mouse. This line doesn't actually create an instance of the Button class; that happens back on line 22. 22 Me.Button1 = New System.Windows.Forms.Button The New keyword creates new instances of classes. In this case, that new instance is assigned to the Button1 class member defined on line 44. At this moment, Button1 is a default instance of the Button class; it doesn't have any of its custom settings, such as its size and position, or the Go Ahead, Click Me display text. All of that is set in lines 27 to 31. 27 Me.Button1.Location = New System.Drawing.Point(64, 104) 28 Me.Button1.Name = "Button1" 29 Me.Button1.Size = New System.Drawing.Size(152, 23) 30 Me.Button1.TabIndex = 0 31 Me.Button1.Text = "Go Ahead, Click Me!" Finally, the button is "glued" onto the form on line 38. 38 Me.Controls.Add(Me.Button1) This adds the Button1 instance to the list of Controls managed by Form1. The Me keyword used throughout this code refers to the Form1 class itself, so Me.Button1 refers to the Button1 class member specifically in the current Form1 class. Most of the code in this file appears in the InitializeComponent member procedure. 21 Private Sub InitializeComponent() ... 43 End Sub When Visual Basic creates an instance of Form1 to display on the screen, it calls the InitializeComponent procedure to do the work of adding the controls to the form. Actually, Visual Basic calls the form's constructor, which in turn calls InitializeComponent. Constructors are special class members that perform any needed initialization on a class instance. They are called automatically by .NET each time a class instance is created. In Visual Basic, all constructors use the name New, as with the following code: Friend Class ClassWithConstructor Public Sub New() ' ----- All initialization code goes here. End Sub End Class I'll talk much more about constructors in Chapter 8, but for now, locate the constructor in the code for Form1. (Very long pause.) What? There is no constructor? So, if there isn't a constructor, how is the InitializeComponent member ever called? That's what I'd like to know. Actually, when the Visual Basic compiler generates the IL code for Form1, it adds a constructor silently, a constructor that calls InitializeComponent. How about that! Why didn't Microsoft simply include the constructor's code right in the source code? It's a simplicity-for-the-programmer thing. They needed to have a default constructor that would call InitializeComponent, but they didn't want a conflict to arise if you added your own default constructor in the non-Designer file. So they hid all of the code until it came time to actually compile the form. Clearly, it's all rather hush-hush, so let's move on. Well, that's pretty much the entire code, at least the part that matters to us now. Although we will rarely, if ever, examine the Visual Studio-generated code for the forms in the Library project, it's good to see what's going on behind the scenes. If you were a Visual Basic 6 programmer, you probably looked at the source code for your forms through Notepad at one time or another. If you did, you noticed that the form and all of its controls were defined with a hierarchy of special commands, and not with actual Visual Basic code. In .NET, that's all changed; the form and all of its controls are created with ordinary Visual Basic code, so you can access it all and see what is really going on. Now, turn to Chapter 2, "Introducing Visual Basic," where I delve into the Visual Basic language itself. |
EAN: 2147483647
Pages: 247