Choosing Pens and Brushes
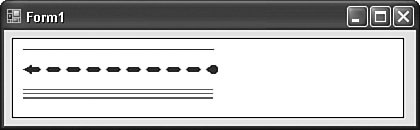
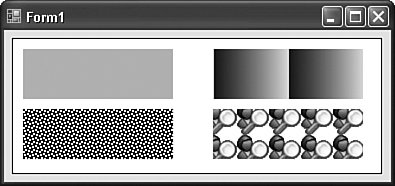
| A lot of graphics work involves drawing primitives: using lines, ellipses, rectangles, and other regular and irregular shapes to build up a final display. As in real life, you draw these primitives using a Pen object. For those primitives that result in a fillable or semi-fillable shape, a Brush object specifies the color or pattern to use in that filled area. GDI+ includes many predefined pens and brushes, or you can create your own. PensPens are line-drawing tools used with the drawing commands of a Graphics object. A basic pen has a solid color and a thickness. ' ----- A red pen five units wide. Dim redPen As New Pen(Color.Red, 5) As with Graphics objects, any Pen you create using the New keyword must be disposed of properly when you are finished with it. redPen.Dispose() There are several predefined pens made available through the System.Drawing.Pens class, all named by their color, as in Pens.Red. If you use one of these pens, you don't have to dispose of it. You can create a lot of interesting pens that vary by line style, end decoration, and color variations. The following code generates the image displayed in Figure 17-2. Private Sub PictureBox1_Paint(ByVal sender As Object, _ ByVal e As System.Windows.Forms.PaintEventArgs) _ Handles PictureBox1.Paint ' ----- Draw some fancy lines. Dim usePen As Pen ' ----- Blank out the background. e.Graphics.Clear(Color.White) ' ----- Draw a basic 1-pixel line using the title ' bar color. usePen = New Pen(SystemColors.ActiveCaption, 1) e.Graphics.DrawLine(usePen, 10, 10, 200, 10) usePen.Dispose() ' ----- Draw a thicker dashed line with arrow and ball ' end caps. Each dashed segment has a triangle end. usePen = New Pen(Color.FromName("Red"), 5) usePen.DashCap = Drawing2D.DashCap.Triangle usePen.StartCap = Drawing2D.LineCap.ArrowAnchor usePen.EndCap = Drawing2D.LineCap.RoundAnchor usePen.DashStyle = Drawing2D.DashStyle.Dash e.Graphics.DrawLine(usePen, 10, 30, 200, 30) usePen.Dispose() ' ----- A semi-transparent black pen with three line ' parts, two thin and one thick. usePen = New Pen(Color.FromArgb(128, 0, 0, 0), 10) usePen.CompoundArray = _ New Single() {0.0, 0.1, 0.4, 0.5, 0.8, 1.0} e.Graphics.DrawLine(usePen, 10, 55, 200, 55) usePen.Dispose() End Sub Figure 17-2. Yes sir, yes sir, three lines full The code shows that there are a few different ways to specify a color, either by its predefined name (Color.White and SystemColors.ActiveCaption), a string name (using Color.FromName), or its Alpha-Red-Green-Blue value (Color.FromArgb). That last version lets you supply distinct values for the "alpha blend" (which sets the transparency level, from 0 for fully transparent, to 255 for fully opaque), red, green, and blue components of the full color. Most of the pen-specific properties I demonstrated here are somewhat self-explanatory. As with most of GDI+, the mind-numbing amount of available features makes it impossible to completely document in a small chapter, let alone provide a good night's sleep for authors designing such chapters. I will simply refer you to the online documentation for the Pen class to get all of the luscious details. BrushesBrushes are used for filling in spaces between drawn lines, even if you make those lines fully invisible. GDI+ includes a variety of brush types, including solid brushes (your basic single-color brush), hatch brushes (pattern brushes that are pleasant but general), texture brushes (where a custom bitmap is used for the brush), and gradient brushes (which slowly fade from one color to another across the brush). The System.Drawing.Brushes class includes some predefined solid brushes based on color name. As with pens, you must dispose of brushes that you create, but not the solid system-defined brushes. The following block of code draws some simple rectangles with a variety of brush styles. The results appear in Figure 17-3. Private Sub PictureBox1_Paint(ByVal sender As Object, _ ByVal e As System.Windows.Forms.PaintEventArgs) _ Handles PictureBox1.Paint ' ----- Draw some fancy rectangles. Dim useBrush As Brush e.Graphics.Clear(Color.White) ' ---- Draw a filled rectangle with a solid color. e.Graphics.FillRectangle(Brushes.Cyan, 10, 10, 150, 50) ' ----- Draw a hatched rectangle. Use black for the ' background, and white for the pattern foreground. useBrush = New Drawing2D.HatchBrush( _ Drawing2D.HatchStyle.LargeConfetti, _ Color.White, Color.Black) e.Graphics.FillRectangle(useBrush, 10, 70, 150, 50) useBrush.Dispose() ' ----- Draw a left-to-right linear gradient rectangle. ' The gradient's own rectangle determines the ' starting offset, based on the Graphics surface ' origin. useBrush = New Drawing2D.LinearGradientBrush( _ New Rectangle(200, 10, 75, 25), Color.Blue, _ Color.Yellow, Drawing2D.LinearGradientMode.Horizontal) e.Graphics.FillRectangle(useBrush, 200, 10, 150, 50) useBrush.Dispose() ' ----- Use an image for the brush. I'm using the ' "LookupItem.bmp" graphic used in the Library ' Project. useBrush = New TextureBrush(Image.FromFile( _ "LookupItem.bmp")) e.Graphics.FillRectangle(useBrush, 200, 70, 150, 50) useBrush.Dispose() End Sub Figure 17-3. Kind of square if you ask me |
EAN: 2147483647
Pages: 247