Setting Up Your Development Environment
| This section describes the steps you'll need to complete to get set up to work with SQL-NS and this book's sample code. You'll begin by installing SQL-NS and all required software, and then you'll copy and configure the sample code from this book's CD-ROM. Installing Notification Services and Other SQL Server 2005 ComponentsSQL Server 2005 comes with one setup program from which you can install all components. This single setup program lets you choose to install the database engine, Analysis Services, Reporting Services, Notification Services, Integration Services, or the client tools and documentation. You can select various combinations of these components to install on any particular computer. Follow these steps on your development machine to install the components required for SQL-NS development:
After you successfully complete the setup wizard, you'll see a new group called Microsoft SQL Server 2005 added to your Start menu under Programs. This program group contains shortcuts to all the tools we'll use to develop SQL-NS applications, as well as the SQL Server Books Online (detailed product documentation for all aspects of SQL Server 2005, including SQL-NS). From now on, I'll refer to this program group as the SQL Server program group. Installing Visual Studio .NET 2005If you do not already have Visual Studio .NET 2005 installed on your development computer, it's a good idea to install it now. To work with the managed code examples in this book, the Visual C# language and tools must be in the list of Visual Studio components you choose to install. Note Because Visual Studio .NET 2005 comes in many editions, each with its own set of prerequisites, dependencies, and components, it's not practical for me to provide detailed instructions on installing Visual Studio .NET 2005 here. Refer to the Visual Studio .NET 2005 documentation for thorough information on all the installation options. Installing the Source CodeAll the source code used in this book is located on the accompanying CD-ROM. To work with it, you have to copy it to the hard drive of your development machine; you cannot use it directly from the CD-ROM. The following steps describe how to properly copy the source code:
This copies all the required files to your development machine. If you explore the folder you copied the source code to, you should see the following subdirectories:
As you work through the remaining chapters of this book, you'll become familiar with the meaning and use of the files in these directories. Make a note of the directory you created in step 4 in the preceding list of instructions. You'll need to refer to this directory several times as you work through the samples in this book. From now on, I'll refer to this directory as the source code base directory. Creating the Service AccountIn most of this book's samples, we'll run the SQL-NS engine as a Windows Service. You must configure the service to run under a particular account. For security reasons, it's recommended that you run the service under a low-privileged (non-Administrator) account. This section describes how to create an account you can use to run the SQL-NS engine. The account you create can be either
A local account exists only on the machine on which you create it and generally cannot access resources on other machines. Domain accounts are created on the domain controller and are recognized by all the machines in the domain. Which type of account is appropriate in your environment depends on the answers to the following questions:
If your development machine is not joined to a domain, you must create a local account, and you can use Windows Authentication only if your SQL Server is local. If your development machine is not joined to a domain and your SQL Server is remote, you must use SQL Server Authentication. If your development machine is joined to a domain, you can create either a local or a domain account, but this choice affects the authentication modes available to you if your SQL Server is remote:
If your development machine is joined to a domain and your SQL Server is local, you can use either authentication mode regardless of which type of account you create. All the preceding choices are summarized in Figure 2.1. Figure 2.1. Matrix of choices for account types and authentication modes.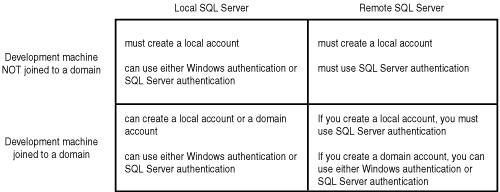 This section provides separate sets of instructions for creating a local account and creating a domain account. Based on the information in Figure 2.1, decide whether you'll be creating a local account or a domain account and follow the appropriate set of instructions. Before doing this, however, you must first decide on a username and password for the account. I have chosen to give the account I use to run the SQL-NS service the name SQL-NS_Service. You can choose any other name if you prefer; if you choose a different name, replace SQL-NS_Service in all the following commands with the name you've chosen. Caution Make sure you remember the username and password you choose for the SQL-NS service. You will need them throughout your work with the code samples in this book. To create a local account, follow these steps:
To create a domain account, follow these steps: Note Depending on how your domain is set up and administered, you may not have permission to create a domain account. If this is the case, your domain administrator must create the account for you.
Setting Up SQL Permissions and AccountsYou need to perform a few steps to get the accounts and permissions on your SQL Server set up appropriately for SQL-NS development. These steps differ based on whether you're using Windows Authentication or SQL Server Authentication. The following sections describe the specific instructions for each authentication mode. Windows AuthenticationWindows Authentication relies on Windows credentials to authenticate users when they attempt to log in to the database server. If you're using Windows Authentication, configuring your system for SQL-NS development involves granting specific forms of SQL Server access to various Windows user accounts. As described in the "Accounts and Security" section (p. 24), both the SQL-NS development tools and the SQL-NS runtime engine make connections to the database server. The tools are usually invoked in the context of the Windows user account under which you're logged in to your development machine. In contrast, the SQL-NS engine usually runs as a Windows service, in the context of the service account you set up in the "Creating the Service Account" section (p. 30). You'll need to configure your SQL Server to allow both the Windows user account you use on your development machine, and the service user account, to log in. However, the two accounts will be granted different levels of privilege. By completing the following instructions, you'll enable your development account and the service account to log in to the SQL server. You'll also add the development account to the sysadmin fixed server role, making it a system administrator on the database server. This is necessary because some of the development tools manipulate system tables. The service account does not require system administrator permissions; other permissions needed to perform various operations in the databases associated with each application will be granted to the service account later. Caution If you're using SQL Server Authentication, do not perform these steps: You can skip this section entirely and move instead to the "SQL Server Authentication" section that follows (p. 34). Note The following instructions must be performed by a user who is already a system administrator on the SQL Server.
SQL Server AuthenticationThis section describes how to create and configure the SQL accounts you'll need if you're using SQL Server Authentication. Caution If you're using Windows Authentication, do not perform these steps: You can skip this section entirely. You should, however, have performed the instructions in the section "Windows Authentication" (p. 32). When building SQL-NS applications, you need two SQL Server accounts:
Note As with everything else in this chapter, the account configuration described here applies only to development. When you deploy your SQL-NS applications in production, you may need different SQL Server accounts, and they may be configured with different security settings. The first account is the one that the SQL-NS tools use to connect to the SQL Server when you compile and configure your applications. I'll refer to this as the development account. When you invoke the SQL-NS tools, you specify the username and password of this account. This account must have system administrator permissions on the SQL Server to perform the operations required to create and manage SQL-NS applications. The second account is used at runtime by the SQL-NS engine and other application components when they need to read and manipulate your application's data. I'll refer to this as the test account. When you configure the SQL-NS engine, you supply the username and password of this account. The test account requires specific permissions in the SQL-NS databases it accesses, but it does not need to be a system administrator. You can use the same SQL Server account for both development and testing, but I don't recommend this. It's generally good security practice to always connect to your SQL Server with the minimum required permissions for the operations you're performing. If you used a single account for development and testing, you'd always be connecting as a system administrator. Though this is necessary when creating and managing SQL-NS applications, the runtime components of SQL-NS don't need this level of privilege. I recommend that you use two accounts and configure each of them as described in the following sections. The Development AccountChoose a username and password for your development account. On my system, I've chosen the username SQL-NS_Dev, but you may use another username if you prefer. Be sure to remember the username and password you've chosen; you'll need them later. Note The following instructions must be performed by a user who is already a system administrator on the SQL Server.
Note You may be tempted to save the query script you executed previously for reuse later. If you do so, make sure that you edit out the password before saving. It's not a good idea to leave passwords lying around in scripts. The Test AccountChoose a username and password for your test account. On my system, I've chosen the username, SQL-NS_Test, but you may use another username if you want. Be sure to remember the username and password you've chosen; you'll need them later. Note These instructions assume you still have Management Studio open (after completing the steps in the previous section to create the development account) and you're logged in to your SQL Server under a system administrator account.
Notice that the test account is not granted membership in any fixed server roles. When we create SQL-NS applications in subsequent chapters, we'll grant the test account the specific database permissions it needs. Environment VariablesThe command scripts (batch files) used to compile and run the sample SQL-NS applications in this book rely on a set of environment variables to work correctly. These environment variables specify where the source code is installed, the name of the SQL Server, the name of the account under which the engine should run, and the SQL authentication mode to use. Each of the batch files that execute SQL-NS commands first calls another batch file, setenv.cmd, that gets these environment variables set up correctly. Setenv.cmd is located in a common directory that every other batch file references by relative path. The following steps describe how to edit setenv.cmd to set up the environment variables appropriately for your environment. In the next section, we'll run a test script that verifies the environment settings you make here and we'll troubleshoot any problems that may occur. Finally, in the "Customizing the Source Files for Your Environment" section (p. 39), you'll run a script that uses the settings you make here to insert environment-specific values into some of the source files you copied off the CD-ROM.
Testing Your Development EnvironmentIn the previous section, you edited the batch file that sets up the required environment variables and supplied values appropriate for your system environment. In this section, you'll run a test script that determines whether everything is set up correctly. This section assumes that you have completed the preceding steps. Note The test script described here uses the sqlcmd.exe command-line utility to connect to your SQL Server. The script will check whether sqlcmd.exe is in your path and will provide instructions for adding it to your path if necessary. Several of the scripts used in later chapters of this book require sqlcmd.exe to be in your path, so I recommend you set this up now. You can find sqlcmd.exe in the 90\Tools\Binn directory under the directory in which you have SQL Server 2005 installed (usually %ProgramFiles%\Microsoft SQL Server). In most cases, the SQL Server setup wizard adds this directory to your path automatically when you install the SQL Server client tools, but you may have to add it manually on your system.
This batch file attempts to exercise the environment settings you made in the previous section and displays error messages and troubleshooting suggestions if problems occur. If you see any error messages, follow the suggested instructions for resolving the problems. These usually tell you to change one or more environment variable settings in the setenv.cmd file you edited in the previous section. After you've made the appropriate changes, follow the instructions in this section to execute testenv.cmd again. Repeat this process until testenv.cmd completes without errors. When the testenv.cmd batch file completes successfully, you'll know you're ready to proceed. Customizing the Source Files for Your EnvironmentMany SQL-NS source files contain settings and other information that must be customized for each environment. For example, some SQL-NS source files contain directory paths whose values depend on where the source files are installed. On this book's CD-ROM, source files containing environment-specific information are shipped as templates, with placeholders for the values that are different in each environment. As a final step in getting prepared to work through the examples in this book, you'll need to run a script that customizes the template source files you copied from the CD-ROM. This script uses the environment variable settings you created and tested in the previous two sections to replace the placeholders in the template source files with the correct values for your system. In addition, the script also performs some final configuration steps (such as granting appropriate filesystem permissions to the service account used to run the SQL-NS Windows service). After you complete the following instructions, the source code on your system will be ready for you to work with (as described in subsequent chapters). It's important that you complete these instructions now; otherwise, the sample applications will not compile.
Caution If you're using SQL Server Authentication, you will receive several prompts for SQL passwords as setup_all.cmd runs. In each case, pay attention to the account for which the password is requested. Most of the prompts request the password for the development account, but a few require the password for the test account. When you run setup_all.cmd, you may see some error messages because the script performs cleanup operations that try to remove things that may not be present on your system the first time you run it. You can safely ignore these error messages, as long as the script prints a final message, Setup SUCCEEDED, at the very end. SummaryIn this chapter, you installed the required software and set up your development environment to work with the source code in the rest of this book. When you start building your own notification applications, you'll be able to use this same development environment to perform SQL-NS development and administration tasks. In setting up the environment, you had to pay particular attention to security and user permissions. Although these steps can sometimes seem tedious, I urge you to continue being diligent about doing them when building and deploying your own applications. |
EAN: 2147483647
Pages: 166