14.2. Publishing Your Animations Publishing your animation is Flash shorthand for "using the editable .fla file you work with in Flash to generate a noneditable file your audience can play." The kind of noneditable file Flash produces depends on how you decide to publish your animation. Your choices include: -
A compiled Flash file (.swf) . Flash Players, including the Flash Player plug-in that comes with most browsers, play .swf files. If you plan to include your Flash animation in a hand-coded HTML file (or to import it into a Web site creation program such as Microsoft's FrontPage), you want this option. -
A Web page (.html, .swf) . Choose this option if you want Flash to put together a simple Web page for you that includes your animation. (You can always tweak the HTML file later, either by hand or using another Web site creation program.) -
An image file (.jpg, .gif, or .png) . This option lets you display one of the frames of your animation as an image file or as an animated GIF fileuseful for those times when your audience doesn't have a Flash Player installed because at least they can see part of your animation. (For more advice on using ActionScript to detect your audience's Flash Player at runtime and offer alternatives, see the box on Section 14.2.2.)
Note: Flash gives you another way to turn your artwork into an image file: by exporting it (Section 14.3).
-
A standalone projector file (.exe, .hqx) . A projector file is a self-contained Flash-player-plus-your-animation file. Your audience can run a projector file to play your animation even if they don't have a copy of Flash Player installed. Typically, you choose this option if you plan to deliver your animation to your audience on CD or DVD (as opposed to over the Web). Projector files for Windows carry the .exe extension. On Mac, the projector file doesn't have an extension, but if you create a Mac projector file in Windows, the projector extension that Flash creates is .hqx. -
A QuickTime movie (.mov) . Flash lets you publish your animation as a QuickTime movie so that folks with the QuickTime player can see it. This option has become a bit less popular now that most Web browsers can play Flash files on their own. To view a QuickTime movie, audiences have to go to the trouble of downloading and installing the free QuickTime player (But if you insist, see the box on Section 14.3 for help in publishing your animation as a QuickTime movie.) You can choose more than one publishing option at a time, simply by turning on as many checkboxes as you like in the Publish Settings dialog box. For example, you can publish your animation as a compiled Flash file, a Web page, and a standalone projector file all at once when you click Publish. The following sections show you each of these five publishing options in detail. 14.2.1. Publishing as a Compiled Flash (.swf) File When you publish your animation as an .swf file, your audience can run it using a Flash Playereither a standalone version of Flash Player, or a Web browser plugin version. Publishing as an .swf file gives you the flexibility of including your animation in a from-scratch Web page.
Note: If you've worked through any of the examples in this book, you're already familiar with .swf files. Each time you test your animation using Control  Test Movie, Flash automatically generates an .swf file and plays it in the Flash Player that comes with Flash. Test Movie, Flash automatically generates an .swf file and plays it in the Flash Player that comes with Flash.
-
Choose File Publish Settings . A Publish Settings dialog box, similar to the one in Figure 14-5 appears. Here's where you tell Flash what kind of files to publish, and you can choose as few or as many as you like. When you turn on a checkbox, Flash shows you a panel where you can choose settings specific to that file type. -
Turn on the checkbox next to "Flash (.swf)" and then turn off all the other checkboxes . The Flash tab appears next to the Formats tab. -
Click the Flash tab . The Flash settings in Figure 14-6 appear. Figure 14-5. Each time you turn on a Type checkbox, Flash adds a corresponding tab to the Publish Settings dialog box; each time you turn off a checkbox, Flash removes the corresponding tab. Here, the tab matches the one type chosen : Flash. 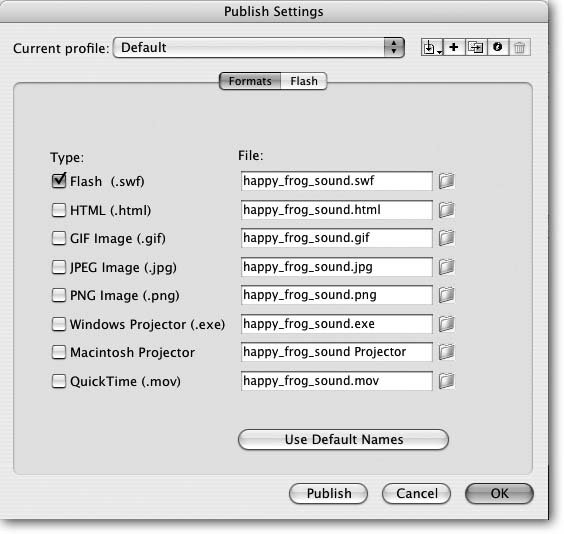 -
Change one or more of the following settings : Version . Lets you select the version of Flash Player you want to be able to run your animation. Choose the latest version (Flash Player 8) if you've included any of the new-in-Flash-8 features (Section 3.3) or if you're not sure whether or not you've included any new features. If you know your audience is running an earlier version of Flash Player (for example, Flash Player 7) and you know you won't be using any new-in-Flash-8 features, you can choose the earlier version. Flash activates the relatively unhelpful Info button only when you choose one of the Flash Lite versions. Flash Lite is a special Flash Player designed for handhelds, such as Pocket PCs. (This book doesn't cover Flash Lite, but you can find out more about it by visiting the online sources listed in the Appendix.)
Note: If you choose Flash Player 8 and it turns out your audience is running an earlier version of the player, such as Flash Player 7, they may need to download and install Flash Player 8 in order to play your animation (depending on the features you included in your animation). Macromedia (now Adobe) makes a free downloadable copy of the latest Flash Player available at www.macromedia.com/software/flashplayer, but it's your responsibility to let your audience know when (or if) they need to surf there and download a new player. For more information, see the box on Section 14.2.2.
Load order . Tells Flash to either load your layers from the bottom of the stack up (Flash does this automatically), or from the top down. This option affects only the first frame of your animation, so unless someone is running a very slow Internet connection, chances are your file will load and begin playing so quickly that load order isn't an issue. Figure 14-6. The settings here let you fine-tune the .swf file that Flash generates when you click Publish. Normally, you don't have to make any changes to these settings. But in some casesfor example, when you know your target audience is running a back-level version of Flash Playeryou do want to change them. These pages explain each setting.
If you don't like the audio format Flash picks for you (circled), click the Set button to display the Sound Settings dialog box shown in Figure 14-8.  ActionScript version . Tells Flash which version of ActionScript to use. In most cases, you want to leave ActionScript 2.0 selected.
Note: If you're an ActionScript programmer and know for sure that your audience is running Flash Player 6 or earlier (or the Flash Lite player) and that you haven't included any ActionScript 2.0 statements in your actions, go ahead and choose ActionScript 1.0.
Generate size report . Tells Flash to list the bytes in your .fla file by frame, scene, action, and so on. While this report isn't as useful for testing as the bandwidth profiler report (Section 13.5.1.1), you may find it useful for keeping track of which content you've added to your animation. Protect from import . Theoretically, this option tells Flash to encode your .swf file so that other folks can't import it into Flash and edit (steal!) your animation. Unfortunately, human nature being what it is, you can find programs floating around the Web that let folks bypass this encoding. So if you need to reference sensitive information in your Flash animation (such as passwords or confidential company info) don't store that information in Flash; instead, store it safely on a protected server and get it at runtime. Omit trace actions . Tells Flash to ignore any trace() statements you've added to your ActionScript actions (Section 13.6.1).
Note: Flash Player won't display the Output window or any trace() actions even if you don't turn on this checkbox. The only time you need to turn on this checkbox is if you plan to debug your animation remotely, using the special Flash Debug Player, but for some reason don't want to see your trace() statements.
Debugging permitted . Tells Flash to let you debug your animation remotely (over the Web) using the special Flash Debug Player browser plug-in. This book doesn't cover remote debugging, but you can find out more about it using Flash Help (see the Appendix). Compress movie . Tells Flash to reduce .swf file size as much as possible without sacrificing your animation's quality. Make sure this option's turned on. (Flash can't compress animations targeting pre-6 versions of Flash Player, but odds are you aren't doing that anyway.) Optimize for Flash Player 6 r65 . This option targets your animation especially for playback on an interim version of the Flash 6 Player, so you almost never want to check it. Password . If you've chosen "Protect from import" or "Debugging permitted," type a password in this box. Typing a password lets anyone with the password import the compiled .swf file into Flash at a later date and edit ita potential security risk if your ActionScript code contains confidential company information. Typing a password also lets anyone with the password debug the .swf file remotely. (This book doesn't cover remote debugging.) JPEG quality . This option lets you set the quality (and therefore the size) of the bitmaps you've added to your animationbut only for those bitmaps for which you've turned on the "Use document default quality" checkbox in the Bitmap Properties dialog box (Figure 14-7, top). To set JPEG quality, either drag the slider or, in the box, type a number from 1 to 100 (Figure 14-7, bottom). Audio stream . Tells Flash which compression scheme you want it to use for streaming audio clips for which you haven't already specified a compression scheme (Section 14.1.1.7). Flash displays the compression scheme it assumes you want. To specify another one, click the Set button and then, in the Sound Settings dialog box that appears (Figure 14-8), choose the compression scheme you want. Figure 14-7. Top: If you turn on the checkbox next to Use document default quality, as shown here, Flash lets you set bitmap quality using the JPEG quality checkbox in the Publish Settings window's Flash tab.
Bottom: If you set the quality of your bitmap using the Bitmap Properties dialog box, however, Flash ignores the JPEG quality checkbox in the Publish Settings window. In other words, you can't tell Flash to compress the same image twice. 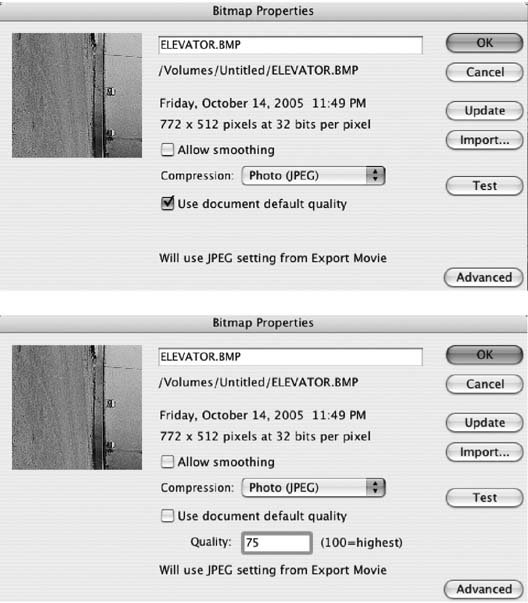
Note: Flash gives you two ways to specify a compression scheme for your sound clips. You can specify a compression scheme for individual sound clips using the Sound Properties dialog box (Section 14.1.1.9) or you can specify one for all of the sound clips in your animation using the Audio Stream and Audio Event options you find in the Publish Settings window. (See below for more detail on the difference between audio streams and audio events.)
Audio event . Tells Flash which compression scheme you want it to use for audio events for which you haven't already specified a compression scheme, using the Sound Properties dialog box. Flash displays the compression scheme it assumes you want. To specify another one, click the Set button next to "Audio event," and then, in the Sound Settings dialog box that appears, choose another compression scheme. Your options are identical to the options Flash gives you for setting "Audio stream" (see Figure 14-8), and they don't override individual sound properties unless you turn on "Override sound settings."
Note: Specifying a high-quality compression scheme doesn't improve a low-quality sound clip; Flash can only work with what you give it.
Figure 14-8. Clicking the Set button (circled in Figure 14-6) opens the Sound Settings dialog box. Here, you can choose from high-quality compression schemes (such as MP3, suitable for long, continuous clips like soundtracks ) and lower-quality, byte-saving schemes (such as Speech or ADPCM. Choosing Raw tells Flash not to compress your sounds at all. 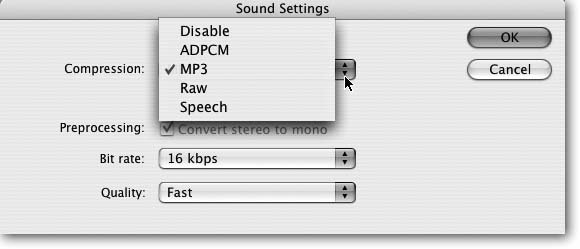 Override sound settings . Tells Flash to ignore the compression schemes you set for your sound clips using the Sound Properties dialog box (Section 14.1.1.9) and use the compression schemes (both streaming and event) you set in the Publish Settings window instead. If you don't turn on this checkbox, Flash uses the compression settings you set in the Publish Settings window only for those sound clips assigned a Default setting in Sound Properties dialog box. Export device sounds . Tells Flash to include MIDI and other device sound files with the .swf file. Turn on this option only if you're targeting mobile devices. Local playback security . New in Flash 8, this option lets you tell Flash if you want your .swf to be able to exchange information with local files (files located on your audience's computers) or network files (files located elsewhere on the Web). If you don't choose either of these options, Flash lets your .swf file read information from both local and network files, but not write information to either. -
Click Publish . The Publish Settings window disappears, and Flash generates a Flash file based on the name you set in the Formats tab. If you didn't type a name of your own choosing, Flash names the file similar to your .fla file. For example, if the name of your Flash document is myAnimation.fla, Flash generates a file named myAnimation.swf .
Tip: You don't have to go through the Publish Settings window every time you want to publish your animation. Once you've got the settings the way you want them, all you have to do is select File Publish.
14.2.2. Publishing as a Web Page If you want to put your animation on a Web page, an .swf file by itself isn't sufficient: You also have to create an HTML file (a Web page) that embeds that .swf file. You can create the HTML file either by using your favorite HTML editor or by telling Flash to generate a simple HTML file for you. POWER USERS' CLINIC
Creating a Publish Profile | | Customizing all the different publishing settings Flash offers can be time-consuming . If you suspect you'll want to reuse a batch of optionsbecause, for example, your boss wants you to publish each animation both as a QuickTime movie and a Flash file and wants to see both versions embedded in different-looking Web pagesyou can save each batch of settings as a named profile: say, myQuickTimeProfile and myFlashProfile. That way, when you want to publish an HTML embedding the QuickTime version of your animation (for example), all you have to do is specify your QuickTime profile. When you want to change gears and publish an HTML that embeds an .swf file, you can switch to your Flash profile (instead of having to hunt through all the options, figure out which ones to change, and change them again and again and again). To create a publish profile: -
In the Publish Settings dialog box, click the "Create new profile icon." (It looks like a + sign.) -
In the Create New Profile dialog box that appears, type a name for your profile, and then click OK. -
Flash saves all your current settings to that profile. As you continue to make changes in the Publish Settings window, Flash continues to save those changes to your profile. You can create as many profiles as you like. To change profiles, click Current Profile and then select a profile from the drop-down list. 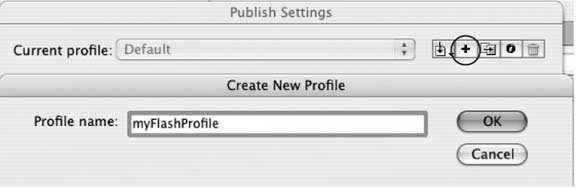 |
At a minimum, the HTML file needs to tells the Web browser how to display the .swf file: at the top of the page or in the middle, whether you want the animation to begin playing immediately or wait until the audience clicks a button, and so on. Because most people who use Flash want to put their animations on the Web, Flash simplifies the process by letting you create an .swf in addition to a simple Web page (.html) in one fell swoop, using the Publish Settings dialog box. To publish your animation as a Web page (.html and .swf): -
Choose File Publish Settings . The Publish Settings dialog box appears. -
Make sure the checkboxes next to "Flash (.swf)" and "HTML (.html)" are turned on; if they're not, turn them both on now . The Flash and HTML tabs appear next to the Formats tab, as shown in Figure 14-9. -
Click the Flash tab and then set up your .swf file . For the details, see step 4 on Section 14.2.1. -
Click the HTML tab . The HTML publish settings you see in Figure 14-10 appear. Figure 14-9. Flash assumes you want to publish your animation on the Webfor which you need both an .swf file and a .html fileunless you tell it otherwise . You can change the suggested file names, all of which begin with the name of your Flash document (here, rolling_ball). 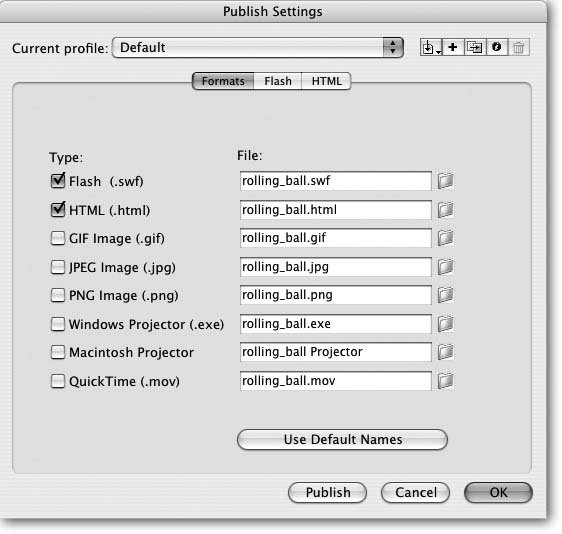 -
If you like, change the template setting . Most of the time, you want to stick with the "Flash only" template that Flash assumes you want. But if you've added certain elements to your animation, or if you want to target a specific Web browser, Flash needs to insert special HTML tags into the template it uses. In that case, you may need one of the following options: Flash for Pocket PC 2003 . Creates an HTML file that runs on Pocket PC 2003. Flash HTTPS . Choose this option if you plan to upload your HTML and .swf file to a secure Web server (https://). Flash only . Creates a basic HTML file that runs in any Web browser. Flash with AICC Tracking . Choose this option if you've added Learning Interaction components (Window Common Libraries Learning Interactions) to your animation and plan to have these components interact with an AICC learning management system. (AICC stands for Aviation Industry CBT Committee.) Flash with FSCommand . Choose this option if you've included the ActionScript fscommand() statement in your animation. ( fscommand() lets your Flash animation call a JavaScript statement. JavaScript is the scripting language supported by most Web browsers.) Figure 14-10. These settings let you tell Flash how you want your animation included in your Web page. This option's great for testing the way your animation looks on the Web. as well as for creating simple pages. But if you want a really sophisticated Web page, you need to edit the HTML file that Flash producesin either a text editor, or in a Web page creation tool such as Dreamweaver. 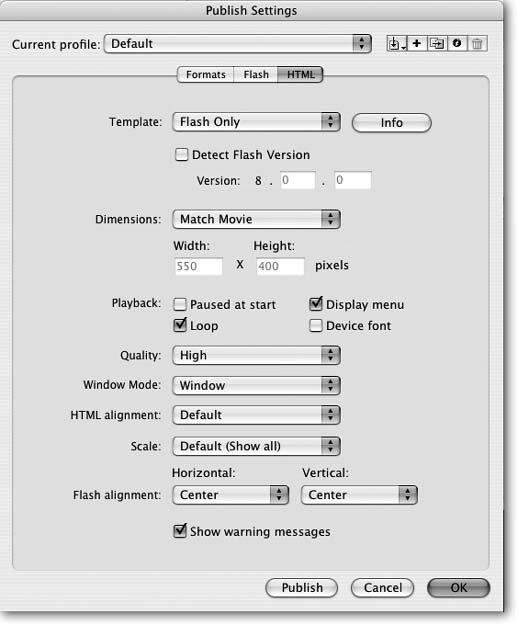 Flash with Named Anchors . Choose this option if you've organized your animation into named scenes (Chapter 10). Flash generates the tags necessary to let people surf directly from scene to scene using their browsers' Back buttons . Flash with SCORM 1.2 Tracking and Flash with SCORM 2004 Tracking . Choose one of these options if you've added Learning Interaction components (Window Common Libraries Learning Interactions) to your animation, and plan to have these components interact with a SCORM learning management system. (SCORM stands for Shareable Content Object Reference Model.) Image Map . Choosing this option tells Flash to create an HTML image map (which an HTML-savvy person can turn into hotspots). For this option to work, you need to have added the frame label #map to the frame you want Flash to turn into an image map, and you have to have chosen GIF Image (.gif), JPEG Image (.jpg) or PNG Image (.png) in addition to HTML (.html) in the Formats tab of the Publish Settings window. (Chapter 10 explains how to add frame labels.) QuickTime . Choose this option if you chose QuickTime in the Formats tab of the Publish Settings window. Flash embeds your animation as a QuickTime .mov file (instead of a Flash .swf file). -
If you chose "Flash only" or "Flash HTTPS" in the previous step, you can now turn on Detect Flash Version/Version to help make sure your audience has the correct version of Flash Player to view your animation . When you turn on the checkbox for this option, your audience sees a Web page telling them where to download the latest Flash Player (but only if the version of Flash Player they have installed doesn't match the version of Flash Player you specify in the Version box). For example, if you type a Version of 8.0.0, someone trying to run your animation with version 7.0 Flash Player sees a Web page similar to the one shown in Figure 14-11. When you turn on Detect Flash Version, anyone who doesn't have the version of Flash Player you specify sees this Web page (instead of the Web page containing your animation). Clicking the Get Flash link whisks your audience to Macromedia (now Adobe), where they can download a free copy of the correct Flash browser. You can edit this HTML file if you'd like to reword the message, and of course you have to upload it to your Web server along with the .swf file in order for your audience to see its contents. (See the box on Section 14.2.2 for further advice.) Figure 14-11. If you turn on Detect Flash Version, anyone who doesn't have the version of Flash Player that you specify sees this Web page.  -
Turn on any of the following settings if you'd like you tweak how your animation appears in the Web pagewhich may be different from how it appears in Flash on the Stage : Dimensions . Lets you tell Flash how large you want your animation to appear in the Web page. Your options are Match Movie, which tells Flash to use the dimensions of the Stage you specified in the Document Properties window (Section 2.2.1.1); Pixels, which tells Flash you want to specify new height and width dimensions in pixels (see below); and Percent, which tells Flash you want to specify new height and width dimensions as a percentage of the Web page display (see below). Width/Height . Lets you specify your animation's width and height in the Web page in pixels or in a percentage of the Web page. Paused at start . Tells Flash not to begin playing your animation as soon as your audience loads your Web page into their browser. If you choose this option, make sure you either turn on Display menu (see below) ora better solutionmake sure you've included an obvious visible Play button in your animation. Otherwise, your audience won't be able to play your masterpiece. DESIGN TIME
The Problem with Detecting Your Audience's Flash Version | | If you create an animation that uses Flash 8-only features, your audience won't be able to play it in an earlier version of Flash Player. But how do you know which version of Flash Player your audience has installed? And if it turns out they are running an earlier version, how can they see your animation? The easiest approach to this dilemma is the one most Flash-ianados opt for: using the Detect Flash Version publishing option described on Section 14.2.2. But making people jump through hoops before they can see your animation isn't always the best design choice. For one thing, not everyone wants to stop what they're doing and download yet another plug-in. For another, folks in many corporate settings aren't allowed to download and install software of any kind, even a free Flash Player. Fortunately, hoop-jumping isn't necessary: Computers excel at this kind of automatic detect-this-and-do-that process. With a little bit of elbow grease, you can devise a more seamless, professional approach, such as: -
Detecting your audience's installed Flash Player and automatically displaying a version of your animation that runs in that player -
Having your HTML file substitute a static image or animated GIF file if it doesn't find the correct Flash Player -
Having your animation download and install the correct version of Flash Player for your audience so they don't have to Macromedia (now Adobe) maintains a Web site devoted to this oh-so-common design problem, and with any luck Adobe will continue to maintain it. As this book goes to press, you'll find descriptions, examples. and sample code at www.macromedia.com/software/flashplayer/download/detection_kit. | Display menu . Tells Flash to include a shortcut menu for your animation so that when your audience right-clicks (Windows) or Control-clicks (Mac), they see animation controller options such as Zoom In, Zoom Out, Play, Loop, Rewind, Forward, and Back. Loop . Tells Flash to automatically play your animation over and over again. Device font . Tells Flash to check your audience's Windows computer for fonts that match the fonts in your animation. If Flash doesn't find any matching fonts, it substitutes the closest system fonts it can find on your audience's computer. (This option only applies to Windows computers.) Quality . Tells Flash how precisely (and how processor-intensively) you want it to render , or draw, your animation on your audience's computer. Your options range from Low to Best. -
Choose one of the following Window Mode settings to tell Flash how you want your animation to appear with respect to HTML/DHTML content that you add to your .html file : Window . This standard mode tells Flash to place your animation in a rectangular area on the Web page. HTML content can appear around the animation. Opaque Windowless . Tells Flash to place your animation on top of HTML content. Transparent Windowless . Tells Flash to erase the background of your animation (the blank parts of the stage) so that HTML and DHTML content can show through. HTML alignment . Tells Flash how you want it to align your animation with respect to the rest of your Web pagethe text, images, and so on you plan to add to your HTML file. Your options include Default (center), Left, Right, Top, or Bottom. -
Choose one of the following Scale options to tell Flash whether to stretch or crop your animation in those cases where your Stage size doesn't match the height/width dimensions you set in the Publish Settings window (Section 14.1) . Default (Show All) . Fits as much of the animation into the height/width dimensions you set as possible without stretching or distorting the animation. If there's extra room left over, Flash fills in the empty spaces with black bands, letterbox style. No border . Fits as much of the animation into the height/width dimensions you set as possible without stretching or distorting the animation. If there's extra room left over, Flash crops it. Exact fit . Stretches (or squishes) the animation to fit the height/weight dimensions you set. No scale . Tells Flash to preserve the Stage height/width dimensions you set in the Document Properties dialog box. Flash alignment: Horizontal . Tells Flash how you want to align your animation with respect to the dimensions you set in the Publish Settings dialog boxin other words, how you want to position your animation horizontally inside the width-and-height box you're adding to your Web page. Your options include Left, Center, and Right.
Note: See "HTML Alignment" in the previous step if you want to align the width-and-height box with respect to your Web page (as opposed to aligning your animation with respect to the width-and-height box, which you do using "Flash alignment").
Flash alignment: Vertical . Tells Flash how you want to align your animation with respect to the dimensions you set in the Publish Settings dialog box; in other words, how you want to position your animation vertically inside the width-and-height box you're adding to your Web page. Your options include Top, Center, and Bottom.
Note: You need to know when Flash encounters problems so that you can fix them, so make sure the "Show warning messages" option is always turned on. Turning on this option tells Flash to pop up any errors that occur during the publishing process.
-
Click Publish . The Publish Settings window disappears, and Flash generates both an HTML file and a Flash file based on the names you set in the Formats tab. If you didn't type names of your own choosing, Flash names both files similar to your .fla file. For example, if the name of your Flash document is myAnimation.fla, Flash generates a file named myAnimation.html and myAnimation.swf . To make your HTML file and Flash animation available on the Web, you'll need to upload both of these files to your Web server. 14.2.3. Publishing a Frame as a Static Image File It may seem odd that Flash lets you publish a frame of your animation as a single, static imageafter all, the point of using Flash is creating animations, not images. But publishing your animation as an image file (in addition to publishing it as a Flash file) can be a savvy design choice: If some people don't have a Flash Player installed on their machines and so can't see your animation, at least they can see your opening frame.
Note: When you do choose to publish an image file, you're the one who needs to create the HTML to display that image file; Flash doesn't do it for you when you select the "HTML (.html)" option in the Formats tab of the Publish Settings window.
14.2.3.1. Publishing a Static GIF GIF (Graphic Interchange Format) files are super-small, thanks in part to the fact that they limit your image to 256 colors. GIF files are the best choice for vector images containing just a few areas of solid color .
Note: Another way to create static images is to export them by choosing File Export Image (Section 14.3).
-
On the Timeline, click to select the frame whose content you want to publish . Flash highlights the selected frame. On the Stage, you see the image you're about to publish.
Note: Another way to tell Flash which frame you want to publish is to add the frame label #Static to the frame you want to publish. Chapter 10 (Section 10.2.2.1) shows you how to label a frame.
-
Choose File Publish Settings . A Publish Settings dialog box appears. -
Turn on the checkbox next to "GIF Image (.gif)." The GIF tab appears next to the Formats tab. -
Click the GIF tab . The GIF publishing options shown in Figure 14-12 appear. Figure 14-12. GIFs are generally the most compact of the three static image file formats, but they're also the most restrictive : They can display only 256 colors. (If the image you're exporting contains a bunch of custom colors, your GIF may look slightly off.) Two different types of GIFs exist: static and animated. In this section, you see how to publish frame content to a static GIF. 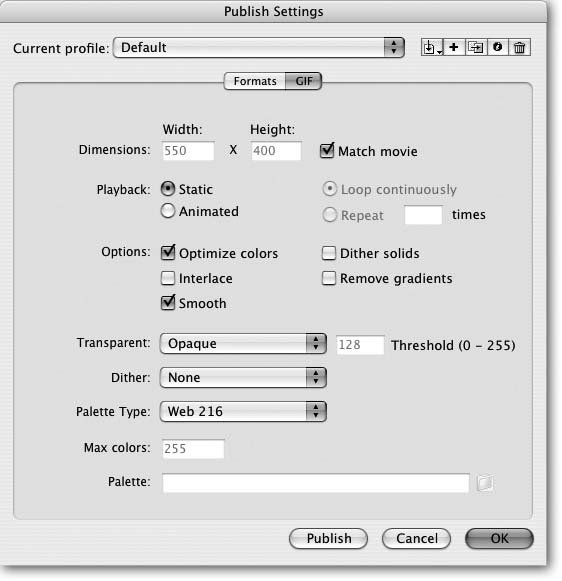 -
Choose one or more of the following publishing options : Dimensions (Width/Height) . Tells Flash how large you want the GIF file to be, in pixels. These options are available only if you haven't checked Match movie (see below). Match movie . Tells Flash to create a GIF image the same size as the Stage. Static/Animated . Tells Flash whether to create a static GIF file or an animated GIF file. Make sure you turn on Static. (Section 14.2.4 shows you how to create an animated GIF file.) Optimize colors . Lowers file size as much as possible without sacrificing image quality. Always make sure you turn this option on. Interlace . Tells Flash to create a GIF that downloads in several passes , so that a fuzzy version appears first, then a clearer version, then a still clearer version, and so on. Turning on this option doesn't reduce download time, but it does give your audience quick successive "tastes" of the image while they're waitinguseful for very large images. Smooth . Tells Flash to smooth (anti-alias) your image. Turning on this option may improve the look of any text your image contains; it can also save a few bytes. Dither solids . Tells Flash to attempt to match any solid custom colors you've used as closely as it can by combining two colors. If you don't turn on this option, Flash chooses the nearest -in- shade solid color in its palette. Remove gradients . Tells Flash to convert the gradients in your image to solid colors. (Gradient effects don't translate well to the GIF format anyway, so if your image contains gradient effects, you probably want to turn on this option.) Transparent . Lets you specify the transparency of your image background (the blank area of the Stage). Your options include Opaque (a regular, solid background), Transparent (no background), or Alpha and Threshold (lets you choose how transparent you want the background to appear). Dither . Tells Flash to dither (mix two colors) to try to match all the non-solid areas of your image as closely as possible. Your options include None (no dithering), Ordered (minimal dithering, minimal file size increase), and Diffusion (maximum dithering, maximum file size increase). Palette Type . Lets you tell Flash which 256 colors to use to create the GIF image. (GIFs are limited to 256 colors, but you get to pick which 256.) Your options include Web 216 (Web-safe colors), Adaptive (non-Web-safe colors), Web Snap Adaptive (a mix of Web-safe and non-Web-safe colors), and Custom (lets you specify a color palette you've saved as an .act file, using a program such as Fireworks). Depending on the image you're publishing, one of these options may yield better-looking resultsalthough in most cases, you want to leave this option set to Web 216. Max colors . Available only if you've selected a Palette Type of Adaptive or Web Snap Adaptive (see above), this option lets you specify a maximum number of colors lower than 256 to save on file size. Palette . Available only if you've selected a Palette Type of Custom (see above), this option lets you type the file name of your own custom color palette. You must have created the palette using another program, such as Fireworks, and saved it with the .act file extension. If you prefer, you can click the file icon to browse your computer for the palette file name. -
Click Publish . The Publish Settings window disappears, and Flash generates a GIF file based on the name you set in the Formats tab. If you didn't type a name, Flash names the GIF file similar to your .fla file. For example, if the name of your Flash document is myAnimation.fla, Flash generates a file named myAnimation.gif . 14.2.3.2. Publishing a JPEG JPEG (Joint Photographic Experts Group) files typically don't end up being as small as GIF files, but they can contain many more colors. Sometimes referred to as the "photo format," JPEG is the best choice if your image, like a scanned-in photograph, contains lots of colors, subtle shading, or gradient effects. To publish a frame of your animation as a JPEG file: -
On the Timeline, click to select the frame whose content you want to publish . Flash highlights the selected frame. On the Stage, you see the image you're about to publish. -
Choose File Publish Settings . A Publish Settings dialog box appears. -
Turn on the checkbox next to "JPEG Image (.jpg)." The JPEG tab appears next to the Formats tab. -
Click the JPEG tab . The JPEG publishing options shown in Figure 14-13 appear. Figure 14-13. Publishing a frame of your animation as a JPEG file is a pretty cut-and- dried process. As you can see here, the only options Flash gives you are to specify your image's JPEG version's size and quality. 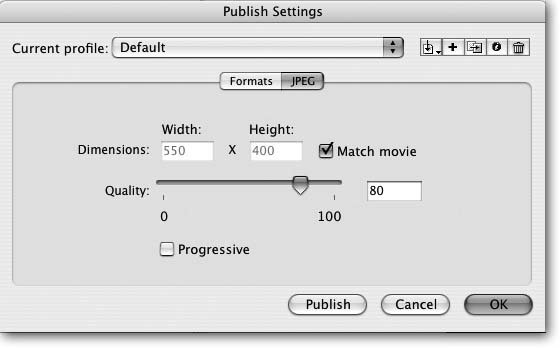 -
Choose one or more of the following publishing options : Dimensions (Width/Height) . Tells Flash how large you want the JPEG file to be, in pixels. These options are available only if you haven't turned on "Match movie," described next. Match movie . Tells Flash to create a JPEG image the same size as the Stage. Quality . Tells Flash how much detail you want it to include. The larger the number you type (or specify by dragging the slider), the better your JPEG image will look, and the larger your JPEG file size will be. (Depending on your particular image, the image quality may appear similar enough at different quality levels that you can get away with a lower number, thereby whittling away at your animation's finished file size. See Section 14.1.1 for more on optimization.) Progressive . Similar to the GIF's Interlace option (Section 14.2.3.1), turning on this option tells Flash to create a JPEG that downloads in several passes, so that a fuzzy version appears first, then a clearer version, then a still clearer version, and so on. Turning on this option doesn't reduce download time, but it does give your audience quick successive "tastes" of the image while they're waiting, which some audiences appreciate. -
Click Publish . The Publish Settings window disappears, and Flash generates a JPEG file based on the name you set in the Formats tab. If you didn't type a name, Flash names the JPEG file similar to your .fla file. For example, if the name of your Flash document is myAnimation.fla, Flash generates a file named myAnimation.jpg . 14.2.3.3. Publishing a PNG Developed to replace and improve on the GIF file format (back when it looked like Web developers would have to pay royalties for every GIF they produced), the PNG (Portable Network Graphics) file format offers the best of both worlds : the tiny file size of a static GIF with the support for 24-bit color of a JPEG. PNG files can include transparent (alpha) effects, too. To publish a frame of your animation as a PNG file: -
On the Timeline, click to select the frame whose content you want to publish . Flash highlights the selected frame. On the Stage, you see the image you're about to publish. -
Choose File Publish Settings . A Publish Settings dialog box appears. -
Turn on the checkbox next to "PNG Image (.png)." The PNG tab appears next to the Formats tab. -
Click the PNG tab . The PNG publishing options shown in Figure 14-14 appear. Figure 14-14. Some older Web browsersfor example, Internet Explorer versions 6 and earlierdon't offer complete support for PNG files. If you want to publish a static image but you're not sure which browser your audience has installed, you may want to opt for GIF or JPEG instead. 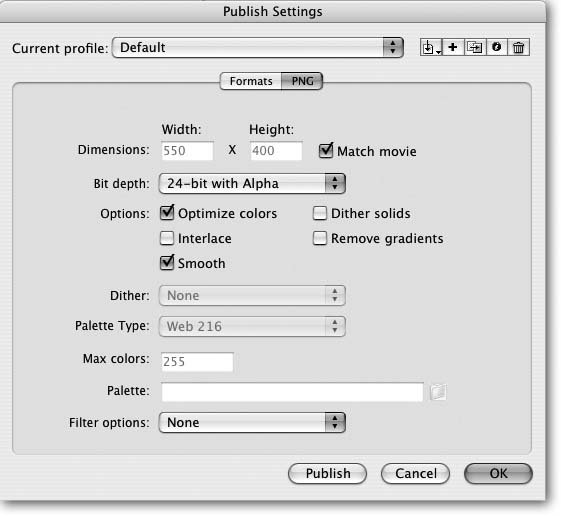 -
Choose one or more of the following publishing options : Dimensions (Width/Height) . Tells Flash how large you want the PNG file to be, in pixels. These options are available only if you haven't turned on "Match movie," described next. Match movie . Tells Flash to create a PNG image the same size as the Stage. Bit depth . Tells Flash how many colors you want the PNG to be able to render. Your options include 8-bit (256 colors, the same as GIF), 24-bit (16.7 million colors), and 24-bit with Alpha (16.7 million colors plus the ability to render your image background as transparent). The more colors, the larger the file size. Optimize colors . Reduces file size without sacrificing the quality of your image. You always want to turn this option on. Interlace . Tells Flash to create a PNG that downloads in several passes, so that a fuzzy version appears first, then a clearer version, then a still clearer version, and so on. Turning on this option doesn't reduce download time, but it does give your audience quick successive "tastes" of the image while they're waitinguseful for very large images. Smooth . Tells Flash to smooth (anti-alias) your image. Turning on this option may improve the look of any text your image contains; it can also save a few bytes of file size. Dither solids . Tells Flash to attempt to match any solid custom colors you've used as closely as it can by combining two colors (only necessary if you choose a Bit depth of 8-bit as described above). If you don't turn on this option, Flash chooses the nearest-in-shade solid color in its palette. Remove gradients . Tells Flash to convert the gradients in your image to solid colors to save on file size. Dither . Tells Flash to dither (mix two colors) to try to match all the nonsolid areas of your image as closely as possible (only necessary if you've chosen a Bit depth of 8-bit). Your options include None (no dithering), Ordered (minimal dithering, minimal file size increase), and Diffusion (maximum dithering, maximum file size increase). Palette Type . Available only if you choose a bit depth of 8-bit (see above), this option lets you tell Flash which 256 colors to use to create the PNG image. Your options include Web 216 (Web-safe colors), Adaptive (non-Web-safe colors), Web Snap Adaptive (a mix of Web-safe and non-Web-safe colors), and Custom (lets you specify a color palette you've saved as an .act file, using a program such as Fireworks). Depending on the image you're publishing, one of these options may yield better-looking resultsalthough in most cases, you want to leave this option set to Web 216. Max colors . Available only if you've selected a Palette Type of Adaptive or Web Snap Adaptive (see above), this option lets you specify a maximum number of colors lower than 256. Palette . Available only if you've selected a Palette Type of Custom (see above), this option lets you type the file name of your own custom color palette. You must have created the palette using another program, such as Fireworks, and saved it with the .act file extension. If you prefer, you can click the file icon to browse your computer for the palette file name. Filter options . This option lets you tell Flash to apply an additional compression algorithm when it's creating your PNG file. Normally, you don't use this option unless you're trying to pare down your PNG file by a few bytes. Your options include None, Sub, Up, Average, Path, and Adaptive. -
Click Publish . The Publish Settings window disappears, and Flash generates a PNG file based on the name you set in the Formats tab. If you didn't type a name, Flash names the PNG file similar to your .fla file. For example, if the name of your Flash document is myAnimation.fla, Flash generates a file named myAnimation.png . 14.2.4. Publishing as an Animated GIF In addition to static images, the GIF file format lets you create animated images. Animated GIFs are mini-animations that play right in the Web browser, with no need for a Flash browser. The quality isn't always stellar and your audience can't interact with them (which is why Flash was invented). But depending on how long your animation is and what quality of playback you're shooting for, they can be an impressive alternative. To publish your animation as an animated GIF file: -
Choose File Publish Settings . A Publish Settings dialog box appears. -
Turn on the checkbox next to GIF Image (.gif) . The GIF tab appears next to the Formats tab. -
Click the GIF tab . The GIF publishing options shown in Figure 14-15 appear. Figure 14-15. Animated GIFs are amazing creatures : small, decent quality (especially if you're only talking about a few frames), and as easy to include in an HTML file as a static GIF file (the basic line of HTML code you need is <IMG SRC="yourGIF.gif">). The only extra settings you have to specify for an animated GIF, as opposed to a static GIF, are whether you want the animated GIF to loop continuously, loop a few times, or not loop at all. 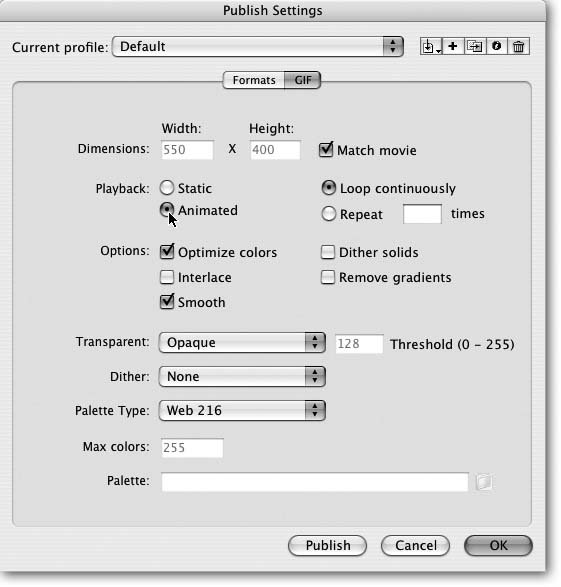 -
Set the publishing options you see in Figure 14-15 just as you would for a static GIF file (Section 14.2.3) except for the following : Static/Animated . This option tells Flash whether to create a static or animated GIF file. Make sure you turn on Animated. Loop continuously . Turn on this option to tell Flash to replay the animated GIF over and over again. (If you include the GIF in an HTML file, your audience can stop the animated GIF by clicking their Web browser's Stop button.) Repeat . Tells Flash to create an animated GIF that automatically plays the number of times you type into the times box. -
Click Publish . The Publish Settings window disappears, and Flash generates a GIF file based on the name you set in the Formats tab. If you didn't type a name, Flash names the GIF file similar to your .fla file. For example, if the name of your Flash document is myAnimation.fla, Flash generates a file named myAnimation.gif . 14.2.5. Publishing as a Standalone Projector A projector is the equivalent of an .swf file and a copy of Flash Player all rolled up into a single executable file. When you create a projector, your audience doesn't need to have either a Web browser or a Flash Player installed on their computers: All they need to do to play your animation is run the projector file. You'll want to choose this option if you want to deliver your animation on a CD or DVD (as opposed to over the Web). Tutorials, product demonstrations , and program mock-ups (as well as the programs themselves ) are all examples of the kinds of animations you might want to publish as projectors.
Note: If you plan to distribute a Flash projector to folks outside your company, take a look at the Macromedia Flash Run-Time Distribution License, a legal-ese description of what you can and can't do with your projector files. Adobe may change the location of this document, but the time of this writing, you can find a copy online at www.macromedia.com/software/eula/tools/flashplayer_usage.html.
To publish your animation as a standalone projector: -
Choose File Publish Settings . A Publish Settings dialog box appears. -
Turn on the checkbox next to one or both of the following, depending on the operating system you expect your audience to be running : Windows Projector (.exe) to create a projector that runs on Windows. Macintosh Projector to create a projector that runs on the Mac. -
Click Publish . If you chose "Windows Projector (.exe)", Flash generates an .exe file. If you chose Macintosh Projector, Flash generates an .hqx file (if you're running Windows) or a self-running animation file with no extension (if you're running Mac). (Running the zipped .hqx file on a Mac automatically unzips the projector file and runs it.) Flash names the files based on the names displayed in the Formats tab. For example, if the name of your Flash document is myAnimation. fla, Flash generates files named myAnimation.exe or myAnimation.hqx . FREQUENTLY ASKED QUESTION
Publishing Flash as QuickTime | | Every time I try to publish my animation as a QuickTime movie, I get an error. What's up? Technically, Flash lets you publish your animation as a QuickTime movie, so that folks who've installed the QuickTime player on their machines can play your animation without having a Flash Player installed. The thing is, QuickTime support for Flash stopped at Version 5. If you create an animation using Flash 8, you have to target it for a Flash 5 player to be able to publish it as a QuickTime movie. Put another way, you can't use any of the features Macromedia introduced in Flash Versions 6, 7, or 8 in your published QuickTime movie. If you still want to publish your Flash animation as a QuickTime moviebecause your audience is running machines with only the QuickTime player installed, for examplefollow these steps: -
Choose File Publish Settings. -
-
In the Flash tab, specify a "Version of Flash Player 5." -
In the QuickTime tab, find the Controller drop-down box, and then select Standard. Click Publish. When you do, Flash generates a .mov file you can play in the QuickTime player. 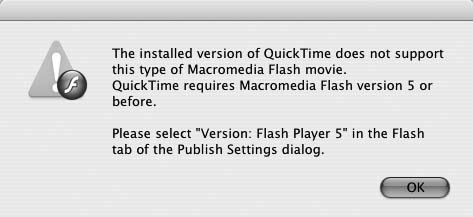 |
|