Section 4.1. Working with Frames
4.1. Working with FramesWhen you create an animation, you build it from frames and keyframes. Editing your document is a simple matter of moving, cutting, and pasting those frames until they look good and work well. You can perform these operations on individual frames or on multiple frames by combining them into groups, as you'll see at the end of this section. 4.1.1. Copying and Pasting FramesCopy and paste are the world's favorite computer commands with good reason. These functions let you create a piece of work once (a word, line, shape, drawing, or what have you) and then quickly recreate it to build something even more complex with a minimum of effort. Well, Flash lets you cut, copy, and paste not just the content of your frames but your frames themselves , from one part of your Timeline to another. Copying and pasting frames is a great way to cut down on your development time. Here's how it works. Say you have a series of frames showing a weasel unwrapping a stick of chewing gum. It's a gag scene, one you want to repeat throughout your animation for comic effect. Instead of having to insert all the keyframes and regular frames every time you want to slip in the weasel gag, all you need to do is copy the weasel frames once and then paste them onto your Timeline wherever you want them to go. Furthermore, copying and pasting isn't just useful for those times when you want a carbon copy of a scene. If you want to change something in each pasted scenethe brand of chewing gum the weasel's unwrapping, for exampleyou can do that, too, after you've pasted the frames. Copying and pasting frames works almost exactly like copying and pasting words or drawn objectswith a few twists . Here are some points to keep in mind:
Note: Although Cut, Copy, and Paste usually travel as a threesome, in Flash things work a little differently. The Cut Frames command on the Edit  Timeline submenu doesnt actually cut frames ; instead, it cuts the contents of the selected frame. To get rid of the frame itself, you need to use Edit Timeline Remove Frames, as described in the box on Section 4.1.3. Timeline submenu doesnt actually cut frames ; instead, it cuts the contents of the selected frame. To get rid of the frame itself, you need to use Edit Timeline Remove Frames, as described in the box on Section 4.1.3.
Figure 4-1. To select multiple frames, click the first frame of the series you want to select; then Shift-click the last frame. Flash automatically selects all the frames in between. If you know you're going to be copying and pasting frames in the same document, you can speed up the process by pressing the Alt key (Windows) or the Option key (Mac) while you drag a copy of the selected frames from their original location to where you like on the Timeline. 4.1.2. Moving Frames (Keyframes)The Timeline is serial: When you run your animation, Flash displays the content in Frame 1, followed by the content in Frame 2, followed by the content in Frame 3, and so on. If you change your mind about the order in which you want frames to appear, all you need to do is move them. Simple in theorybut moving frames in Flash isn't quite as cut and dried as you might think. As you may recall if you've had a chance to read through Chapter 3, only keyframes can contain actual images; regular frames contain either tweened or "held over" copies of the images placed in the previous keyframe. So whether you move a frame or a keyframe, you end up with a keyframe. Here's how it works:
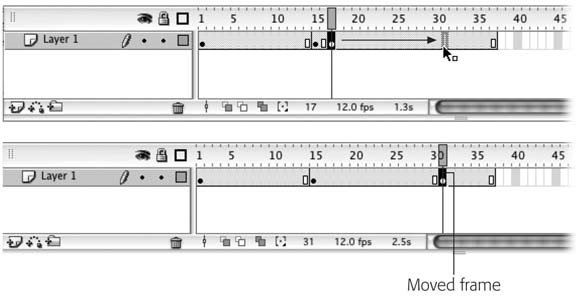
Tip: There's another way to change the order in which Flash plays frames: by creating an ActionScript action, as described in Chapter 10. Creating an action lets you tell Flash how to play your frames: backwards , for example, or by rerunning the first 10 frames three times and then moving on. You want to use ActionScript (as opposed to moving frames) when you want to give your audience the choice of viewing your animation in different ways. To move frames, you simply select and then drag them. The process is the same whether you're moving frames, keyframes, or both, and all the usual rules of frame selection described earlier in this chapter still apply. Here are the steps in detail:
Tip: If dragging your frames isn't working, you can always copy and paste the frames you want to move (Section 4.1). Then use Edit Timeline Remove Frames to delete them from their original location (Section 4.1.3). 4.1.3. Editing Multiple Frames Imagine you've just completed a 250-frame animation showing a character in a red t-shirt demonstrating your company's latest product, an electronic egg slicer. Suddenly, your boss comes in and declares that red's out. (Red's the color your competitor's using for their egg slicer launch.) You have, your boss declares, until the end of the day to change all 250 frames. Now, if you had to change all 250 frames by hand, you'd never be able to get it done in time; and even if you did, you'd probably make a few mistakes along the way, like accidentally repositioning the t-shirt in a couple of frames or missing a few frames altogether. But it's precisely this kind of en masse editing job that Flash's multiple frame editing capability was designed to handle. Figure 4-2. Top: Click the frame you want to move and then let go of your mouse. Drag the frame you just selected. If Flash displays a gray selection- sized box above your cursor, you're gold: Drag to the point in the Timeline where you want to insert the moved frame (here, Frame 30) and then drop it. (If you don't see a gray box, you need to start the process over.) |
| UP TO SPEED Remove vs. Cut vs. Clear |
| Flash offers several commands you can use to get rid of your frames (and the content associated with those frames): remove, cut, and clear. Unfortunately, it's not immediately clear which command does what. Here's what these commands do to selected frames:
|
Using a technique called onion skinning , you can see the contents of several different frames all at once. The currently selected frame appears on Stage it always does; the other frames you've told Flash using onion markers that you want to see appear grayed out, so you can tell which is which. Onion skinning lets you quickly identify (and change) the frames containing red t-shirts.
Onion skinning is also useful for those times when you want to hand-draw an "in-between" frame because you can see both the preceding and succeeding frames on the Stage at the same time.
Note: Technically speaking, when you edit multiple frames in Flash, you're actually editing multiple keyframes . Keyframes are the only frames that contain unique, editable art. (Regular frames just "hold over" the contents of the previous keyframe, and Flash stores tweened frames not as editable images, but a bunch of calculations.)
To edit multiple frames using onion skinning:
-
In the Timeline, click the Edit Multiple Frames icon .
Flash displays multiple frames on the Stage and adds onion markers to the frame display (Figure 4-3, top). These beginning and ending onion markers tell Flash which frames you want it to display on the Stage.
-
Click the Modify Onion Markers icon .
Flash displays a pop-up menu.
Figure 4-3. Top: When you click Edit Multiple Frames, Flash shows the content of a bunch of frames on a single Stage. Unfortunately, Flash might miss a frame or two. To tell Flash to show the content of all your frames, click Modify Onion Markers and then, from the pop-up menu that appears, select Onion All. (You can also drag the onion markers separately to enclose a different subset of frames.)
Bottom: Here you see the result of selecting Onion All. The onion markers surround the entire frame span (Frame 1 through Frame 4) and all four images appear on the same Stage, ready for you to edit en masse.
-
From the pop-up menu, select Onion All (Figure 4-3, bottom) .
Flash displays onion markers from the beginning of your Timeline's frame span to the end, and shows the contents of each of your frames on the Stage. (If you don't want to edit all the frames in your animation, you can drag the onion markers independently to surround whatever subset of your frame span you want.)
-
Edit the frames .
Because you can see all the content on a single Stage, you can make your edits more easily than having to hunt and peck individually through every frame in your animation. In Figure 4-4, all four frames' contents are first recolored and then moved in one fell swoop.
-
Click Edit Multiple Frames again .
Flash returns to regular one-frame-at-a-time editing mode and displays only the contents of the current frame on the Stage.
Note: You can't edit multiple frames on a locked layer (Section 4.4.5). In fact, when you click Edit Multiple Frames on a locked layer, Flash doesn't even show you the content of the unselected frames (not even in onion skin form).
EAN: 2147483647
Pages: 126