3.1. Frame-by-Frame Animation An animation is nothing more than a series of framed images displayed one after the other to create the illusion of motion. When you create an animation by hand in Flash, you create each frame yourselfeither by using Flash's drawing and painting tools (Chapter 2), or by importing images or movie clips that someone else has created (Chapter 8). The best way to gain an understanding of frames , keyframes, and Flash's animation tools is to start animating by hand, frame by frame. Most of the time, though, you'll use tweening (Section 3.3) to save time and frustration. For more advice on when to use either technique, see the box below. UP TO SPEED
To Tween or Not to Tween | | The great thing about creating an animation frame by frame is that it gives you the most control over the finished product. If you're looking for a super-realistic effect, for example, you're probably not going to be satisfied with the frames Flash generates when you tell it to tween (Section 3.3). Instead, you're going to want to lovingly handcraft every single frame, making slight adjustments to lots of different objects as you go. Say, for instance, you're creating an animation showing an outdoor barbecue. Over the course of your animation, the sun's going to move across the sky, which is going to change the way your characters' shadows appear. Bugs are going to fly across the scene. When one character opens his mouth to speak, the other characters aren't going to remain static: Their hair's going to ripple in the breeze , they're going to start conversations of their own, they're going to drop pieces of steak (which the host's dog is going to come streaking over and wolf down). You can't leave realistic, director-level details like this to Flash; you've got to create them yourself. On the downside, animating by hand is understandably time- intensive . Even though most Web-based Flash animations run at a modest 12 fps (frames per second), that's a whole lot of frames. And compared to tweening, creating individual frames adds substantially to the file size of your movie, tooa big consideration if you intend to put your finished animation up on the Web. (Big files tend not to play so well over the Web, thanks to uncontrollable variables such as Internet traffic and the connection speed of the folks viewing your animation. You can find tips for optimizing your finished animation's file size in Chapter 14.) In other words, with frame-by-frame animation, you get more controlbut it's going to cost you in time and hassle, and ( potentially ) it's going to make your finished animation harder for folks to view. The choice is yours. |
3.1.1. Frames and Keyframes Flash recognizes two different types of frames: keyframes , and plain old frames . Although in frame-by-frame animations most of the frames you create are keyframes, if you want to tell Flash to hold a particular image for effect, you'll need both: -
Keyframes are the important framesthe frames you designate to hold distinct images. -
Frames in a Flash animation contain whatever image you associated with the last keyframe; their purpose is to mark time. You use them to pace the action of your animation by telling Flash to skip a beat in the action here and there. As you see on in the following section, you add both keyframes and frames to an animation using the Timeline. 3.1.2. Creating a Frame-by-Frame Animation To build a frame-by-frame animation, you can use Flash's drawing tools to draw the content of each frame on the Stage, or you can import (Section 8.1) existing images created in another program. Either way, you must place an image in each keyframe you create. Here are the steps to creating a frame-by-frame animation: -
Open a blank Flash document . As the Property Inspector in Figure 3-1 shows, Flash starts you out in Layer 1, Frame 1. (If you don't see the Property Inspector, select Window  Properties Properties.) Properties Properties.)
-
Drag the playhead and release it over the frame in which you want to begin your animation . Flash displays the red playhead rectangle over the frame you chose. In most casesas in Figure 3-1the frame you want to begin your animation in is Frame 1. Figure 3-1. Most things begin at the beginning; when you create a new Flash document, as shown here, Flash automatically designates Frame 1 as a blank keyframe. You can tell that Frame 1 contains a blank keyframe by the little hollow circle Flash displays in Frame 1 (and by the fact that there's nothing on the Stage). 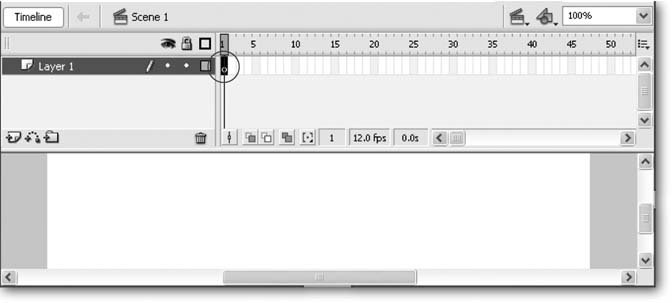 -
Using Flash's paint and drawing tools, draw an image on the Stage . Figure 3-2 shows an example drawing of a frog with a tempting fly overhead.
Note: If you have an existing image stored on your computer, you can bring it onto the Stage. Select File Import Import to Stage and then, in the Import window that appears, type in (or browse to) the name of the file you want to pull in. When you finish, click OK. (Chapter 8 covers importing files in more detail.)
Figure 3-2. Flash associates the selected keyframe with all the images you place on the Stagewhether you draw them directly on the Stage using the drawing and painting tools, drag them from the Library, or import them from previously created files. Here, Flash associates the frog-and-fly drawing with the keyframe in Frame 1. 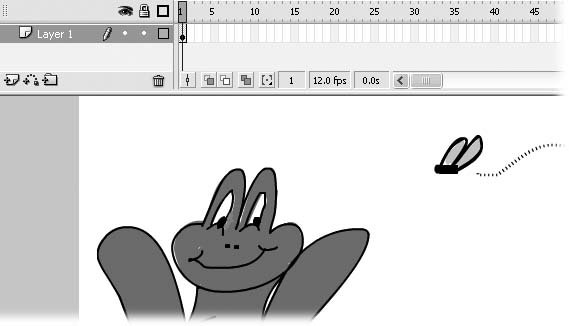 -
Click to select another frame further out on the Timeline . Which frame you select depends on how long you want Flash to display the content associated with your first keyframe. Since Flash usually plays at a rate of 12 frames per second, selecting Frame 2 would tell Flash to display the two images so quickly that all you'd see is smooth, fast motion. For practice, so you can clearly see each frame of your work-in-progress, try Frame 10. Flash highlights the frame you select, as you see in Figure 3-3.
Note: Although Flash has a frame rate of 12 fps (frames per second) out of the box, you can change this setting. Learn how on Section 10.1.1.
-
Turn the selected frame into a keyframe by choosing Insert Timeline Blank Keyframe . Flash moves the playhead to the selected frame (Frame 10 in Figure 3-4), inserts a keyframe icon, and clears the Stage. -
Draw a second image on the Stage . The second keyframe in Figure 3-4 shows the frog with a thought balloon instead of a fly. But if your two images are fairly similar, you can avoid having to completely redraw the image for your second keyframe, as you'll see in the next step. Figure 3-3. When you click a frame in the Timeline, Flash highlights it with a tiny blue rectangle, as shown in Frame 10. The Property Inspector starts out blank since you haven't yet added a keyframe (or a regular frame) at Frame 10. 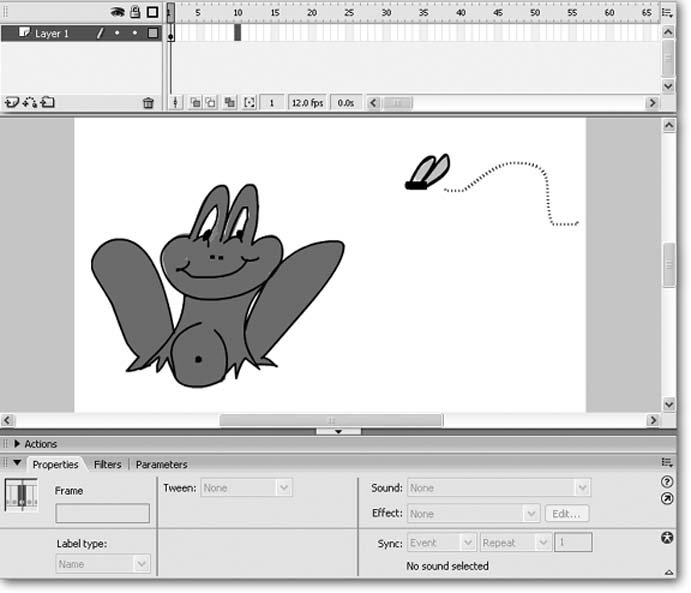 -
-
Note: You can examine this sample animation to check your work. Simply download frame_by_frame.fla from the "Missing CD" page.
GEM IN THE ROUGH
Making the Timeline Easier to Read | | You can't create an animationframe-by-frame or tweenedwithout the Timeline. The Timeline serves as a kind of indispensable thumbnail sketch of your animation, showing you at a glance which frames contain unique content (the keyframes) and which don't (the regular frames), how many layers your animation contains (Section 3.2), which sections of your animation contain tweens (Section 3.3), and so on. Unfortunately, with its tiny little squares and cryptic symbols, the Timeline can be pretty hard to read. And the more keyframes you add to your animation, the harder it is to remember which image you put in which keyframe. You can always click a keyframe (or drag the playhead over a keyframe) to tell Flash to display the image associated with that keyframe on the Stagebut there's an easier way. You can tell Flash to expand the Timeline and show miniature versions of each of your keyframes. In the Timeline, click the Options menu you see in the upper-right corner; then, from the pop-up menu that appears, turn on the checkbox next to Preview.  | Figure 3-4. Here, the playhead is over the second keyframe, which tells Flash to place the content on the Stage in the second keyframe (Frame 10). Flash displays only new content in the finished animation when it detects a new keyframe, so Frames 29 carry forward the content from Frame 1 (the first keyframe). You can verify this behavior by dragging the playhead (scrubbing) from Frame 10 back to Frame 1.  3.1.3. Testing Your Frame-by-Frame Animation You have two choices when it comes to testing your animation, and both of them are simple: -
Control Play . The quickest, easiest approach is to test your animation inside the Flash development environment. Select Control Play (or press Enter). When you do, Flash runs your animation right there on the Stage. So, for example, if you create an animation containing just two keyframes (similar to the example on Section 3.1.2), Flash displays the content for the first keyframe, followed by the content for the second keyframe.
Play, Flash starts your animation beginning at whatever frame your playhead happens to be overeven if thats at the end of your animation. To tell Flash to begin at the beginning, drag the playhead to Frame 1 before you select Control Play.
Test Movie. Selecting Control Test Movie exports your Flash document (compiles the .fla document into an executable .swf file) and automatically loads the .swf file into the built-in Flash Player. Figure 3-5 shows an example. Testing your animation this way takes a bit longer, but it's more accurate: You're actually seeing what your audience will eventually see, from beginning to end. (In some casesfor example, if you've added a motion guide path as described on Section 3.3.3.1 to your animationselecting Control Play shows a slightly different result than selecting Control Test Movie does.) Figure 3-5. The first time you run your animation in Flash Player, Flash assumes you want to run it over (and over, and over, and over). Fortunately, you can disabuse Flash of this annoying assumption. From the player main menu, select Control and then turn off the checkbox next to Loop. Other useful options you find on the player's Control menu include stopping your animation, rewinding it, and even stepping through it frame by frame. Chapter 13 covers animation testing in-depth . 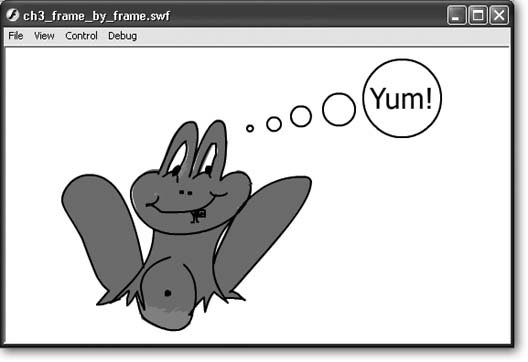 3.1.4. Editing Your Frame-by-Frame Animation It's rare that your first crack at any given animation will be your last. Typically, you'll start with a few keyframes, test the result, add a few frames, delete a few frames, and so on until you get precisely the look you're after. This section shows you how to perform the basic frame-level edits you need to take your animation from rough sketch to finished production: inserting, copying, pasting, moving, and deleting frames. 3.1.4.1. Selecting frames and keyframes Selecting a single frame or keyframe is as easy as zipping up to the Timeline and clicking the frame (or keyframe) you want to select, as shown in Figure 3-6. But if you want to select multiple frames, Flash gives you four additional selection alternatives: -
To select multiple contiguous frames . Click the first frame you want to select and then drag your mouse to the last frame you want to select. Alternatively, click the first frame you want to select and then Shift-click the last frame you want to select.
Note: Click-dragging to select multiple frames can be highly annoying. Flash lets you move frames by selecting a series of frames and then dragging it to somewhere else on the Timeline, so you may well end up moving frames when all you wanted to do was select them.
-
To select multiple noncontiguous frames . Ctrl-click (on the Mac,  -click) each frame you want to select. -click) each frame you want to select.
Note: Oddly enough, Ctrl-clicking (or, on the Mac, -clicking) the last frame in a frame span deselects all the selected frames (except for the last frame).
-
To select an entire frame span . Double-click any frame in the frame span . A frame span consists of all the frames between one keyframe (including that keyframe) and the next keyframe. So, for example, if you have a keyframe in Frame 15 and another keyframe in Frame 30, double-clicking any frame from Frame 15 through Frame 29 automatically selects every frame from Frame 15 through Frame 29. -
To select all the frames on a layer . Click the name of the layer. In the example in Figure 3-6, clicking "Fly" would automatically select all the frames in the Fly layer; clicking "Frog" would automatically select all the frames in the Frog layer. Figure 3-6. To select a single frame (including a keyframe), simply click the frame; to select multiple frames, click-drag or choose one of Flash's other two multiple-frame-selection options. A frame span comprises a keyframe, an end frame, and all the frames between the keyframe and end frame. If you've added multiple layers to your animation, make sure you select frames from the correct layer. 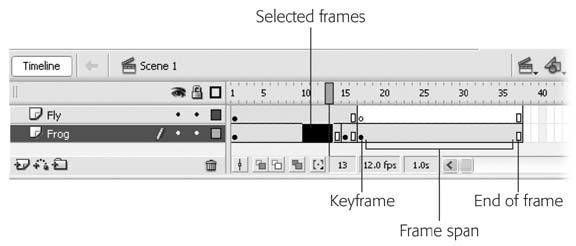 No matter which alternative you use, Flash highlights the frames to let you know you've successfully selected them. 3.1.4.2. Inserting and deleting keyframes and frames The smoothness of your finished animation depends on the number of keyframes and regular frames you've included. This section shows you how to add and delete both to an existing animation. Inserting keyframes . Typically, you'll start with a handful of keyframes and need to insert additional keyframes to smooth out the animation and make it appear more realistic (less herky-jerky). For example, say you're working on an animation showing a dog wagging its tail. You've got a keyframe showing the tail to the left of the dog; one showing the tail straight behind the dog; and a final keyframe showing the tail to the right of the dog. You test the animation and it looks okay, but a little primitive. Inserting additional keyframes showing the dog's tail in additional positions (just a bit to the left of the dog's rump, a little bit further to the left, a little further, and then all the way to the left) will make the finished sequence look much more detailed and realistic.
Note: Technically speaking, you don't actually insert a keyframe in Flash; you turn a regular frame into a keyframe. But Flash-ionados speak of inserting keyframes, and so does the Flash documentation, so that's how this section presents it.
To insert a keyframe into an existing animation: -
In the Timeline, select the regular frame you want to turn into a keyframe . If you want to add a keyframe midway between Frame 1 and Frame 10 on Layer 1, for example, click in Layer 1 to select Frame 5, as shown in Figure 3-7. Flash moves the playhead to the frame you selected. -
-
Using the drawing and painting tools, add content for your new keyframe to the Stage . If you've already created drawings in another program, you can import them as described on Section 8.1. Inserting frames . Regular frames in Flash act as placeholders: They simply mark time while the contents of the previous keyframe display. So it stands to reason that you want to insert additional frames when you want to slow down the action a little. In fact, inserting frames is sort of like having a director yell, "Hold camera!" with the contents of the last keyframe remaining onscreen while the camera's holding. Figure 3-7. Technically, you don't always add a keyframe in Flash (unless you're positioned over an existing keyframe or the very last frame in a layer); instead, when you're positioned over a regular frame, you turn that regular frame into a keyframe. As you can see here, Flash displays its usual icons to show the results: The selected frame, Frame 5, is now a keyframe (you can tell by the solid black dot in Frame 5), and Frame 4 is the end frame, or the last frame that'll display the contents of the previous keyframe, Frame 1 (you can tell this by the hollow rectangle in Frame 4). 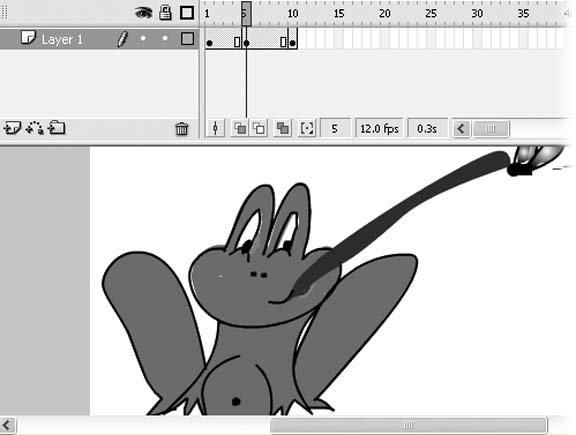 To insert a frame into an existing animation: -
On the Timeline, click to select the frame before which you want to add a frame. (Make sure the frame you select appears on the Timeline after the keyframe you want to hold onscreen .) Flash moves the playhead to the frame you selected. -
Select Insert Timeline Frame (or press F5 ). Flash inserts a new frame after the frame you selected, bumping up the total number of frames in your animation by one. Deleting keyframes . Technically speaking, a keyframe is just a regular frame to which you've added unique content. So to delete a keyframe, you first need to turn it back into a regular frame; then you need to delete the frame altogether. To clear a keyframe and turn it back into a regular frame (Section 3.2 shows you how to delete a frame): -
On the Timeline, click to select the keyframe you want to clear . The playhead appears over the keyframe. -
Right-click the selected keyframe and then, from the pop-up menu that appears, choose Clear Keyframe . Flash removes keyframe status from the frame and whisks the associated image off the Stage.
Tip: Because you can't tie a drawing to a regular frame, clearing a keyframe means you lose anything you've drawn or imported to the Stage for that keyframe . To get the contents of the Stage backperhaps you'd like to save your drawing as a reusable symbol or save it off in its own separate file, as shown in Chapter 7, before you delete it from this frameselect Edit Undo Clear Frame.
-
On the Timeline, select the frame (or frames) you want to delete . Flash highlights the selected frame(s) and moves the playhead to the last selected frame. -
Select Edit Timeline Remove Frames . Flash deletes the selected frames (including selected keyframes, if any) and shortens the Timeline by the number of deleted frames.  |