Captions
I once had a client who wanted their training videos captioned for their hearing-impaired customers. There were approximately 10 videos, totaling roughly an hour of content. At that point, I had to implement these captions using the Callouts feature discussed earlier in this chapter. Callouts are wonderful for adding dialogue bubbles, labeled arrows, or a random graphic to your video, but using them for captioning was a terribly laborious process.
If only I’d had the Captions feature available to me at the time, I could have saved myself hours of effort and frustration. Not only are captions a terrific addition to your video content arsenal (particularly if a lot of your viewers are hearing impaired or have a low proficiency in English), but they’re ridiculously easy to do. Simply add your text narration, sync the text with your audio, and you’re all set up to deliver your video with glorious captions. It’s not a long process, either - once you get the hang of timing out your captions, it should only take you as long as the running time of your video, as you’re literally synchronizing the captions as you watch.

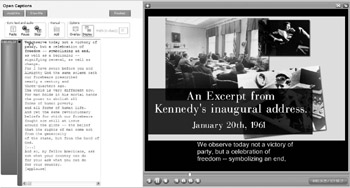
As you paste in your narration text and sync it with the audio, you’ll be able to monitor your captions right inside your Video Preview.
A lot of attention is being paid to video captioning these days due to the Section 508 laws, which require federal agencies and departments (and depending on the state, some state entities as well) to make some basic accessibility provisions for people with disabilities. For these organizations, all videos and multimedia titles need to be appropriately captioned. If you work for the U.S. federal government, or if you plan on using Camtasia Studio to create a product (and the U.S. government is a potential target market for you), it would behoove you to research the basics of Section 508 compliance. Please check out www.section508.org for more information.
For all video formats except Flash, Camtasia Studio employs what is known as open captioning, meaning that the added captions are always visible to everybody. Unlike closed captioning, they cannot be turned on/off as needed. These captions are in fact “burned into” your final video. The application can either superimpose them over your video content, or extend the vertical length of your video window so that the captions appear in their own black box, just below the actual video content.
Flash users, however, have the ability to add closed captions to their work. When playing the file back in their browsers, they’ll be able to view the captions, or not, simply by clicking the appropriate button.
To get started down the road of captioning our narration, we first have to open the Open Captions pane in Camtasia Studio, which is accomplished thusly:
-
Choose Captions… from the Edit menu.
or
-
In the Task List, choose Captions… from the Edit subsection.
or
-
If you have any pre-existing captions on the Timeline, double-click one. The Open Captions pane will appear, starting right with the caption you selected.
If this is your first time bringing up the Open Captions pane, a tip screen will appear. Read through it if desired, and then close it to continue.
Adding Narration Text
If you followed the above procedure, the Open Captions pane should be open. Now it’s time to insert your narration text. The easiest way to add the corresponding text to audio narration you record on the fly is to view your video in small chunks using the Video Preview and type the transcription into the text window as you go. Of course, things are even simpler if you had the foresight to narrate your video from a script (yet another reason to script everything ahead of time!). Just open your original source document, copy your entire script, and then paste it into the text window using the Paste button, which is in the Sync text and audio section of the Open Captions pane, and looks like this: ![]()
To recap, here’s how to add narration text to create your captions:
-
Make sure the Open Captions pane is visible.
-
Move the seek bar on your Timeline to the point where your narration starts, presumably near the beginning of the video.
-
If importing text from a pre-existing script, select and copy the entire text in your source file.
Tip Make sure that your script is as clean as possible prior to importing. You might want to perform a quick spelling/grammar check right before executing that copy command. Additionally, it’s not a bad idea to run through the video with an eye on your script to make sure that nothing has changed, especially if you’re like me and make minor adjustments to the text during the audio recording phase to improve the flow of the narration.
-
Return to Camtasia Studio, and then click the Paste button, located just above the narration text box.
or
If creating a new script from scratch, scan through the video using the controls on the Video Preview pane. Transcribe the audio as you go by clicking in the text box and typing your caption content.
-
Perform any needed editing to remove superfluous text.
The first caption is automatically inserted at the point where you placed your seek bar. Since Camtasia Studio displays three lines of caption content at a time, the first three lines of your script should be colored black. The rest of your text will be colored red, meaning that this text has not yet been assigned to a caption point (a point on the Timeline where a caption appears). Caption points are symbolized by small blue dots, and appear on your Timeline in a special Caption track, like so:
![]()
Notice that you’ll have a bit o’ text from the first line next to each caption point on the Timeline to help you get your bearings (it’s easier to see when you’re zoomed in). Currently, you only have one caption point on your Timeline. Poor little guy looks lonely, doesn’t he? Let’s give him a few friends by adding some more caption points. This can be accomplished by one of two methods: Sync text and audio or Manual.
Synchronizing Your Caption Content
The first method of synchronizing your captions, and by far the simplest, is to utilize the Sync text and audio commands. This will play through the video, and will allow you to click the first word of each caption block (the three-line block of text that belongs to every caption) as it appears in the voiceover narration. Every time you click, a new caption point appears on your Timeline.
This is how to synchronize captions to your audio:
-
Make sure you’ve inserted all needed text and edited it appropriately, so that it mirrors your audio track. I also insert carriage returns at appropriate spots to make sure that the captions don’t break in awkward places. I’ve listed a few tips for formatting your captions in a separate guide at the end of this section.
-
If you’ve been scrolling around in your video, move your seek bar back to the beginning of your video.
-
Press the Start button, located just above your caption text window. The video will begin to play back.
-
Mouse over the text in your caption text window. See how the mouse cursor changed to a pointing hand? Proceed to the first word on the fourth line (i.e., the first red word). When you come to that word in your audio narration, click it. That second block of caption text will be synchronized with the narration. Congratulations, you just created your second caption point.
-
Repeat the process for each new three-line block of text. A new caption point will be automatically added every three lines. Of course, it doesn’t always have to be three lines. You can click to create a one-line or two-line caption block if it’ll help improve the flow. I always try to avoid widow and orphan text blocks, those little one-liners that make up the very beginning or tail end of a particular thought. For example, if I’m captioning a sentence comprised of four lines total, I’ll usually do two blocks of two lines each, as opposed to a three-line block and then a one-line orphan on the next block.
-
Feel free to pause the action by clicking the Pause button (which toggles between Play and Pause). Simply click Play to resume, and the playback continues right where it left off. When finished, or if you need to stop for an extended period, clicking the Stop button will conclude that session.
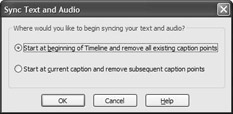
If you ever want to resume a stopped session, simply place the seek bar where you want to start, and then click Play. You’ll get a dialog that looks like this:

The first option will completely wipe out all your previous captions and kick you back to the start of your video. With this selection, you’re essentially telling Camtasia Studio, “I want to start all over again.” The second option only wipes out any captions located after your current spot on the Timeline. You can start at your most recent caption and continue onward, or you can backtrack a bit if your last few captions weren’t quite right.
| Caution | Of course, you’ve probably figured out by now that you don’t even need audio narration to insert captions. If you just want to use captions alone, you may freely do so. Simply sync the captions to the actions in the video itself rather than to the audio commentary. It’s certainly possible to do this, but for the sake of accessibility, I don’t recommend it. If you take out the audio portion, then it’s your sight-impaired viewers who are left out in the cold. While it’s often tempting to remove the audio due to file size considerations, there’s just no real replacement for a professionally delivered voice-over. |
Manual Addition and Organization of Caption Points
As cool as the Sync text and audio tools are, if you demand greater precision (or if you just have poor reflexes), you can add a caption point manually. Manual control is also handy for those occasional situations where the narration is sparse, and you simply want to jump to those specific points in the video rather than wading through the whole thing. Just click a word, click the spot on the Timeline corresponding to that word, and pair them together by clicking Add.
Need more detail? This is the drill for manually adding your caption points:
-
Place the seek bar at the exact point on your Timeline where you want your new caption to start. The sound waveform in your audio track(s) can be a handy guide for getting the placement right. Feel free to zoom in for greater precision.
-
Click in your caption text window at the beginning of the first word in your desired caption. The placement of your cursor is important. If you’ve clicked in the middle of a word, the word will be split in two, and the caption block will begin with the second half of that word.
-
Click the Add button in the section labeled Manual on the Open Captions pane.
-
A caption point will appear both at the designated spot on your Timeline and next to your specified caption block. For the caption point in your text window, on the left-hand side you’ll see the exact point in the video’s running time that the caption will appear.
Adding to the fun is the fact that your caption points are not set in stone. No sir, not by any stretch. Simply click and hold on one to see what I mean. The selected caption point turns a lovely shade of cyan. In this manner, your caption points can be dragged around, both on the Timeline and in the caption text window, though these each serve different purposes:
-
Timeline caption points. Dragging a caption point here changes the time at which that caption is introduced. You can make subtle adjustments to the timing of your captions in this way. You can’t go hog-wild, though. You cannot drag to reorder captions, nor can you come within one second of any adjacent caption.
Caution Your caption points require a certain amount of elbow room. The DCMP (Described and Captioned Media Program, the federal program that over- sees captioning for the hearing impaired) recommends that all captions remain on the screen for at least two seconds. Camtasia Studio is a bit more flexible, allowing a bare minimum of one second from the point a caption is introduced to the point that it’s replaced by the next caption. One nicety is the program’s ability to intelligently give you the space you need. If you place a caption a little too close to the one that came before it (< one second), then Camtasia Studio will nudge your current caption over by a set amount (five seconds, provided there’s not another caption in its way, in which case it may be less). If you try to insert a caption between two pre-existing captions that are already less than two seconds apart it simply can’t comply, and you’ll get an error message.
-
Text window caption points. These caption points can also be dragged about, with dramatically different results. If you click and hold on these caption points, notice that a horizontal line appears in your text window:

Drag your caption point to choose what text to include in your caption.
This line shows exactly what is included in the current caption point. While Camtasia Studio sections off your captions into three lines by default, you can place your caption points to include one, two, or three lines of text. Three’s the maximum. If you try to rope in more, you’ll end up with more of the dreaded red text, and you’ll need to move the next caption point upward to help take up the slack.
| Tip | Keep in mind that a caption will remain on the screen until the next caption comes in. If you have breaks in your video that don’t have any audio commentary, and you don’t want the most recent caption to linger on through 30 seconds of silence, you can take it off the screen by manually inserting a blank caption point: Just place your mouse cursor right at the beginning of the second caption block (the caption you want to appear after the pause). Then click Add. A blank caption point appears. Note that you might have to adjust the timing afterward to get it just right. |
Likewise, you can also edit the text itself to change the amount you’ll see on each line. For example, the DCMP recommends that every new sentence start on its own line. Just place your cursor in the appropriate spot, press Enter, and then adjust the caption point if necessary. As another example, you may occasionally find that you have odd breaks where a phrase is broken up into two different caption blocks, thus obscuring the meaning. Feel free to get in there and move that text around. Of course, it does facilitate the process if you do it sooner rather than later. That way, you’ll only have to lay down the caption points once, rather than needing to juggle them around because you made all kinds of text edits after the fact.
However, now that we’ve added all the captions, the next issue that naturally comes up is how in the world we can delete one should the need arise. Fortunately for us, this too is rather straightforward. Simply right-click on one of your caption points (whether in the text window or on your Timeline). It presents you with three removal options:
-
Delete caption and text. This option not only gets rid of a particular caption point but also the text block associated with it. It’s useful if you ended up striking a phrase in your audio narration, and this change never made it back into the script file for whatever reason.
-
Delete caption point only. This removes only your caption point. The text block that was formerly part of the caption point will remain intact, and you’ll probably need to shift some of your other caption points around to get this text included in your captioning again.
-
Delete all captions and text. This is another “do-over” option that gets rid of everything. Don’t fret about accidentally wiping out all your hard work, though - for this option, you’ll get a friendly dialog box that asks you if you’re absolutely sure. Choose wisely.
Captioning Options
After adding and editing all our script text and its corresponding caption points, it’s now time to point out a few additional options that help specify how and when the captions get displayed. While advanced formatting and placement options are not offered (yet), there are a couple of nice formatting choices that are left up to you. Check out the controls in the Options section of your Open Captions pane.

As you can see here, we’ve got some choices to make. Fortunately, they’re pretty simple ones.
Overlay
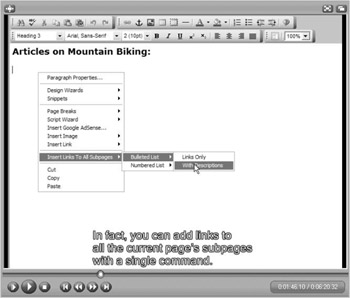
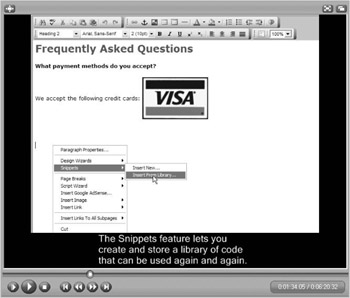
The Overlay toggle button will let you determine whether the caption is laid over the actual video content (always at the bottom of the window) or whether the caption will appear in its own box. Here are examples of each:

This caption makes use of the Overlay option. It appears right over the top of your actual video.

The Overlay option is off. The caption appears below the video.
With Overlay disabled, the vertical length of your video will be extended to accommodate the captioning text box. In other words, your actual video won’t be shrunk down in any way to make room for the caption box, so you needn’t worry about that. Overlaying the captions doesn’t increase your video dimensions at all.
Keep in mind that the text is always white, and the font is always Arial. For overlaid text, the text will have a black outline around it (useful when dealing with white backgrounds). For the overlay-abstainers, the caption box is always black (even if you’ve selected another color for your video’s background). Keep this in mind when designing the look of your video project.
It’s important to note that the Overlay button only works for open caption formats, that is, all formats except for Flash (SWF and FLV). For Flash videos, closed captioning is in effect, and the Overlay setting does nothing.
Display
The job of the Display toggle button is simple: It allows you to choose whether you want to include captions in your video. Come again? you’re probably saying. Why do I need this? What was the point of this whole section if not to include captions in my video?
Well, friends, in the creation of your video project, depending on the demand from your audience and/or the decisions from the boardroom, you may find yourself in the position of having to create two versions of your video, one captioned and one not. Rather than forcing you to maintain two separate project files, this handy button will let you toggle the presence of captions in your video, while maintaining the actual data should you need it again. This setting is also reflected in your video’s preview, so if you’re working with captions and wondering why they’re not being displayed, your troubleshooting should begin with this option.
Width (in chars)
As you’ve probably figured out, the Width option specifies the maximum number of characters in each line of your caption block. It can accept any value from 20 to 100. Though it can be tempting to squeeze more information onto one line, I strongly urge you to resist. The setting of 32 characters per line has been the standard since closed captioning was introduced back in 1980, and with good reason. You don’t want to overwhelm your viewer with captions to the point that they ignore the video. Keep in mind that the longer you make your line, the smaller it will appear in the video. That said, if you have a compelling reason for increasing line length, it’s comforting to know you have the option.
Formatting Tips for Captions
To help you in achieving better captions for your Meisterwerk-in-progress, I’ve compiled a short list of tips for formatting them. Most of these are borrowed from the Described and Captioned Media Program (DCMP), a program of the National Association of the Deaf (NAD). These folks compile an annual Captioning Key[*] to aid aspiring captioneers (which is sort of like a mouseketeer, but without the dorky caps or Annette Funicello). If you’d like a more detailed series of guidelines, feel free to check them out. At any rate, I hope these are helpful to you:
-
All captions should be left aligned.
-
If a phrase is repeated (i.e., “Move it slowly. Move it slowly.”), then the second line should be indented a couple of spaces.
-
The standard 32 characters per line is strongly recommended.
-
If sound effects are used, you might want to caption the sound in parentheses or brackets, especially if it’s critical to the meaning.
-
Every sentence should begin on a new line unless the sentences are short and thematically related (e.g., “This is it! My greatest discovery!”).
-
Additionally, line breaks should be done in as commonsensical a way as possible so as not to obscure meaning. Try not to break up prepositional phrases, noun phrases, verb phrases, names, or titles. Try to start conjunctions (and, or, etc.) on the following line.
-
The words-per-minute that the user is required to read should never exceed 160. You want to caption as close to verbatim as possible, but if the rate at which the narrator is speaking precludes that (which would obviously never happen with videos narrated by you, but let’s assume for argument’s sake that some random fast-talking colleague did your voice-over), you may need to “tighten up” the commentary. Shorten the captioning just enough to get it under 160 wpm. One exception: You should never do any editing on famous quotes, poems, or song lyrics.
-
On a related note, try to keep each caption on-screen for at least two seconds.
-
There’s no need to caption information that is already shown on-screen, such as a callout.
That’s it for captions. When finished captioning your video, clicking the Finished button at the top of the Open Captions pane will take you back to the main Camtasia Studio interface.
[*]At the time of this writing, the 2006 version of the Captioning Key was available here: www.cfv.org/caai/nadh7.pdf.
EAN: 2147483647
Pages: 146
