Final Recording Tips
While the above two methods can help ensure that your presentation videos are of reasonable file size and dimensions, I do have a few other miscellaneous tips to share for really getting the most out of your PowerPoint recordings.
Capturing Video Content within PowerPoint
If the PowerPoint presentation you’re trying to record has any videos placed inside one or more of its slides, you may notice that you’re getting a solid black rectangle where the video should be when previewing your recording. As with media player content, this is due to display acceleration being enabled.
You can try turning off display acceleration within PowerPoint itself by choosing Set up Show… from the Slide Show menu, and then making sure that Use hardware graphics acceleration is unchecked. However, even with this option disabled, it has been my experience that if PowerPoint detects a system with video acceleration capabilities, it will attempt to make use of them anyway. If you’re still running into problems, I’d advise you to turn off display acceleration globally, which affects all Windows programs.
Here are some instructions for globally disabling your hardware acceleration:
-
Choose Start, and then select Control Panel (in Windows 2000, choose Start, then Settings, then Control Panel). Double-click the Display icon.
-
On the Settings tab, click the Advanced button.
-
Click the Troubleshoot tab. Under Hardware Acceleration, drag the slider all the way to the left from Full to None. Click OK, then Yes (or OK in Windows 2000).
Capturing Smoother Animations
As I mentioned in the section on recording Macromedia Flash files in Chapter 5, “Recording Your Screen,” sometimes your animated content just doesn’t seem to capture very well. Although you may have a relatively newer system with a decent video card, you might notice some choppiness in your animations, even if the Recorder window is reporting zero dropped frames. As with Flash, you can remedy this by slowing down the content and then doing a time-lapse capture to give the recorder more time to process the information.
But PowerPoint presents us with a few unexpected snags. Unlike Flash, there’s no way to set the frame rate globally for you to record the whole presentation at one-third speed, for example. No, sir, that would be way too easy! Instead, you need to slow down each and every animation on an individual basis. It’s slow, meticulous, mind-numbing work, and if you happen to have 1,000 animations in your presentation, it probably won’t be worth it to you in the end. Also, the add-in does not support time-lapse capture, meaning that we have to use the Camtasia Recorder, thereby sacrificing all the cool automatic splitting and marker features that the add-in brings to the table. And lastly, recording a presentation at one-third speed is obviously not an option if you’re doing it before a live audience - this option is therefore only for those who want to make a high-quality video of a presentation they’re not doing live. But for those who have the determination to get the best possible capture quality for their PowerPoint animations, the payoff can be big.
Here’s how to slow down those animations and set up time- lapse capture in the Camtasia Recorder to speed them back up later:
-
Make a copy of your animation-laden PowerPoint presentation in Windows. Open the copy for editing.
-
If your Task Pane isn’t present, bring it up by pressing Ctrl-F1.
-
Click on the Task Pane name at the top of the pane to bring up a menu list of other task panes.
Choose Custom Animation, near the bottom of the list.
-
The Custom Animation task pane appears, with a complete list of every animation in the current slide, in order of appearance. In order to effectively do our time-lapse capture, we’re going to have to slow all of these down.
-
Click on an animation effect to select it, and then click the drop-down arrow on its right-hand side to bring up a context menu for that effect. Choose Timing… from the list.
-
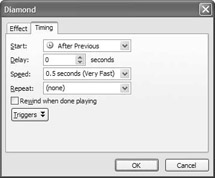
A dialog appears, allowing you to adjust several aspects of the effect’s timing. Only two of the settings are important for our needs: Delay (the number of seconds after the previous animation that the current one begins to play) and Speed (how quickly the animation itself is displayed). For both of these, take the field’s current value, and multiply it by three. Don’t alter any of the other fields.

In this particular case, I would type “3” into the Delay field, and “1.5” into the Speed field in order to slow this effect down.
Note Some objects may have “On click” listed in the Start field, meaning that this particular effect is waiting on input from the user (a mouse click) in order to start playing. While it sometimes works to record such prompted animations if you can time it out okay, it’s tricky because you have to remember to give each animation three times the delay before moving on to the next. In short, timing it manually is a chore. I therefore recommend putting all animations and slide transitions on a timer prior to recording. Make a copy of your original file, and try to get the timing of the animations to adhere to your narration script. Utilizing the Advance slide automatically after __field within the Slide Transition task pane, you can also have the presentation move automatically from slide to slide, eliminating your need to baby-sit the computer at all during recording.
The slowed-down version of the presentation would then be a copy of this copy. If you do add the automatic slide transitions I just mentioned, remember to slow these down by a factor of three as well; otherwise, the slide show will proceed to the next slide before all your animations on the current slide have a chance to run.
-
Click OK to save your changes. Repeat the process with every animation in the current slide. Then move on to all your other slides. Depending on how animation-intensive your presentation is, this could obviously take a while.
-
Save the file. This is the one from which you’ll be recording, so keep it open.
-
Since the Camtasia Studio Add-in for PowerPoint does not yet support time-lapse recording capability, we’ll have to do this the old-fashioned way, with the Camtasia Recorder. Open the Recorder now.
-
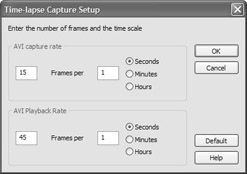
Choose Options… from the Tools menu. On the Video tab, check the Time-lapse capture check box. Then click the Time-Lapse Setup… button.
-
In the dialog that appears, you can set the frame rate for both capture and playback. In the AVI Capture Rate section, enter your usual frame rate (I use 15 fps). In the AVI Playback Rate section, enter a frame rate equal to three times that of your capture rate. I would therefore enter 45 frames per second:

-
Click OK twice. Now choose your recording area: Full if you’re doing a full-screen recording or Window if you have the slide show set to display in a window.
-
If there’s audio narration in your presentation (linked to an external file) that you also want to record, it will have to be added later in Camtasia Studio, since audio recording is disabled when making a time-lapse capture. To learn how to do this, please see Chapter 10, “Working with Other Media: Audio, PIP, and Title Clips.”
-
Begin recording. Start the presentation in Slide Show mode, and then press your Record hotkey to begin the recording. If you’ve set up your presentation to proceed from animation to animation and slide to slide on a timer, you should be able to simply walk away from the computer, returning only to stop the recording once the slide show concludes.
-
Use your Stop hotkey to end the recording, saving the file per usual.
-
Optional: A file that plays back at 45 fps is going to be somewhat larger. It has been my experience that you can use Camtasia Studio to reproduce your video at 15 fps without any major impact on the smoothness of your animations. Feel free to give it a try and see if it works for you.
EAN: 2147483647
Pages: 146