Chapter 15: Other Output Options
At this point we’ve covered the production options in Camtasia Studio as well as shown how to create an attractive front end for your videos, both for CD-ROM (MenuMaker) and web distribution (Theater). But there are some additional features in Camtasia Studio that can augment your file production, thus assisting you in sharing your videos with the world.
This chapter is divided into three sections. First, we’ll discuss the wonders of batch processing, helping you take a multitude of files and put them in a desired format. Then we’ll talk about using Pack and Show to make EXE files out of videos, helpful in a totally locked-down environment where no additional software may be installed. And finally, we’ll go over the Camtasia Player, an elegant little AVI player that is simple without being simplistic.
Assembling Multiple Videos with Batch Production
Say you have created a series of 20 tutorial videos about your company’s performance evaluation software, producing them as SWFs to upload them to the corporate intranet. Then you get a call from management. The files are too large, and people are complaining of long download times. So, you begin to pitch the usual list of suspects on how to make the files smaller (try lossy SWF or FLV, more audio compression, reduce frame rate, etc.). You agree on a plan of action. Right before hanging up, your manager says, “Oh, and we need them all by tomorrow.” Click.
Time to panic? Nope, not with the magic of batch production at your fingertips. Rather than reproduce every single video in the series, you can set up all the video files to produce in a specific file format with specific settings. Just start the process and walk out the door at five. Barring a freak power outage, you’ll have all 20 videos produced and waiting for upload when you arrive the next morning. So, let’s fire up our Batch Production dialog and go to it. It is launched from Camtasia Studio, and can be run regardless of whether or not a project is currently in memory (the project won’t be affected).
You can launch batch processing in one of the following two ways:
-
From the File menu, choose Batch Production….
or
-
In Camtasia Studio’s Task List, click on Batch Production (Produce section).
The Batch Production dialog appears. This dialog is a multi-step wizard. Our first stop is the Select Files screen, so let’s do what it says, and add some. Let’s click on the Add Files/Projects button. A dialog pops up that will let you browse for both video files (including CAMREC files, AVIs, MPEGs, and WMVs) and entire Camtasia Studio project files (*.camproj). Simply browse to the directory where your files are contained, select them (multiple selections are possible by holding down the Ctrl key), and then click Open. If your desired files are split across multiple directories, you can repeat the process by clicking Add Files/Projects again.
Creating a Production Preset
Choose Next, and you’ll end up at the Preset Options screen. If you created a preset or two back in Chapter 12, “The Production Process,” you will see them listed here. If not, the list will be grayed out, and it’s up to you to create one. Click the Preset Manager… button. The Manage Production Presets dialog appears, and if you have any presets created, they’ll be listed here. If not, we’ll have to create one. To begin a new preset, click New….
The Preset Editor Wizard comes up, the first screen of which is called Create a Production Preset. If you’ve worked with the Advanced Production Wizard that we discussed in Chapter 12, this new wizard will look rather familiar. The production steps are laid out more or less the same:
-
Choose an output file format.
-
Set your encoding options.
-
Choose a video size.
-
Select additional video options.
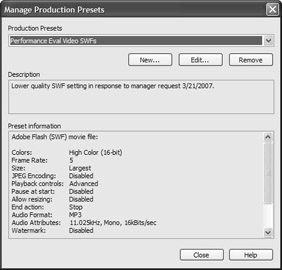
But we’re getting ahead of ourselves. This first screen differs a little, in that we’re provided a couple of text fields that ask for a preset name and a corresponding description of up to four lines. The preset name is the text that you’ll see listed when it’s time to pick a preset in the future. So, following our example at the beginning of this section, I’ll enter “Performance Eval Video SWFs” as my name and something like “Lower quality SWF setting in response to manager request 3/21/2007” for the description. Resist the temptation to enter setting-specific information in your description, as this info will automatically be listed under Preset information in your Manage Production Presets dialog, anyway. Here’s what the dialog will look like once you’ve completed the preset:

The Manage Production Presets dialog. You’ve got a bird’s-eye view of your preset’s name, description, and settings. From looking over this info, you can edit the preset, delete it, or start a new one from scratch.
Back in the Preset Editor Wizard, your next step is to choose a video file format, which in our case will obviously be SWF. Click Next, and you’re presented with the Encoding Options screen, which if you’ll recall is specific to the chosen output format. To achieve a smaller file size, I’ll set the Frame Rate to 5 fps, the Colors to 16-bit, and the Audio Format to MP3 (11.025 kHz, Mono, 16 kBits/sec). Then it’s on to the Video Options screen. Once you have everything set the way you like, click Finish to add the preset to your list, where you can select it over and over again on similar projects.
That’s the beauty of presets. For every preferred set of output options you have, just set your desired options once, and you don’t have to do it again. Ever. Also, you don’t have to be in batch production to use your presets. When producing from your current project, you may recall from Chapter 12 that you have the option of choosing one of your established presets to produce your final video rather than using one of Camtasia Studio’s two production wizards.
Using Your Presets to Batch Produce
So, once you’ve managed to create a preset or two, go ahead and close out the Manage Production Presets dialog. This will bring us back to the Preset Options screen in our Batch Production dialog, where we now have the option of picking a preset from those we just created in the processing of our files. There are two ways to go about it:
-
Use one preset for all files/projects. Just select a preset right within this dialog, and this preset will be used for all files and/or projects you selected. This would be the way to go in the performance evaluation example I gave.
-
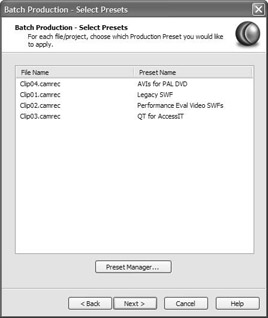
Use a different preset for each file/project. When you click the Next button after choosing this option, you get a special bonus screen, allowing you to select a preset from a drop-down list for each and every file or project. At the bottom of this screen is an additional Preset Manager… button that will let you add, edit, or delete your presets.
So, you’ve got one option for producing a bunch of file/projects in one format, and you’ve another option for producing a bunch of file/projects with a different format for each. But what if you have just one file or project that you need to convert into a multitude of file formats (such as when you want to give the viewer a choice between different formats or bandwidth requirements)? Well, there’s actually a super-secret third option to let you do just that. On the Select Files screen, click the Add Files/Projects button and select your file. Repeat this step, selecting the same file over and over. You can select multiple instances of the exact same file or project, one for every output preset. Then, on the Preset Options screen, choose Use a different preset for each file/project. Click Next, and pick a different preset for each instance by clicking a preset name and choosing a preset from the drop-down list, just like this:

Just keep in mind that if you’re using the same file type for more than one preset (multiple AVI presets with different settings, for example), the files will be named by number. That is, the first will be called myfile.avi, the second myfile(2).avi, etc. It may be worthwhile to instead make copies of your file and then rename each appropriately (myfileHQ, myfileLQ, myfileSWF, etc.) prior to doing the batch production.
Finally, a click of the Next button will bring you to the dialog’s Finish screen. Here, you’re prompted for an Output Folder. Special directories will be created in your chosen output folder to house your new file(s) that bear the name of the original file or project. Either type in the path or simply click the Open button to browse for it. Checking the Show production results check box gives all sorts of valuable information upon completion of your production, including the start and finish time, the size of each file, and a rundown of all the production settings.
Once you’ve set your options here, a click on the Finish button will set the process in motion. So, feel free to grab a cup of coffee, or if you’re working with a whole lot of files, take a little nap under your desk. The Rendering Batch Production dialog keeps you abreast of the status of your production, both for the current file/project and overall. From the file list, it’s easy to see which files have finished producing and which are still pending. After it finishes, you’ll get a handy summary of all production activity, provided you didn’t disable the Show production results check box (and I strongly recommend that you don’t).
So now you have all those lovely fresh new (smaller) files ready for upload, and you’ve hit your deadline with flying colors. Management is happy, the viewing audience is happy, and you didn’t have to pull an all-nighter to make it happen, which makes you happy, too.
EAN: 2147483647
Pages: 146