| Now you're going to take the static neon image and turn it into a nice, soft flickering sign. 1. | FileIn the frame.1-109#.iff, neon.0001.iff, and trailer.1-109#.iff files once again from the Lesson12 folder.
| 2. | On the Globals tab, set the timeRange to 1-109.
| 3. | Click the Home icon at the bottom right of the interface to sync the Time Bar to the Globals timeRange.
| 4. | Right-click the Glow icon in the User tab and choose Create.
| 5. | Connect neon clip to both inputs of Glow1.
| 6. | Set the glowSize to 40 and the glowBrightness to 1.2.
The neon sign would look better if you increased its saturation.
| 7. | From the Color tab, add a Saturation node and set it to 1.75.
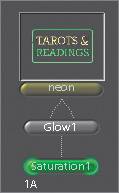 The glow now looks pretty good, but the neon sign really needs to flicker, as all neon signs should.
| 8. | Add a Blur node from the Filter tab and a Brightness node from the Color tab.
You're going to manually animate the Brightness and Blur parameters to create a soft flickering light, which will be sure to strain your mouse finger. Later in the lesson, you'll learn how to accomplish the same result by inserting an expression into Brightness1's Value parameter.
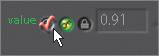
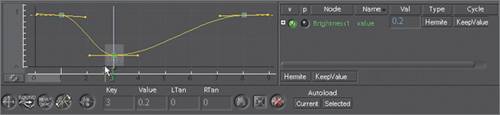
| 9. | Go to frame 1 and click the Keyframe toggle next to the Value parameter.
 | 10. | Enter 0.91 for the value.
| 11. | At frame 3, enter 0.2.
| 12. | Go to frame 8 and enter 0.91.
|
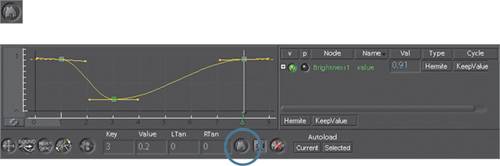
The Curve Editor While you've been setting keyframes, these values are simultaneously being entered as curves in the Curve Editor. Follow these steps to see what the curve looks like numerically: 1. | Click the + to the left of the Value parameter.
 Are you feeling both confused and impressed at the same time? Suppose I told you that you're looking at a numeric representation of the keyframes that have been set. It makes more sense now, right?
The Curve Editor allows you to see a visual representation of animated keyframes on a graph. You are able to create, see, and modify these animation curves. When you activated keyframing, the Clock icon next to the parameter was also activated. When a checkmark is on the Clock icon, it will be loaded into the Curve Editor.
| 2. | Make sure that the Value parameter's Clock icon has a checkmark next to it.
 | 3. | Select the Curve Editor in the tool tabs.
The Curve Editor displays the animation curve for the Value parameter of Brightness1.
| 4. | Click the Home icon below the Curve Editor to center the curve.
 Take a deep breath and enjoy the beauty of the curve. All right, that's enough, snap out of it. Take a deep breath and enjoy the beauty of the curve. All right, that's enough, snap out of it.
|
Adding and Deleting Keys You can add keyframes on the curve by Shift-clicking it. 1. | Shift-click the curve between frames 3 and 8, and a keyframe will be created.
You can drag it around, or, if it is still selected, you can enter numerical values in the text fields at the bottom of the Curve Editor.
 You can delete keyframes in two ways: You can delete keyframes in two ways:
- Drag a selection box around the keyframe or keyframes and press the Delete key on the keyboard.
- Move the Time Bar to where the key is and click the Delete Keyframe button if you are using an onscreen control.

| 2. | Drag a selection box around the keyframe that you added and press the Delete key on the keyboard.
|
Selecting Keyframes and Curves You can select curves and keyframes in several ways: - Drag the mouse over a segment to select a curve, or Shift-drag to add to a selection.
- Drag over keyframes to select them.
- Press Command-A to select all curves.
- Press Shift-A to select all points on active curves.
- Use the Curve List to select curves by name.
Modifying Values You can modify a value by: - Grabbing keyframes and adjusting their position in the Curve Editor.
- Changing a keyframe's value in the Parameters workspace or onscreen controls when AutoKey is turned on.
- Selecting the keyframe and using the text ports at the bottom of the screen as virtual sliders (Control-drag) to change the Key (its time) or Value entries.
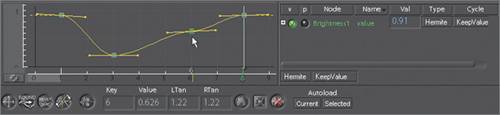
1. | Drag a selection box over the keyframe at frame 3 to select it.
 | 2. | In the Value text box, change the value from .2 to .86 and press Enter.
 | 3. | Set the following keyframe values in the Parameter workspace:
Frame | Value |
|---|
2 | .79 | 4 | .80 | 5 | .97 | 6 | .88 | 7 | .77 |
| 4. | Right-click in the Curve Editor and choose View > Frame Selected.
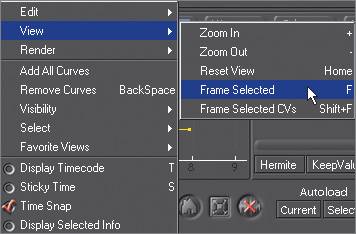 The curve is framed within the Curve Editor.
 |
Note See the end of this lesson for a complete list of Curve Editor keyboard shortcuts. For detailed information on the Curve Editor, please refer to the Shake User Manual.
Setting the Cycle Mode 1. | Drag the Time Bar back and forth between frames 1 and 8.
The curve you created works fine as an animation for the flickering of the neon sign, but it's too short. The Curve Editor has a number of Cycle modes, one of which can cycle the animation. Let's try it out.
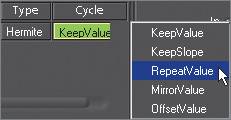
| 2. | Click the KeepValue tab below Cycle and choose RepeatValue from the pop-up menu.
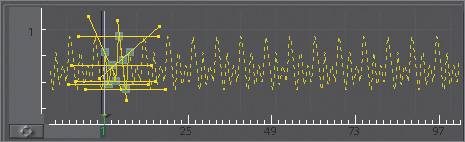
 | 3. | Press Control-Alt and drag to the left in the Curve Editor to expand the displayed frame range.
The eight-frame animation now continuously repeats, courtesy of RepeatValue.
 | 4. | Click the Flipbook icon and play what you have done so far.
The neon sign flickers randomlynot bad for setting only eight keyframes.
| 5. | Close the flipbook.
|
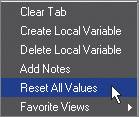
Animation Using Expressions The cycle animation you created was the equivalent of starting a fire with flint and steel. It's time to break out the blowtorch. 1. | Right-click the Brightness1 Parameter tab and choose Reset All Values.
 | 2. | Click in the Value text field and replace the number 1 with the word time.
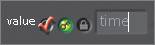 This uses the current frame number for the Value parameter.
| 3. | Move the Time Bar to various frames.
This brightens the image as you get to higher frames, since at frame 109 it creates a brightness value of 109.
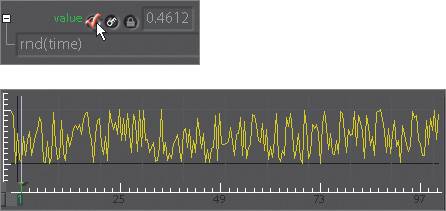
| 4. | Click the + next to the Value parameter.
 You will see an expanded text field with your expressiontimein it. The normal text field shows you the result of that expression at that frame. You can put any expression here, so let's do something clever like using a random function.
| 5. | Type rnd(time).
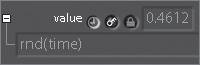 This will return a random value between 0 and 1, with time as your variable. The rnd function isn't truly random, but by using time as the variable, you guarantee that the values will differ from frame to frame.
| 6. | Click the Flipbook icon to preview the animation and close it when you're done.
Note If you move the slider on the Value parameter by mistake, you will remove the expression. To get it back, simply retype the expression, or click Undo (if using the full version of Shake). The only exception to this behavior is if your expression is an animated curve that you create with keyframes. | 7. | To see the animated values in the Curve Editor, click the Clock icon next to Value and open the Curve Editor.
 Your dreams of impressing those around you with your mastery of expressions will no doubt be destroyed when you try clicking the erratic curve. Nothing happens. Why? Because you aren't using keyframe animation. So read on to see how you control an expression.
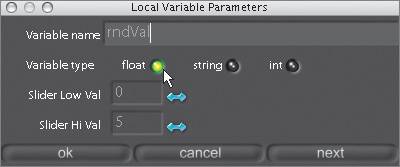
| 8. | Right-click Brightness1's Parameter1 tab. From the pop-up menu, choose Create Local Variable.
 This means you will be adding an extra parameter to Brightness1 with which you can do whatever you want. A window will appear prompting you to name your local variable and select its type. A variable can be one of the following types:
- Float A number with a decimal place (0.1, 0.5, 1.0, and so on)
- String Characters ("The quick brown fox...")
- Int A rounded number (0, 1, 2, and so on)
| 9. | In the Variable Name field, type rndVal, keep the Variable Type as Float, and click OK.
 A new subtree named localParameters will appear in Brightness1's parameters.
 If you adjust the slider, you will see that absolutely nothing happens. Be patient. First add another local variable and more expressions.
| 10. | Right-click the Parameter1 tab again and choose Create Local Variable.
| 11. | Name it animVal and keep it on Float.
It would be pretty impressive if you could set some keyframes in the animVal local variable that would control the random time animation. Give it a try.
| 12. | Go to frame 1, turn on the AutoKey for animVal, and set three keyframes. Enter values of 0.5 at frame 1, 0.4 at frame 55, and 0.6 at frame 109.
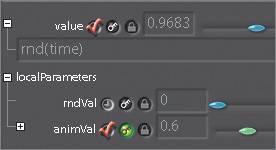 | 13. | Click the Home button below the Curve Editor to show all your curves.
This centers all your curves within the Curve Editor, but the animVal keyframes are not controlling the random time animation. To do this, you first have to move the rnd(time) expression from Value to rndVal and then write a new expression for Value.
| 14. | Click the word value (a little hand holding a piece of paper should appear), drag down to rndVal, and release the mouse button.
| 15. | Open rndVal's subtree.
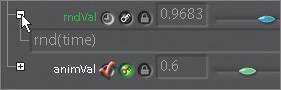 You should see rnd(time) as its new expression.
| 16. | Open Value's subtree, double-click Value's expression, and replace it with rndVal*animVal.
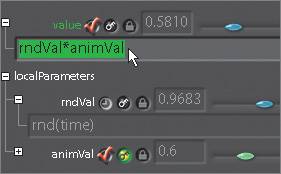 This will multiply the results of rndVal and animVal together.
| 17. | Make sure Value and animValbut not rndValare loaded in the Curve Editor.
 Finally, you can see that the curve is modifying the shape of the otherwise random curve.
| 18. | Go ahead and grab the keyframes or insert a new one. When you do, you change the form of the random shape.
| 19. | Drag the Time Bar to various frames to get an idea of what the animation looks like.
Now that you can control the random flickering, you can link the animation in Brightness1's Value parameter to Blur1's xPixels. This will give the blur the same random animation as in Brightness1's Value parameter.
| 20. | Click the right side of the Blur1 node to edit its parameters.
| 21. | Open the Pixels subtree, click in the xPixels text field, and type Brightness1.value*75.
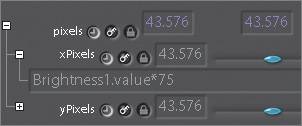 The *75 is for multiplying the result of Brightness1's Value animation, which is in a range of only 0.4 to 0.6. Multiplying by 75 makes the effect of the blur noticeable.
| 22. | Drag the Time Bar again to see what is happening.
The blur randomly animates along with the flickering neon through parameter linking. Our last step will be to combine this random flicker animation with the original neon element.
| 23. | Highlight the Saturation1 node, right-click IAdd from the Layer tab, and choose Branch.
| 24. | Connect the output of Brightness1 to the second input of IAdd1.
| 25. | Set the IAdd percent parameter to 50.
| 26. | Press Control-E over the tree to activate Enhanced Node View.
Your tree should look like this:
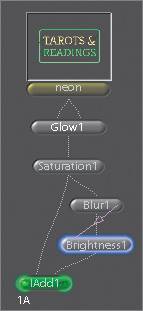 In Enhanced Node View, a purple line connecting Blur1 to Brightness1 signifies that an expression exists between them.
| 27. | Double-click the IAdd1 node, make a flipbook, and play it.
 The neon element is now complete and ready for the MultiPlane node.
| 28. | Close your flipbook.
|
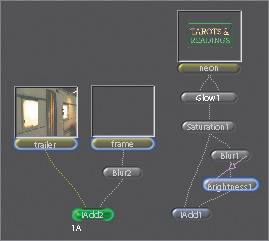
Highlighting the Metal Frame The neon sign element will ultimately fit inside the trailer's metal frame. The frame clip, which already matches the motion of the trailer, was generated to provide a green glow around this metal frame. 1. | Select the trailer clip and choose an IAdd node from the Layer tab.
| 2. | Connect the frame image to the second input of IAdd2.
| 3. | Go to frame 109 so you can see the frame.
| 4. | Place your pointer over the IAdd2 node and press I repeatedly to toggle the effect on and off.
The frame looks harsh around the edges and could use a bit of softening.
| 5. | Make sure that the IAdd2 node is in the active state.
| 6. | From the Filter tab, insert a Blur node between the frame and IAdd2 nodes.
| 7. | Set the Pixels to a value of 6.
That does the trick.
 | 8. | Make a flipbook and play it.
All elements are prepped, and it's time to import camera-tracking data into the MultiPlane node to create the proper perspective change for the 2D images.
|
|