4.3. The Post-Dump Slideshow Once you've imported a batch of pictures into iPhoto, what's the first thing you want to do? If you're like most people, this is the first opportunity you have to see, at full-screen size , the masterpieces you and your camera created. That's the beauty of iPhoto's slideshow feature, which comes complete with the tools you need to perform an initial screen of the new pictures ”like deleting the baddies, rotating the sideways ones, and identifying the best ones with star ratings. To begin the slideshow, click the Last Roll icon in the Source list at the left side of the screen to identify which pictures you want to review.
Note: On a freshly installed copy of iPhoto, this icon is labeled Last Roll. If you've fiddled with the iPhoto preference settings, it may say, for example, "Last 2 Rolls" or "Last 3 Rolls," and your slideshow will include more than the most recent batch of photos. If that's not what you want to see, just click the actual photo that you want to begin the slideshow (in the main viewing area).
Now Option-click the Play triangle underneath the Source list. iPhoto fades out of view, and a big, brilliant , full-screen slideshow of the new photos begins, accompanied by music.
Tip: If you just click the Play triangle (instead of adding the Option key), you summon the Slideshow dialog box instead of starting the show. This dialog box has lots of useful options; for instance, you can choose the music for your slideshow, for example. If you merely want a quick look at your new pix, however, Option-clicking is the way to bypass it.
You can read more about slideshows in general in Chapter 7. What's useful here, though, is the slideshow control bar shown in Figure 4-9. You make it appear by wiggling your mouse as the show begins. GEM IN THE ROUGH
iPhoto Becomes iSound | | OK, so iPhoto now imports and manages still photos, and it imports and manages digital movies. It's only logical, then, that you should also be able to use iPhoto to manage your digital sound files. After all, what's a movie but a sound file plus a video file? Weirdly, though, iPhoto doesn't recognize these sound files if you try to import them. Apple would probably argue that that's what iTunes is for. Still, there are times when it's far more logical to store them in iPhoto. Consider, for example, the voice annotations that you can record using most digital cameras nowadays. These are sound recordings that you can associate with particular photos as reminder notes. Fortunately, there's a workaround that lets you store these voice notes right in iPhoto “if, that is, you're willing to putter around in QuickTime Player Pro (Chapter 11). To pull this off, start in iPhoto. Locate the photo to which the sound annotation was supposed to be attached, and export it to your desktop (see page 322). Choose JPEG format, 640 x 480 resolution. Drag the exported JPEG graphic onto the icon of QuickTime Player. When the photo appears, choose Edit  Select All, and then Edit Copy. Select All, and then Edit Copy. Now open the sound file in QuickTime Player, too. (You'll first have to copy it from the camera's memory card, of course, either by dragging in the Finder or by using Image Capture, described on page 357.) It appears as just a scroll bar, with no picture. Choose Edit Add Scaled. QuickTime Player responds by creating a video track for the sound file (using the photo as the "video). Presto! You turned a sound file that iPhoto doesn't recognize into a video file that iPhoto does recognize! Choose File Export to save the resulting "movie onto the desktop, and then import it into iPhoto as described in this chapter. Now, when you see the photo, you can double-click it to open it in QuickTime Player, where you'll see the photo and hear the dulcet tones of your own masterful voice recording as it plays back. Ingenious workaround or time-wasting kludge ? You be the judge. |
As Figure 4-9 points out, this is the perfect opportunity to throw away lousy shots, fix the rotation, and linger on certain photos for more study ”all without interrupting the slideshow. You can even apply a rating by clicking the appropriate star in the band of five; later, you can use these ratings to sort your pictures or create smart albums. See Chapter 5 for full detail on rating stars and smart albums. 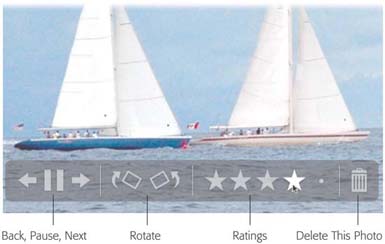 | Figure 4-9. As the slideshow progresses, you can pause the show, go backward, rotate a photo, delete a bad shot, or apply your star rating to a picture, all courtesy of this new control bar. | |
Here's the full list of things you can do when the onscreen control bar is visible: -
Click the Play/Pause button to start and halt the slideshow. The space bar toggles these controls ”and the control bar doesn't have to be visible when you press it. -
Click the left and right arrows to browse back and forth through your photos. The left and right arrow keys on your keyboard do the same thing. -
Press the up or down arrow keys on your keyboard to make the slides appear faster or slower. -
Click the rotation icons to flip photos clockwise or counterclockwise, 90 degrees at a time. -
Click one of the five dots to apply a rating in stars, from one at the left to five all the way at the right. Or use the number keys at the top of the keyboard or on the numeric keypad; press 3 to give a picture three stars, for example. -
Click the Trash can icon to delete a photo from the album you're viewing (but not from the Photo Library). Or simply hit Delete (or Del) on your keyboard.
Tip: There are keyboard shortcuts for all of these functions, too, that don't even require the control bar to be on the screen (page 196).
Click the mouse somewhere else on the screen to end the slideshow. |