12.3. Using MapServer with Web Services
| < Day Day Up > |
| It isn't necessary to program applications to use web services. MapServer is already able to access and provide data using a web services framework. This chapter focuses on setting up your MapServer application to use these services and will show you how to define a layer in your map file (which uses data retrieved from a remote data source). You will also learn how to set up your own service to make your data available to others. The web services specifications for mapping come from the Open Geospatial Consortium (formerly known as the Open GIS Consortium). The OGC has developed standards or specifications for web services for mapping. The goal of the organization is to improve interoperability between applications by creating some common interchange languages through common standards. The membership list is quite impressive, as are the goals. Here is a brief description from the About page at http://opengeospatial.org/about/:
The focus here isn't on creating applications, but on specifications for sharing data. This makes sense when you consider that major mapping, GIS, and IT players sit together on this consortium (e.g., Autodesk, ESRI, MapInfo, Intergraph, and Oracle). MapServer can implement many OGC specifications, in varying degrees of completeness, as summarized in Table 12-1.
Two of the more popular specifications are presented here: Web Map Service and Web Feature Service. Other specifications are useful, including some not used for mapping, but aren't discussed here. Information on all the OGC specifications can be found at http://www.opengeospatial.org/specs/?page=specs.
Reference and tutorial documents for WMS and WFS are available in the OGC Compliance section of the MapServer documentation page. See these documents for the most up-to-date, MapServer-specific information about WMS, WFS, and other web services at http://mapserver.gis.umn.edu/doc/. These web sites may help you find a publicly accessible web service:
12.3.1. Web Map Service (WMS)WMS provides a way to send map images over the Web. Your MapServer applications can request customized maps from remote sources that have a WMS available. Finding a WMS source isn't always easy. Others on the MapServer or OGC-related mailing list can point you in the right direction. Any web site you find that uses web mapping may also have a WMS available. For sites using MapServer, enabling this service can be simple. A range of parameters and options are used when requesting a map, its content, and look. It works much like if you phoned a consultant and asked him to put together a map and email the image to you. How would you make the request? It might be something like this:
All the crucial information needed to get started on a map was collected by the consultant. Now he can go away and create the map image for the client. A WMS request is virtually the same thing, except that there isn't as much two-way discussion going on. The client must know what to ask for. Asking for the wrong thing doesn't get you very far. Specific WMS parameters are required for requesting a map. Table 12-2 briefly describes them, using the phone call analogy for examples.
In many cases you may specify only the SRS, layer, and image type in your map file. The rest is taken care of by MapServer when it makes the actual request. For example, MapServer knows what size the map is and requests an image size that is the same. It also knows what area of the world the map is looking at, so it automatically passes the bounding box parameter with correct values. If you are building a URL manually, you will have to specify all these parameters.
12.3.1.1 Checking the capabilities of a WMS providerOnce you've found a WMS source or a site offering WMS, you will probably be given an obscure URL to look at. This page (http://www.refractions.net/ogcsurvey/index.php?country=US) provides a comprehensive list of WMS (and other) services that are available. The URL given for each item doesn't take you to a web page. This is the reference to a WMS document (a.k.a. capabilities document). This may not mean much to someone just starting out with WMS, but this is the standard way of sharing connection information. To understand what a WMS offers, you need to access this capabilities document. For these examples, you will use a popular WMS that provides global satellite imagery and various other layers for the United States. The URL for wms.jpl.nasa.gov is shown on the WMS listing as http://wms.jpl.nasa.gov/wms.cgi?request=GetCapabilities. So what do you do with this URL? Depending on your web browser, clicking on the link may or may not be helpful. The result is an XML document with information in it about the WMS. If your browser doesn't automatically show the contents of the document, you may need to save it to a file on your system and open it with another program. It is sent in a WMS-specific XML format that most browsers won't recognize, though when you force it to load the file, it can render the XML just fine. You can also use the command-line tool wget to download the document directly to a file, like this: > wget -O jplwms.xml "http://wms.jpl.nasa.gov/wms.cgi?request=GetCapabilities" This is all one line. The -O (capital letter o) option saves the results of the URL into a file. Otherwise it will list it on the screen instead. Any text editor such as Notepad, Wordpad, or Emacs can open this document. A web browser should be able to as well. You should save this file using the .xml file extension. Example 12-1 shows some pieces of the capabilities document. The document is usually rich with information and includes the names of those who maintain the service and any restrictions on use. The parts you are most interested in describe the available projections, layers, and image formats. Example 12-1. Parts of a standard WMS capabilities document... <Title>OnEarth Web Map Server</Title> <SRS>EPSG:4326</SRS> <SRS>AUTO:42003</SRS> ... <Layer queryable="0"> <Name>global_mosaic</Name> <Title>WMS Global Mosaic, pan sharpened</Title> ... <LatLonBoundingBox minx="-180" miny="-90" maxx="180" maxy="90"/> ... </layer> ...
Capabilities documents play an integral role in effective web map services. They contain metadata (data about the data) that isn't obvious by looking at the data itself. These documents allow tools to search for the availability of information or catalog services, even by geographic location. Capabilities documents describe what information is available and how to access it. Without these documents, the implementation of OGC web services is hampered. All you need to know is that each little section holds some information about the service. Much of the document may be meaningless to you, but the following paragraphs highlight the key things to look for. Projections are especially important when using WMS layers in MapServer. The remote WMS source may provide maps in various projections. When you set up a layer, you need to decide which projection to request. This should be the same as the projection you are using in your application. The first three lines of Example 12-1 show the title of the service and two spatial reference system codes you can choose from. If the one you are using in your map isn't listed, you can still use the WMS but you'll have to tell MapServer to reproject the image to fit your other layers. The EPSG code for the example is 4326, a global coordinate reference system typically known as WGS 84. So you're in luck; it is listed as an option: <SRS>EPSG:4326</SRS> You can request this directly from the service provider, and MapServer won't have any additional overhead for reprojecting the map for your application. The next section in Example 12-1 is the most important if you already know that the service will be useful to you: <Layer queryable="0"> <Name>global_mosaic</Name> <Title>WMS Global Mosaic, pan sharpened</Title> ... <LatLonBoundingBox minx="-180" miny="-90" maxx="180" maxy="90"/> </layer> The layer sections give you the critical pieces of layer connection information. The main item is the Name element. <Name>global_mosaic</Name> This element gives the layer a unique name that you will refer to in your application. The name here is global_mosaic. Layer names can be quite cryptic. The title element can help you understand what the name means. In this case, the title for the layer is WMS Global Mosaic, pan sharpened. Use the name and not the title of the layer in your MapServer map file. The next section in Example 12-1 is the LatLonBoundingBox: <LatLonBoundingBox minx="-180" miny="-90" maxx="180" maxy="90"/> This is most useful if you are unfamiliar with the geographic area that a WMS covers. The coordinates represent a geographic rectangle that the service covers. If you are south of the equator, a quick look at this line tells you that the southernmost area covered is miny="-90" or 90 degrees south of the equator. It extends to maxy="90.0" or 90 degrees north. This service covers the globe, so you should be able to use it in any application you want, no matter where it is located. There are other useful elements in the capabilities document, such as <MinScaleDenominator>20000</MinScaleDenominator>. You can use it as a guide to know what scale the layer is meant to mapped at. This value is set as the MINSCALE when adding the layer to the MapServer map file, which you'll see later in Example 12-4. The layer name and other parameters are put into a URL and sent to the WMS provider, which then sends back a map image. If there is a problem with your request you will probably get an error message instead of an image. If you have the request right, but there is no data for that area, or at that scale, you will get an empty map and no error. 12.3.1.2 Manually requesting a map from a WMS sourceNow you'll take this information and build your own URL from scratch. MapServer creates all of this automatically later on, but Example 12-2 gives you a taste of what is going on behind the scenes. This URL is all one line, with no spaces. It has been broken into multiple lines with space added to make it more readable. Figure 12-2 then shows the image that is returned from this URL. Example 12-2. A basic WMS request from a handmade URLhttp://wms.jpl.nasa.gov/wms.cgi ?request=GetMap &service=WMS &version=1.1.1 &srs=EPSG:4326 &format=image/jpeg &styles= &bbox=-180,-90,180,90 &width=600 &height=300 &layers=global_mosaic Figure 12-2. A global map image from a WMS request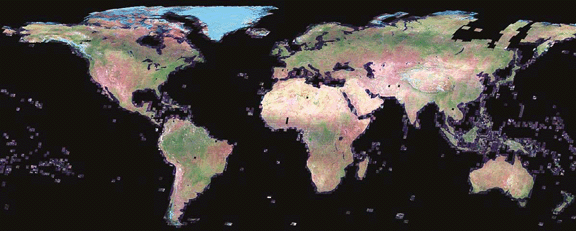 This is a very simple example though it may look complicated. There are other parameters and options that can be used by some WMS providers, but these are just the most basic. The last four settings (layers, bbox, width, and height) can be easily changed to modify your map if you want a larger map, or a different layer. The example can be spiced up a bit by simply adding more layer names to the layers parameter. Example 12-3 shows a map that adds another layer listed in the capabilities document. This layer helps fill in the background where the global_mosaic layer had gaps, in Antarctica and northeast Asia, for instance. Example 12-3. Several layers requested in a URL to a WMShttp://wms.jpl.nasa.gov/wms.cgi ?request=GetMap &service=WMS &version=1.1.1 &srs=EPSG:4326 &format=image/jpeg &styles= &bbox=-180,-90,180,90 &width=600 &height=300 &layers=modis,global_mosaic Very little effort is needed to change the URL and produce a map displaying more information. Figure 12-3 shows the map that is created and returned. Figure 12-3. A WMS map returned from a remote service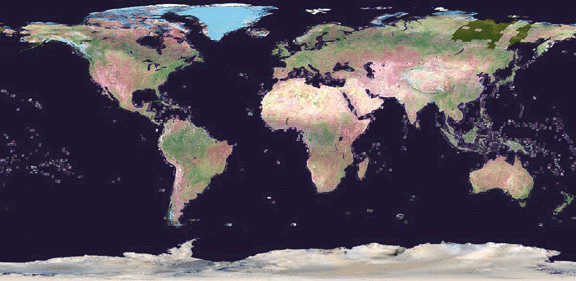 A few minor modifications yield a much more complete-looking map. Notice that where there was no Landsat imagery in Figure 12-2, the gaps have been filled. Note that the modis layer was listed first in the layers parameter. This draws it first on the map, then the global_mosaic draws over top. If you put the modis layer after the global_mosaic, it will draw, but completely cover the global_mosaic. If you want to experiment a bit, change the bbox setting to one of these, for interesting views of parts of the world. Be sure to keep the image size to 600x300 or at least keep the width/height ratio as 2:1.
You can also remove the global_mosaic layer and see how the global modis layer looks on its own. All the other layers listed in the capabilities document can be added to the URL, but many won't show very well because they overlap each other and may only draw at certain scales.
12.3.1.3 Adding a WMS layer to a MapServer map fileSending WMS requests through URLs in your web browser can be interesting, but WMS becomes much more powerful when you combine it with your own, locally stored, data. The remote source doesn't know anything about the other layers on your map, but can add to them. MapServer takes the image that results from the request and treats it as another layer to overlay. It is possible to have an application that uses only external WMS layers. The real power is in combining your own information with someone else's to produce a more effective map than you would have been able to do on your own. A WMS layer in your map file has some more specific settings than other layers. Example 12-4 shows a layer defined using the data source in Example 12-2. Example 12-4. A sample WMS layer in a MapServer map fileLAYER NAME global_landsat TYPE RASTER STATUS DEFAULT CONNECTIONTYPE WMS CONNECTION "http://wms.jpl.nasa.gov/wms.cgi?" MINSCALE 20000 METADATA "wms_server_version" "1.1.1" "wms_srs" "EPSG:4326" "wms_format" "image/jpeg" "wms_styles" "" "wms_name" "modis,global_mosaic" END END You can add this layer to the global.map used in previous chapters. A couple other changes will be required to make it work in that environment. You will probably want to change MapServer's output image format to support more colors, because this WMS has a lot of different colors. Add IMAGETYPE PNG24 right after the IMAGECOLOR setting. You should also remove the COLOR setting from the countries layer so that you can see the WMS data underneath. A complete listing of the global.map file used for these examples is included at the end of the chapter in Example 12-13. The settings in a map file are very similar to those used in the URL. The biggest difference is that several settings aren't required because MapServer generates them internally (e.g., width, height, bbox). MapServer can infer these settings based on the current map being viewed, its extent, size, etc. The connection setting must be set to CONNECTIONTYPE WMS to tell MapServer to make a WMS request. Then the base URL is put in as the connection string. This URL goes up to and includes the question mark (as in Examples 12-2 and 12-3).
All remaining parameters are put into a METADATA section for the layer. Each setting is named, and a value is given. For example "wms_name" is the setting, and the value is "modis,global_mosaic". These setting/value pairs are taken by MapServer and converted into the proper format to request the map image behind the scenes. Most of the settings are self-explanatory if you compare them to the earlier examples. The main difference is the use of "wms_name" to provide the list of layer names. Instinct might tell you to use something like "wms_layers", but that won't work. All the layers that you are requesting need to be set in the wms_name setting. Multiple layers are listed in one long piece of text, separated by a comma. Notice that you don't use any CLASS objects in a WMS layer. You can't change the way the WMS map is drawn unless you use another OGC specification called Styled Layer Descriptors (SLD). SLD allows you to request specific styling of a WMS layer if the WMS supports it. Using SLD is beyond the scope of this book. More information about using SLD with MapServer can be found at http://mapserver.gis.umn.edu/doc/sld-howto.html.
WMS is aimed at interoperability between applications; this includes MapServer and any other WMS-compliant mapping program. In the examples earlier in this chapter, you use MapServer as a client program to make requests from a WMS. The WMS is provided by a different web mapping package from MapServer. This is the power of WMS: application independence not being tied to one particular software package. It is the same when using MapServer as a WMS server; any other program that supports WMS can connect to it, and MapServer doesn't care. There are many other tools that can act as WMS clients. Here are a few:
12.3.1.4 Using MapServer as a WMS serverMapServer can also serve as a WMS server, allowing you to make your data available to others. There isn't a lot to it. You just need to add a few more settings to the map file, and then others can connect to your WMS with their applications. Two parts of the map file need to be modified to support a WMS. Some changes need to be made in the WEB section of the map file; other changes need to be made in the layers you want to make available. The WEB section defines some settings for the entire MapServer application. In this case, you add a few lines describing your application to external WMS clients. Example 12-5 shows what the WEB section looks like if you modify the global.map application. A full listing of global.map is shown in Example 12-13 at the end of the chapter. The highlighted sections were added to enable WMS server support. Example 12-5. Modifying the WEB class to enable WMS server capabilitiesWEB HEADER none TEMPLATE global.html FOOTER none IMAGEPATH "/srv/www/htdocs/tmp/" IMAGEURL "/tmp/" METADATA "wms_title" "My Global Map WMS Server" "wms_srs" "EPSG:4326" END END These values are used when a WMS client makes a GetCapabilities request to your server. It shows the title of your service and what projection it uses. The other place to make changes is at the layer level. Again, we modify the METADATA section of a layer to add a few settings. Most settings merely describe your layer in more detail so that external users can request appropriate information. Example 12-6 shows what the definition for the WMS-enabled layer looks like, with the modifications highlighted. A full map file is listed at the end of the chapter in Example 12-14. The global_mosaic WMS layer was removed as well as the labels for the country layer, to keep this example short and simple. Example 12-6. Making a layer available through WMS LAYER NAME countries TYPE POLYGON STATUS ON DATA countries_simpl MINSCALE 1000 MAXSCALE 1000000000 CLASSITEM 'NAME' CLASS NAME 'Bulgaria' EXPRESSION 'Bulgaria' STYLE OUTLINECOLOR 100 100 100 END END CLASS NAME 'All Countries' EXPRESSION ('[NAME]' ne 'Bulgaria') STYLE OUTLINECOLOR 100 100 100 END END METADATA "wms_title" "Country boundaries" END ENDThis layer makes the countries layer WMS-accessible. By setting STATUS ON, this layer won't be drawn by default. WMS clients won't want default layers every time; they'll want to pick and choose. MINSCALE and MAXSCALE settings prevent data from being used at unsuitable scales. If you don't set them, you may receive warnings. These warnings can be safely ignored, but it is good practice to set them anyway. In this example, it doesn't really matter, so the range is very broad. Just as with the WEB object, you insert a METADATA object containing a wms_title for the layer. This title is displayed in the capabilities document for your WMS. 12.3.1.5 Checking your own WMS capabilities documentOnce you have a WMS server up and running with the previous modifications to your map file, you can test it. The URL will point to the MapServer executable and the map file, using a request=GetCapabilities tagged on the end. The URL used to check is (again, all one line with no spaces) http://spatialguru.com/cgi-bin/mapserv? map=/maps/global.map&request=GetCapabilities&service=WMS. If you are running the example on your own computer, you need to replace http://spatialguru.com/ with your hostname, e.g., http://localhost/. You also need to give it the path to the map file you have built. You will get a lot of information back from the getCapabilities request, but all you need to know is that the layer you set up earlier is listed properly. It is in the XML file you downloaded using the earlier URL, shown here. The <Style> section was removed to show the main layer settings. ... <Layer queryable="0" opaque="0" cascaded="0"> <Name>countries</Name> <Title>Country boundaries</Title> <Style> ... </Style> <ScaleHint min="0.498903" max="498903" /> </Layer> ... Now someone else can request data from the WMS running on your web server. The first three lines describe the group the layers are assigned to in the map file. The second <Layer...> tag in the file starts the actual countries layer section, which is shown. Notice how a lot of information is provided about the layer, including SRS and BoundingBox. These were not explicitly set in the METADATA; MapServer provides these important pieces of information automatically. 12.3.2. Web Feature Service (WFS)Another increasingly popular service uses the WFS specification. It is implemented in several mapping applications; MapServer is just one example. WFS operates much like the WMS but has significant differences. With WMS, only a map image is returned to you; with WFS, actual feature data is returned to the client. The server sends back geographic coordinate data such as line, point, or polygon features. In MapServer, the features can then be drawn like any other layer because it has a copy of the data to work with. The process is more labor-intensive than WMS. WMS is desirable because MapServer just overlays other layers on top of the image; you'll like WFS because it offers more flexibility and can, optionally, save features into a usable data file. 12.3.2.1 Checking the capabilities of a WFS providerThe capabilities of a WFS can be determined through a URL request. Here's a simple one: The results are given back to you in an XML file, similar to the WMS capabilities document format. Portions of the document are listed in Example 12-7. Example 12-7. Sample WFS capabilities document... <Service> <Name>MapServer WFS</Name> <Title>ENVIRODAT - Atlantic Region Water Quality Chemistry Database</Title> <Abstract>ENVIRODAT is a repository of water quality information including chemical, physical, biological, and selected hydrometric data which are stored for surface, groundwater, wastewater, precipitation and various other water types</Abstract> ... <OnlineResource>http://map.ns.ec.gc.ca/envdat/map.aspx?</OnlineResource> ... <FeatureType> <Name>envirodat</Name> <Title>ENVIRODAT - Atlantic Region Water Quality Chemistry Database</Title> ... <SRS>EPSG:4326</SRS> <LatLongBoundingBox minx="-64.6622" miny="46.7594" maxx="-52.6808" maxy="55.2333" /> </FeatureType> The key pieces of information needed for this map file are the OnlineResource and the Name of the FeatureType. 12.3.2.2 Manually requesting data from a WFS sourceManual requests to a WFS source can also be made through a URL. Instead of getting a map back, you get an XML file with geographic and tabular data encoded in it. The file is in the OGC format, Geography Markup Language or GML. WMS gave you a map image back; WFS gives you raw data to work with. The URL looks similar to the WMS URL, but is often much simpler. Because WFS sends you raw data to work with, you don't need to send the service any information such as the size of your map or the image format. The following example shows how to use the wget command to grab data and put it into a file: > wget -O wfs_data.gml "http://map.ns.ec.gc.ca/envdat/map.aspx?service=WFS&version=1.0.0&request= GetFeature&typename=envirodat" Other services may be more strict, but this will at least get you started. The resulting file is 86 KB in size and over 2,000 lines long.
This file can be used as a GML data source in your map file, but with WFS, you don't need this manual step. Instead you can encode the details from the URL into a connection string in the layer definition. 12.3.2.3 Adding a WFS layer to a MapServer map fileAdding the WFS from the previous section as a layer in the map file is fairly simple, as shown in Example 12-8. The key parts are highlighted, and the rest are just settings that make the points look better on the map. Certain parts of the URL used in Example 12-8 are split into METADATA parameters, as with WMS. Example 12-8. Example map file layer that uses a remote WFS... EXTENT -64.6622 46.7594 -52.6808 55.2333 ... LAYER GROUP testing NAME wfs_test STATUS OFF TYPE POINT CONNECTIONTYPE WFS CONNECTION "http://map.ns.ec.gc.ca/envdat/map.aspx?" LABELITEM "envdat:Station_ID" CLASS STYLE SYMBOL 'circle' SIZE 10 OUTLINECOLOR 150 150 0 COLOR 250 250 0 END LABEL SIZE SMALL COLOR 255 255 255 POSITION UR END END METADATA "wfs_version" "1.0.0" "wfs_srs" "EPSG:4326" "wfs_typename" "envirodat" "wfs_request_method" "GET" "wfs_service" "WFS" END END
As shown in Figure 12-4, part of the global mapping application produces a map of water quality points in Newfoundland, Canada. The EXTENT for the map was changed so that the map would focus on an area within the WFS data source bounding box. Example 12-15 shows the complete map file for this WFS client test. Several items were added to improve appearance. Notice that the COUNTRIES layer was shaded, and the WFS layer was added to the end of the map file so that the points draw on top of the COUNTRIES layer. Figure 12-5 shows an example of a map with the WMS global_mosaic layer used earlier, in combination with the WFS layer and some local water and transportation layers. This shows just how well sources can be combined to provide valuable context. 12.3.2.4 Using MapServer as a WFS serverMapServer can be built to operate as a WFS server. It is then easy to make your vector data accessible to others. As with WMS, there are two places you need to add WFS settings. The first place to add settings is in the WEB...METADATA section. Example 12-9 shows the WEB section of the map file, with some WFS METADATA added. Figure 12-4. A map including water quality station points from a WFS data source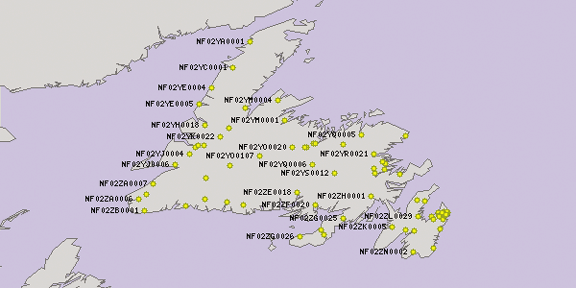 Figure 12-5. A map showing a combination of WFS, WMS, and local shapefile layers Example 12-9. Modifying the WEB class to enable WFS server capabilitiesWEB IMAGEPATH "/srv/www/tmp/" IMAGEURL "/tmp/" METADATA "wfs_title" "My Global WFS Map Service" END END The example shows the most basic settings possible, adding only a "wfs_title" parameter and a name value for the service. There are several other parameters you might choose to include. The EXTENT for the map file restricts any WFS request. In this example, set it back to a global extent (EXTENT -180 -90 180 90). If you keep the EXTENT used in the previous section, only features that overlap the EXTENT are returned. The MapServer OGC Web Services Workshop is a good resource for seeing more complete examples of a map file configured for WFS; see http://devgeo.cciw.ca/ms_ogc_workshop/index.html. For more information about these parameters, see the MapServer documentation for adding WFS support to your map files at http://mapserver.gis.umn.edu/doc/wfs-server-howto.html. Other changes need to be made for each LAYER you want to make available. Keep in mind that only vector data layers can be used for WFS. GML supports vector data types, not imagery; if you need to serve up images, you should be using WMS or WCS (see Table 12-1). Example 12-10 shows the countries layer with the changes required to make it WFS accessible. The full map file is shown at the end of the chapter in Example 12-16. Example 12-10. Making a shapefile layer available through WFSLAYER NAME countries TYPE POLYGON STATUS ON DUMP TRUE DATA countries_simpl METADATA "wfs_title" "Country Boundaries" END PROJECTION "init=epsg:4326" END END Notice how all the styling CLASS objects and some other settings have been removed. If you only want to make your data available through WFS, these objects aren't required because they aren't being mapped. Only the feature data is being sent back to the client. You can still have layers set up to draw maps, and serve up WFS or WMS data as well. Not all settings are made in the METADATA section. For instance, the DUMP parameter needs to be set to TRUE at the layer level. This gives MapServer permission to send raw data to those requesting it. Set this to FALSE for layers you don't want to share. The only required METADATA setting is "wfs_title". It is good practice to use a lot more metadata than shown in these simplistic examples. In fact, you can use it to store whatever metadata you want. Metadata describes your information so that users who aren't familiar with it won't expect more from it than it can provide. It is also a critical tool for large organizations because it keeps track of and manages their spatial data infrastructure. 12.3.2.5 Checking your own WFS capabilities documentTesting your WFS server is much easier than testing a WMS server, because very few parameters are required. Example 12-11 shows wget downloading the capabilities document URL for the previous example. Parts of the results of the capabilities document are shown as well. Example 12-11. Testing the WFS using a URL with the tool> wget -O wfscapabilities.xml "http://spatialguru.com/cgi-bin/mapserv?map= /maps/globalwfs.map&service=WFS&version=1.0.0&request=GetCapabilities" ... <Service> <Name>MapServer WFS</Name> <Title>My Global WFS Map Service</Title> <OnlineResource>http://spatialguru.com:80/cgi-bin/mapserv?map=/maps/globalwfs.map&</OnlineResource> </Service> ... <FeatureTypeList> <Operations> <Query/> </Operations> <FeatureType> <Name>countries</Name> <Title>Country Boundaries</Title> <SRS>EPSG:4326</SRS> <LatLongBoundingBox minx="-180" miny="-89.9999" maxx="180" maxy="83.6274" /> </FeatureType> </FeatureTypeList> ... Notice that the file is full of many entries automatically generated by MapServer, i.e., not part of the WFS METADATA object. MapServer even calculated the LatLongBoundingBox for you. It also created a Name element based on the layer's name setting, which is something else you can set in the METADATA section using the wfs_name parameter if you would like something different. To grab the data from the test layer you have to change the type of request to &request=GetFeature and add &typename=countries based on the FeatureType Name for the layer in the capabilities document. The URL and a piece of the data output from the request is shown in Example 12-12. Example 12-12. Testing the WFS by downloading feature data> wget -O countries.gml "http://spatialguru.com/cgi-bin/mapserv?map=/maps/ globalwfs.map&service=WFS&version=1.0.0&request=GetFeature&typename =countries" ... <gml:featureMember> <countries> <gml:boundedBy> <gml:Box srsName="EPSG:4326"> <gml:coordinates> -57.336025,54.494965 -57.245407,54.577198 </gml:coordinates> </gml:Box> </gml:boundedBy> <gml:polygonProperty> <gml:Polygon srsName="EPSG:4326"> <gml:outerBoundaryIs> <gml:LinearRing> <gml:coordinates> -57.336025,54.494965 -57.330402,54.563805 -57.245407,54.577198 -57.250492,54.506748 -57.336025,54.494965 </gml:coordinates> </gml:LinearRing> </gml:outerBoundaryIs> </gml:Polygon> </gml:polygonProperty> <gid>36354</gid> <cat>38</cat> <fibs>CA</fibs> <name>Canada</name> <f_code>FA001</f_code> <total>32507874</total> <male>16071958</male> <female>16435916</female> <ratio>97.799999999999997</ratio> </countries> </gml:featureMember> ... The list goes on and on, showing the data for every country polygon feature in the layer. GML is a vector format that OpenEV can read, so Figure 12-6 shows a map made to test the downloaded data. Country boundaries were put on top of an earth image, and then some clouds were added. Now this file can be zipped and emailed to somebody else or connected to as a WFS layer in another MapServer application. Figure 12-6. Map produced by OpenEV using the GML file downloaded from the WFS and some other imagery |

| < Day Day Up > |
EAN: 2147483647
Pages: 138
- The Effects of an Enterprise Resource Planning System (ERP) Implementation on Job Characteristics – A Study using the Hackman and Oldham Job Characteristics Model
- Intrinsic and Contextual Data Quality: The Effect of Media and Personal Involvement
- Healthcare Information: From Administrative to Practice Databases
- Relevance and Micro-Relevance for the Professional as Determinants of IT-Diffusion and IT-Use in Healthcare
- Development of Interactive Web Sites to Enhance Police/Community Relations