| In this exercise, you'll add a background graphic to a page. A background graphic can be a small graphic that tiles across your page by repeating itself to the extent of the width and height of the browser window. A tiled background graphic has no effect on the appearance of scroll bars (or lack thereof) on your page. You can also use larger images as background graphics and use Cascading Style Sheets (CSS) to control their placement, as well as whether they tile horizontally, vertically, both, or not at all. Background graphics will automatically tile in old browsers that do not support CSS. You can define both a background color and a background graphic for your pages. On slow connections or in older slower browsers, you might see the background color displayed firsta good reason to set a background color even if you plan on using a background image. After the background graphic loads, it remains onscreen, overriding the background color. Note In this exercise you'll work with XHTML files that have been created using the skills and techniques you learned in the previous lessons. If you want extra practice, you can re-create them using the starting pages as guides.
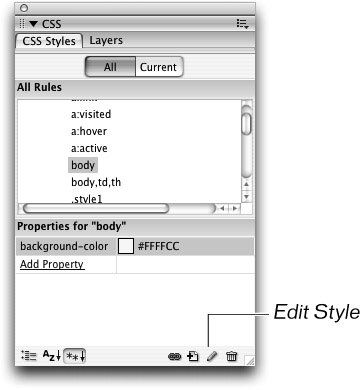
| | 1. | Open index.html from the Lesson_05_Graphics folder. From the All Rules list on CSS Styles panel, select the body rule from the sangha.css style sheet and click the Edit Style button in the bottom of the panel.
 This index.html document uses the sangha.css style sheet that you created in the previous lesson. To make the application of a background image available to other documents in the site, the style sheet must be edited. The body rule redefines the <body> tag, which contains the document's content.
When working on older sites you might come across documents that define attributes directly within the <body> tagthis method of specifying backgrounds and link colors is deprecated and should be avoided in favor of using style sheets as you are learning to do in this exercise.
Note You can also set a background image directly in an individual page through the Page Properties dialog boxthis method will create an internal style that is available only to the document to which it was applied. To do so, choose Modify > Page Properties and select the Appearance category. You can click the Browse button to locate the background image and select a repeat method if desired. Use the keyboard shortcut Cmd+J (Macintosh) or Ctrl+J (Windows) to access the Page Properties dialog box quickly. You can also control the margins of the page directly in the Appearance section as wellthis can be helpful if the amount of the margin is dependent upon the background graphic. Defining a margin in the document you are working with in this exercise for example, can prevent the text from overlapping the vertical bar on the left side of the page. You can also define page margins in external style sheets by defining the margin attribute of the body tag. | | | 2. | In the Background category, click the Browse button next to the Background image text field. Locate the ys_bkg_main.gif graphic in the Images folder of the Lesson_05_Graphics folder. Click Choose (Macintosh) or Select (Windows) to designate the image as the background for the page.
The Background category might be automatically selected because there is one attribute applied to the body tag already: the pale yellow background color, #FFFFCC.
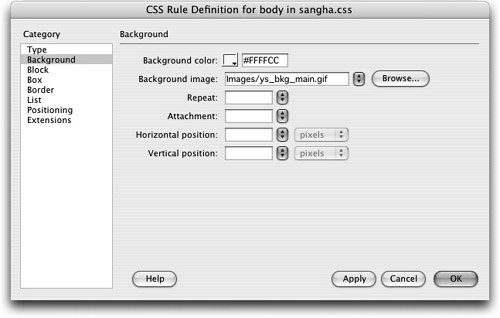 A path name, or path, describes the location of a file. The path to the ys_bkg_main.gif image is now displayed in the Background image text field; the location described by that path is relative to the sangha.css document. If you had not yet saved your file when you added the background image, the entire path name for the graphic relative to your hard disk would display in the text field. Until a file is saved, Dreamweaver has no way to make these kinds of references, so a path name based on the location of the image on the hard disk is substituted instead of a valid link. When the file is saved, the path name will update and change to reflect the location of the graphic relative to the document containing it. It is always best, however, to save your file before importing any graphicseven background images. Path names that are relative to your hard drive don't work on the remote server; if you insert graphics without first saving your page, you run the risk of having "broken" images. A path name, or path, describes the location of a file. The path to the ys_bkg_main.gif image is now displayed in the Background image text field; the location described by that path is relative to the sangha.css document. If you had not yet saved your file when you added the background image, the entire path name for the graphic relative to your hard disk would display in the text field. Until a file is saved, Dreamweaver has no way to make these kinds of references, so a path name based on the location of the image on the hard disk is substituted instead of a valid link. When the file is saved, the path name will update and change to reflect the location of the graphic relative to the document containing it. It is always best, however, to save your file before importing any graphicseven background images. Path names that are relative to your hard drive don't work on the remote server; if you insert graphics without first saving your page, you run the risk of having "broken" images.
Note If the image you select in the Select Image Source dialog box is outside of your local site, Dreamweaver displays an alert and gives you the option to copy the file into your site. The pages and elements (HTML, images, multimedia, and so on) that you use in your site will usually be located in your local root folder. You can also use elements that do not exist in your local root folder but are in a location on the Internet, whether on your own site or elsewhere, through the use of absolute paths (covered in Lesson 3)a technique that is often used for advertising banners. Because such items do not display in the Dreamweaver Document window, you need to preview your page(s) in the browser to view them. You can create a background graphic in an image editor such as Macromedia Fireworks or Adobe Photoshop. Keep in mind that large graphics can significantly add to a page's size and download timeuse smaller graphics whenever possible. The smaller your pages, the quicker they will load; the quicker your pages load, the more likely your visitors are to stay, browse, and return to the site.
Tip If you are considering several background images, you can click the Apply button to see the background image displayed on your page without closing the Page Properties dialog box. If you want to delete a background graphic, you can do so by opening the Page Properties dialog box and deleting the filename in the Background text field or by locating the background property for the page in the CSS panel's Properties list and changing or deleting the value.
| | | 3. | Choose repeat-y from the Repeat menu and click OK to close the Page Properties dialog box.
|
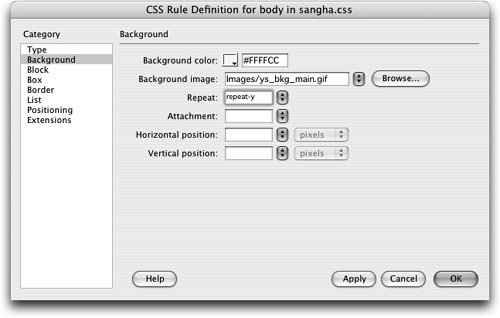 The changes you made are applied to the document, and the ys_bkg_main.gif background image now tiles vertically in the Document window. The background color you applied in the last lesson can be seen if you expand the Document window to the right, past the ending point of the background graphic. There are a number of options available for controlling the repeat property of the background image: repeat-y will tile the selected background graphic vertically repeat-x will tile the graphic horizontally repeat will tile the graphic both vertically and horizontally no-repeat will cause the image not to tile
By default, background images tile both horizontally and vertically unless you apply the repeat properties. The other options available are the following: Attachment allows you to specify whether the background image should be fixed or if it should scroll with the rest of the pagethis property is used with background images that do not repeat. Horizontal position and Vertical position allow you to control the position of the background image. Positioning can be done either by selecting options of left, center, or right for horizontal placement and top, center, or bottom for vertical placement, or by specifying a precise location with numeric values and a measurement unit such as pixels.
|