| You may have a PDF document supporting Picture Tasks and want to print some or all of the images to a desktop printer. Prior to printing you may also want to edit the pictures for contrast adjustment, cropping, compositing, adding text, or a host of other reasons. The Picture Tasks pull-down menu offers a quick and efficient way of exporting pictures and opening them in a program you use to edit photos.  | Use the hawaiianLuau.pdf file, which you can download from www.peachpit.com/adobereader7. |
To export and edit photos from a PDF document supporting Picture Tasks: 1. | Open a PDF document that supports Picture Tasks or the hawaiianLuau.pdf file in Adobe Reader.
| 2. | Select the Export and Edit Pictures command from the Picture Tasks pull-down menu. The Export and Edit Pictures dialog opens.
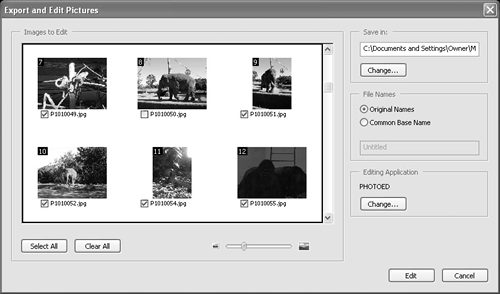
| 3. | Select the images you want to export and edit using the same selection procedures you use when creating slide shows and exporting pictures (Figure 9.10).
Figure 9.10. Click on the pictures you want to export and edit. 
| 4. | Create a target folder where the images are to be exported. Using the same procedure you used when exporting pictures, click the Change button and create a new folder. Note: If you want to use a common base name, follow the same procedure as when exporting pictures.
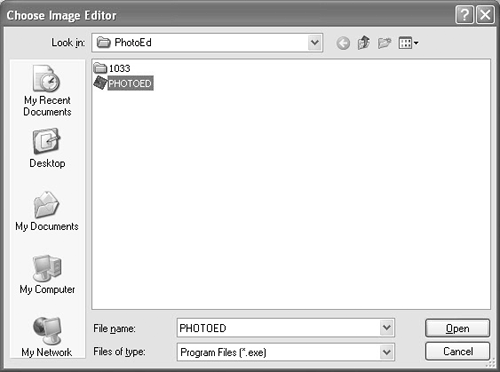
| 5. | Identify your image-editing application. Click the Change button in the Editing Application area and the Choose Image Editor dialog opens (Figure 9.11).
Figure 9.11. Select an image editor and click Open. 
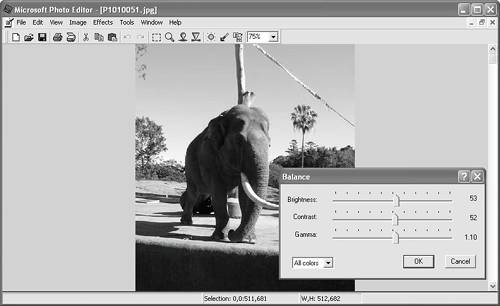
| 6. | If you want to apply effects, correct brightness and contrast, or make other edits, you can use a commercial image editor or the image editor installed with your operating system. In Windows use the Microsoft Photo Editor (Figure 9.12); on the Macintosh use iPhoto. Navigate your hard drive to locate the image editor you want to use. Select the application and click Open.
Figure 9.12. In Windows you can use the Microsoft Photo Editor to edit images for brightness and contrast, and add a number of different effects. 
| 7. | You return to the Export and Edit Pictures dialog. Click Edit, and the files open in the selected image editor.
| 8. | Edit the images as desired using the editing tools and menu commands in your image-editing program.
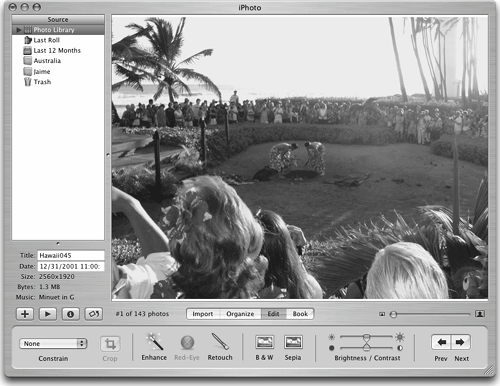
| 9. | On the Macintosh, open the exported images in iPhoto (Figure 9.13). iPhoto supports tools for adjusting brightness and contrast, retouching photos, removing red-eye, and changing color modes such as the Sepia toning applied in Figure 9.13.
Figure 9.13. On the Macintosh, use iPhoto to edit images exported from Adobe Reader. 
|
TIP If you use Adobe Photoshop CS or Adobe Photoshop Elements to edit your pictures, you can export from both programs back to a PDF slide show that can be opened in Adobe Reader. Both programs offer you more transition effects than Adobe Reader Picture Tasks.
|


