| If you fill in a form that doesn't have Adobe Reader usage rights enabled, you need to print the form to keep a record of the data. If a Submit button appears on the form, you can send the form data to the PDF author's URL or email address. The author determines the target destination. In Adobe Designer 7, PDF form designers create Email buttons designed to mail forms back to PDF authors. Notice that in Figure 19.11 a button on the top-right side of the form appears as Submit by Email. This form was designed in Adobe Designer 7. For forms enabled with usage rights, you can save the data added to the form without having to print copies for your personal records. Regardless of which type of form you work with, you fill out the form in the same way.  | Download the form f1040.pdf from the IRS Web site. Scroll the list of forms to find Form 1040 U.S. Individual Income Tax Return. Click the form name and then click the download link to open the file in your Web browser. Save the file from your Web browser to your hard drive. This form has been enabled with usage rights using the Adobe LiveCycle Reader Extensions Server. |
To fill in an Adobe PDF form: 1. | Open the f1040.pdf file.
| 2. | Press the Tab key. When no field is selected, the cursor jumps to the first field on the form
| 3. | Enter the date for the "tax period beginning" and press Tab.
| 4. | Continue adding data and tabbing from field to field to complete the identifying information for the Label.
| 5. | Close the document without saving.
| 6. | Reopen the document and fill in the same fields. If your Auto-Complete feature is functioning properly, you should see some fields completed as you type a few characters (Figure 19.12).
Figure 19.12. As you type form data with the Auto-Complete feature enabled, Adobe Reader provides you with suggestions below the field. 
| 7. | To accept a suggestion from the Auto-Complete response, press the down arrow key or press Tab if all the data are supplied in the Text box.
How do I change data suggestions using Auto-Complete? When Auto-Complete is active in the Preferences dialog, it records your responses. Responses are saved in an entry list of suggestions. As the list grows, there may be suggestions you want to eliminate that do not apply to the fields you edit. To delete items in the entry list, open the Preferences dialog by pressing Ctrl/Command+K. Click Forms in the left pane. Click Edit Entry List in the Auto-Complete section of the Forms preferences. The Auto-Complete Entry List dialog opens (Figure 19.13). Figure 19.13. You remove items from the entry list in the Auto-Complete Entry List dialog. 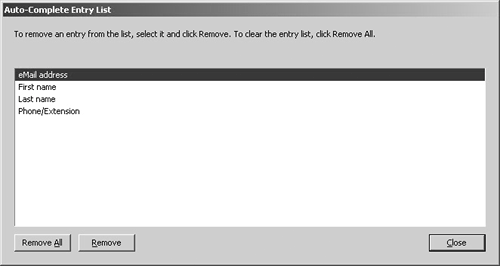
Select an item in the list and click the Remove button to delete the entry from the list. Continue deleting items you want to remove. Click Close and then click OK in the Preferences dialog. The entry list is modified and provides suggestions from the remaining items in the list. |
| 8. | Finish completing page one on the form. Type text in the text boxes and select the check boxes that apply to your situation. Fill in amounts for the Income and Adjusted Gross Income sections using arbitrary values.
| 9. | Select File > Save As. Provide a new name for the form, and save the file to your hard drive.
|
Can I print form data? You can print the PDF document containing all the data you added to the form. The printed document appears the same as what you see in the Adobe Reader Document pane. If you want to print just the data to a preprinted form, without printing the PDF form, you can't do it in Adobe Reader. To print just data without printing the form, you need Acrobat Standard or Acrobat Professional. |
|