| An insert edit is a technique that lets you insert just the video portion of one clip into another larger clip, while using the background audio from the larger clip. It's a useful technique in a variety of circumstances. You might shoot an entire song, for instance, so that you can create a music video composed of the original video shot with the song, plus video scenes pasted in from earlier or later shots. A good example of such a project is a music video I pieced together from footage from the aforementioned Fiddler's Convention, which I touched on in "Applying Basic Shot Composition" in Chapter 1. In this sequence, I introduce viewers to the entire spectacle of the event from the acres of trailers and tents to the capacious grandstands with thousands of attendees watching, listening, and dancing using the complete audio from one of the first songs I shot as the background music and video bits I shot later cut and pasted into the composite clip. Another useful application of the insert edit is to seamlessly shorten the duration of some aspect of an event, such as the opening and closing processionals at a wedding, graduation, or other ceremony. If you use the audio you captured at a wedding ceremony during the closing processional, for example, and then trim out segments when not much is going on or when no one is on camera, you can shorten the sequence dramatically, yet still retain the highlights. And because the audio plays continuously, no one will even notice. To lock the Audio track 1. | Drag the clip containing the background audio onto the Timeline (Figure 7.58).
Figure 7.58. Here's the clip containing the Music track I'm going to use for this music video. We'll be cutting out segments of video and replacing them with other scenes shot after this video. 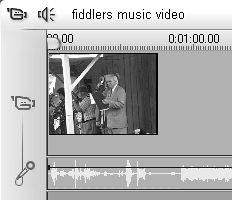
| 2. | At the far right of the Timeline, click the Lock the Main Audio Track button (Figure 7.59).
Figure 7.59. Click here to lock the Audio track. 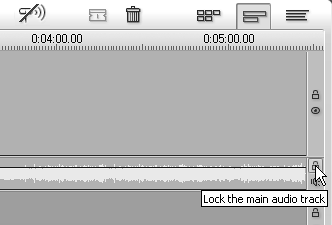
Studio turns the lock red and dims the Audio track (Figure 7.60). If you attempt to select this audio track thereafter, Studio posts the error message: "Can not select clip when track is locked" (Figure 7.60).
Figure 7.60. The locked Audio track is gray, and the lock at the far right shines a bit red. 
At this point, you can freely cut the video above the locked Audio track, and Studio won't snap the remaining video together to fill the gaps. You can paste in other video scenes, and Studio will ignore the audio associated with the pasted clip.
|
To insert video scenes into original video and audio 1. | Move the edit line to the target insertion point for the second video clip and split the clip by doing one of the following:
- Click the Razorblade icon at the top of the Movie window (Figure 7.34).
- Right-click the selected clip and choose Split Clip (Figure 7.35).
- Press the Insert key.
Studio splits the clip into two parts (Figure 7.61).
Figure 7.61. Split the clip at the first frame where you want to paste in another video scene. 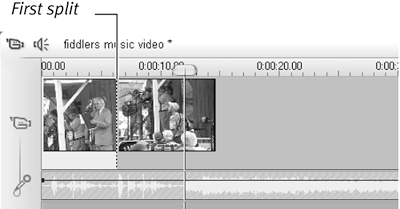
| 2. | Move the edit line to the approximate point at which the inserted clip should end and then create another split (Figure 7.62).
Figure 7.62. Next, move the edit line to the desired end point, and split the clip again to create a section you can delete. 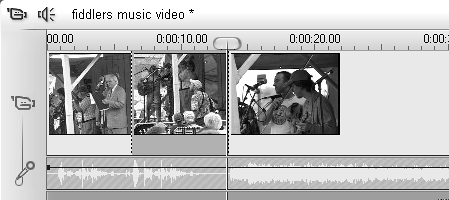
| 3. | Hover the pointer over the segment to be replaced and delete it by doing one of the following:
- Press the Delete key.
- From the Studio menu, choose Edit > Delete.
- Right-click and choose Delete.
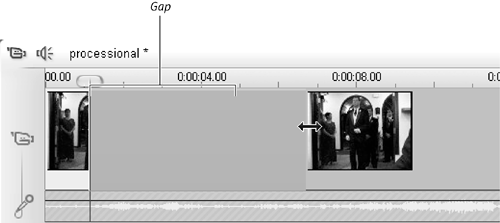
Studio deletes the segment (Figure 7.63).
Figure 7.63. Hover the pointer over the unwanted segment and delete it. You should see a gap like the one shown here. 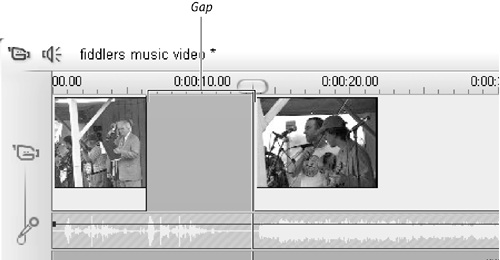
| 4. | Drag the segment to be inserted from the Album into the gap created by the deleted segment.
Studio inserts the segment (Figure 7.64).
Figure 7.64. Now drag in the desired segment. 
If the new segment is too large for the slot you created, Studio fits it into the slot. You can then use the trimming tools discussed earlier to resize all elements of the composite clip.
If the new segment is too small for the slot you created, manually close the gap by dragging the original clip segments to the edge of the inserted scene.
| 5. | Repeat Steps 1 through 5 until you've inserted all the clips you want in your video. When you've finished, your Timeline will look like Figure 7.65.
Figure 7.65. Here's the first minute of my music video, containing 11 different scenes. This amounts to a scene change about every 5 seconds, which definitely helps keep the viewer's interest. 
|
 Tips Tips
I use this insert technique to hide bad camera moments, such as when I'm moving the camera from subject to subject, or zooming in and out to frame a shot. It's generally easiest for me to go through the clip, excise all the bad camera spots, and then fill these gaps with other video scenes. If you plan on doing this type of cutting and pasting, it really pays to annotate your clips when you bring them into the Edit window (see "Working with Scene Comments" in Chapter 6). Annotating allows you to work much more efficiently by allowing you to quickly identify the scenes you want to insert. To make your music video look good, all the parts of the original video clip you retain must remain synchronized with the background audio. This isn't really relevant with the dancing and clapping scenes you insert, since there's almost no way to tell if they're synchronized or not, at least with foot-stomping country music or most other fast dancing. However, if the singer's lips are moving and you can't hear any singing, you've got a problem. Note that once you lock the Audio track, Studio will let you move the Video track above it, and if you do, you may lose synchronization. So be mindful of this when you're cutting, pasting, and trimming, and remember never to move the original video. To insert audio in the Audio track, you follow the same procedure, except that you need to lock the Video track first and then cut the Audio track. Of course, you can also drag the intended audio insertion to either of the other tracks and then mute the Audio track (see "Using the Volume Tool" in Chapter 11). You can easily insert a still image into a video clip: just drag the image to the Title track and resize it (see "To change the duration of a still image on the Timeline," later in this chapter). You can lock any track or combination of tracks except the Menu track, which appears when you're creating DVD menus. Get in the habit of unlocking tracks immediately after performing any edits that require locked tracks. Otherwise, when you try to select a clip track later, nothing will happen, and you'll see the error message shown in Figure 7.60.
To shorten a wedding processional 1. | Load the video clip that contains the processional.
| 2. | Lock the Audio track (see "To lock the Audio track" earlier in this section).
The clip should appear as in Figure 7.66.
Figure 7.66. Here's the scene containing the entire processional I want to transparently condense. I've already locked the Audio track. 
| 3. | Move the edit line to the end of the first sequence and split the clip by doing one of the following:
- Click the Razorblade icon at the top of the Movie window (Figure 7.34).
- Right-click the selected clip and choose Split Clip (Figure 7.35).
- Press the Insert key.
Studio splits the clip into two parts (Figure 7.67). As you can see in the Player at the upper right, the bride and groom have walked past the camera. Now it's time to find a starting point for the next group to walk back up the aisle.
Figure 7.67. The first usher has already walked by me, so most likely it's time to delete some video. Start by splitting the clip just after the usher leaves the camera view. 
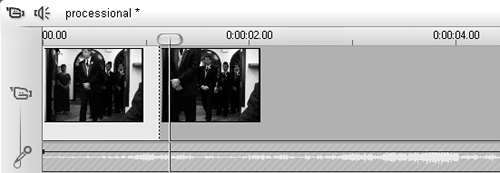
| 4. | Drag the starting point of the second clip to the first frame of the next group to come down the aisle (Figure 7.68).
Figure 7.68. No use watching the ushers just standing there waiting. Delete this footage by clicking the second clip and dragging the clip to the start of the next usher to walk back up the aisle. This creates a gap in the video that you'll fill in a moment. 
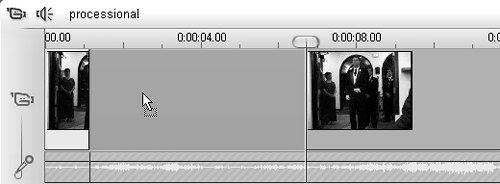
| 5. | Drag the entire second clip to the left until it abuts the initial clip (Figure 7.69).
Figure 7.69. Here I'm dragging the second clip to abut against the first. This shaves only about 6 seconds, but multiply that times the number of bridesmaids, ushers, and family members plus time spent waiting for the blushing bride and it can add up to significant time savings. 
| 6. | Repeat Steps 3, 4, and 5 for each group in the processional. At the end of the exercise, your Timeline should look like Figure 7.70.
Figure 7.70. Repeat as necessary. Here I shaved two minutes off the processional time and no one in the audience will notice a thing because the audio is continuous. 
This example shaved almost a minute off the sequence, and the trick is totally transparent to the viewer.
| 7. | Unlock the Audio clip.
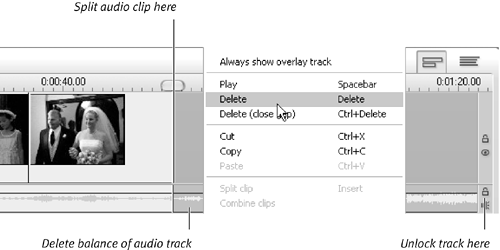
| 8. | Move the edit line to the end of the video and split the audio clip using one of the techniques discussed in Step 3.
Studio splits the audio clip (Figure 7.71).
Figure 7.71. Now unlock the audio clip, split it at the end of the processional, and delete the excess. 
| 9. | Select and delete the second (unneeded) audio clip.
For details, see the "To delete assets" tasks earlier in this chapter.
|
 Tips Tips
When performing these types of edits, consider inserting a short (like 0.5 seconds) dissolve transition between the clips to smooth the visual flow. See "Using Transitions" in Chapter 8 for more details. With most processional videos, you'll probably have to drag the audio backward or forward so that "Here Comes the Bride" sounds as she starts walking down the aisle.
|


 Tips
Tips
