| Now that the hardware side is squared away, it's time to start working on the software side by first selecting your capture source and then setting and adjusting your capture parameters. To select your capture source 1. | Run Studio and enter Capture mode by selecting the Capture tab at the upper left of the screen (Figure 4.1).
| 2. | From the menu bar, choose Setup > Capture Source (Figure 4.12).
Figure 4.12. Getting to the Capture Source screen. 
The Pinnacle Studio Setup Options dialog box appears.
| 3. | In the Video Capture Devices drop-down menu, select your analog video capture device (Figure 4.13).
Figure 4.13. Choosing your analog video capture device. 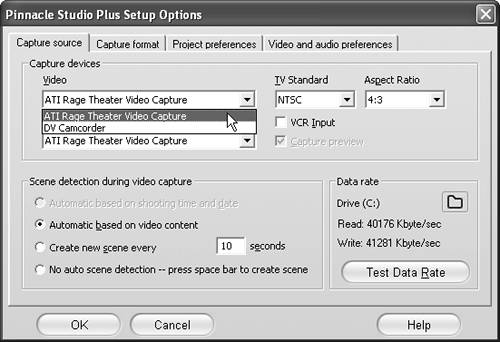
| 4. | In the Audio Capture Devices drop-down menu, select your analog audio capture device (Figure 4.14).
Figure 4.14. Selecting your analog audio capture device. Remember to use Line In! 
| 5. | Select the desired scene-detection option.
Remember that the option Automatic Based on Shooting Time and Date is unavailable because analog tapes don't store this information.
| 6. | Click OK to return to Capture mode.
If your analog capture card has audio input, it should be one of the listed options. Since in this example the system's sound card is used, Line In is selected on the SoundMax sound card.
At this point, you should be in analog Capture mode, and your screen should look identical to Figure 4.1.
|
 Tips Tips
If the video and audio capture controls are not open, open them by clicking the icons on the sides of the Diskometer (Figure 4.1). If you see the Camcorder Controller, you're in DV Capture mode. Go back and reselect your capture source (Step 3 in the preceding task). If your analog capture source appears in the drop-down menu, it's properly loaded and running under Windows. If it's not listed, it's not properly installed, and you have some work to do before you can start capturing. Go back to "Connecting for Analog Capture" earlier in this chapter and try again.
To configure your capture parameters 1. | Open the Studio Setup Options dialog box set to the Capture Format tab by doing one of the following:
- Click the Settings button on the Diskometer.
- From the Studio menu, choose Setup > Capture Format (Figure 4.15).
Figure 4.15. Getting to the Capture Format screen via the Setup pull-down (or you can just click the Capture Format tab in the Setup Options screen). 
The Capture Format tab appears (Figure 4.16).
Figure 4.16. For more information on these settings, read the sidebar "Navigating Your Analog Capture Format Options." 
| 2. | Choose the appropriate preset Good, Better, or Best for your project.
Studio also offers a Custom option that lets you customize capture options at will. See the sidebar "Navigating Your Analog Capture Format Options" for assistance with selecting the best preset or customized parameters.
| 3. | Click OK to return to the capture interface.
|
Navigating Your Analog Capture Format Options The most critical options to consider during analog capture are the video resolution, or the width and height of the captured video in pixels, and the frame rate, or number of frames per second (fps) captured. For example, when you capture at a resolution of 320 x 240 pixels, you produce a captured file that's 320 pixels wide and 240 pixels high. Similarly, when producing an MPEG-1 file that requires 29.97 fps, you must capture at this frame rate. When determining the best resolution to use during capture, the most important factor is your intended output resolution. For example, suppose you intend to create a DVD using MPEG-2. This high-quality format generally outputs at a resolution of 720 x 480. In contrast, MPEG-1 files, typically used for posting to the Web or sharing on CD-ROM, generally have a resolution of 320 x 240. If you're creating a RealVideo file to post for streaming at modem speeds, the resolution may be as low as 176 x 120. The general rule for selecting capture resolution is always to capture at the exact output resolution whenever possible. If not, capture at the next available higher resolution. Similarly, for frame rate, the general rule is to capture at the exact output frame rate. Although all capture devices use different Good, Better, and Best presets (and sometimes name them slightly differently), those in ATI's All-in-Wonder capture card provide an example. Good: 176 x 120 at just under 14.985 fps. Use this preset for all streaming output when your target audience is primarily on dialup modems. Better: 352 x 240 at 14.985 fps. This preset has little use, primarily because it captures at 14.985 fps, which is insufficient for the 30 fps used by MPEG-1. To capture for AVI video or for MPEG-1 video displayed on a computer (as opposed to a television set via Video CD), I would customize the capture parameters to 320 x 240 at 30 fps. To produce VideoCD discs for display on TV sets, I would use 354 x 240. Best: 720 x 480 at 29.997. Use this for MPEG-2 and DVD projects.
|
Adjustments Defined Here are definitions for the analog capture adjustments that Studio provides. Precise controls vary by capture device. Hue: This is the visual property that allows you to distinguish colors. The slider biases all the colors in a clip toward red (left) or green (right). This can be especially useful for correcting flesh tones. Saturation: This is the quantity of pure color, ranging from zero (no color at all, or grayscale) to fully saturated (the maximum color intensity your output system can deliver). Move the slider to the left for a tonally reduced, washed-out look, or to the right for extra vibrancy. Brightness: This is the relative intensity of light, without regard to color. Try adjusting both brightness and contrast to correct video that is underexposed or overexposed. Contrast: This is the range of light and dark values in a picture or the ratio between the maximum and minimum brightness values. Moving the slider to the left lowers contrast, forcing all areas of the image toward medium brightness values. Moving the slider to the right increases contrast, making dark areas darker and bright areas brighter. Sharpness: Increases the contrast of edges in the image, making them appear sharper.
|
To capture audio and configure video input 1. | At the top of the Video Options tab (Figure 4.1), select the icon that corresponds to your physical cable connection (in this case, S-Video).
| 2. | At the top of the Audio Options tab, choose the On button to enable audio capture, to make sure that the audio is up and running.
Once you know it's working, you can disable it if you want by choosing the Off button.
| 3. | The moment of truth has arrived. Press Play on your camcorder.
You should see video in the Player and hear audio over your speakers. If you do, you've jumped a significant hurdle. Now you're ready for analog capture.
If you don't get video and audio right away, take heart. I've installed hundreds of capture cards and rarely gotten it right the first time. Run through the steps in this and the previous task one more time. If you still have no signal, check your capture card installation.
|
|