Pinnacle Studio 10 for Windows. Visual QuickStart Guide
Authors: Ozer J
Published year: 2005
Pages: 44-45/189
Buy this book on amazon.com >>
 < Day Day Up > 

Choosing Your Capture Format

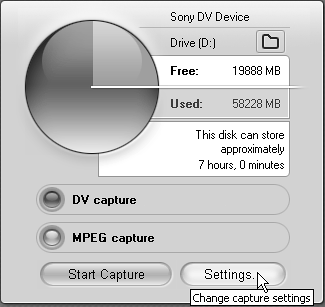
The previous exercise explained how to capture in DV format, which is appropriate for the vast majority of users and projects. However, when you are capturing DV video from a DV camcorder, Studio gives you one additional option: MPEG full-quality capture.

MPEG Full-Quality Capture. Capturing using the MPEG option saves file space and production time if you're producing a DVD, VideoCD (VCD), or Super VideoCD (SVCD) project with MPEG video.

However, the algorithm that Studio uses to encode MPEG during capture is optimized for speed, not quality, so that Studio can store the video to disk in as near to real time as possible. In contrast, when Studio outputs to MPEG format during final project rendering, say for DVD production, the algorithm is optimized for quality, not speed.

Note also that when you insert effects such as transitions, titles, or color correction into captured MPEG video, Studio implements the effects and then re-encodes the affected portions of the video into MPEG format. So if your edits affect substantial portions of the video, your production-time savings will be minimal. In addition, the edited sections are encoded in MPEG format twice—once during capture and once during rendering—which is the digital equivalent of photocopying a photocopy. Also, if you choose a capture bitrate (or quality setting) that ends up being too high to fit all the video you produce for DVD on your disc, Studio will also have to re-encode your video at the lower rate, again negating your time savings.

So unless you're extremely short on hard disk space or expect your edits to be minimal—and production time is absolutely critical—you should capture in DV format and then render in MPEG format after editing. This approach will maximize production quality, even as it may extend production time.

This leaves DV video as the best capture format for virtually all projects.

To choose your capture format

  • On the Diskometer, click the button for the desired capture format ( Figure 3.21 ).

    Figure 3.21. Click the Settings button to access your MPEG configuration options.


    • The light to the left of the button lights up.

    • If you choose DV Full-Quality Capture, you're all set; there are no other options to select.

    • If you choose MPEG Full-Quality Capture, you need to set several options before capture. (See the following section for more information.)

 < Day Day Up > 
 < Day Day Up > 

Capturing DV Video to MPEG Format

The most obvious time to capture directly into MPEG format is when you're creating projects using MPEG-formatted video, such as in DVDs, VCDs, and SVCDs. Studio simplifies these captures with presets that deliver the properly formatted video for each project.

However, remember that during MPEG capture, Studio defaults to an encoding algorithm optimized for encoding speed rather than quality, so quality will be optimized if you capture with DV and encode in MPEG format during final rendering.

In addition, remember that if your edits affect significant portions of the video in the project, you will have to re-render these anyway before producing your disc. If this is the case, capturing in DV format will produce better overall quality with minimal increase in production time.

Knowing all of these caveats, if you still want to capture in MPEG format, here's how.

To capture DV video in MPEG format

1.

Open the Pinnacle Studio Setup Options dialog box to the Capture Format tab by doing one of the following:

  • From the Studio menu, choose Setup > Capture Format (Figure 3.21).

  • In Capture mode, click the Settings button on the Diskometer.

2.

Click the text in the first list box in the Presets section and confirm that MPEG is the chosen option ( Figure 3.22 ).

Figure 3.22. Choose the preset format for your project.


3.

In the second list box in the Presets section, choose one of the following options:

  • If encoding for a DVD project, choose High Quality (DVD).

  • If encoding for an SVCD project, choose Medium Quality (SVCD).

  • If encoding for a VCD project, choose Low Quality (VideoCD).

  • If you want to customize your encoding settings, choose Custom (but be sure to read the following tips first).

4.

Click OK to close the Pinnacle Studio Setup Options dialog box.

5.

If you're not in Capture mode, click the Capture tab.

6.

Use the Camcorder Controller to move the DV tape in the camera to the desired starting point.

7.

Click the Start Capture button on the Diskometer.

The Capture Video dialog box opens, and the Start Capture button changes to Stop Capture.

8.

If you desire , change the duration of the video capture and/or change the name of the captured file.

9.

Click the Start Capture button in the Capture Video dialog box to start capturing.

10.

If the error message appears (refer to Figure 3.18), do one of the following:

  • Click Yes to overwrite the file and start the capture.

  • Click No to return to the Capture Video dialog box and rename the file. Then click Start Capture.

Your DV camera starts playing, and capture begins.

11.

Allow capture to proceed through the specified duration or, to stop capture before then, do one of the following:

  • Click Stop Capture on the Diskometer.

  • Press the Esc key on your keyboard.

Unless you have a fast computer, it may take Studio a while to compress the DV footage into MPEG format, and you'll see a message like the one shown in Figure 3.23 .

Figure 3.23. On all but the fastest computers, Studio requires a few moments to finish encoding after you stop the tape.


After encoding stops, a file labeled Video 1 (or whatever name you may have chosen) appears in the Album. You'll see multiple files if any scene changes occurred in the source video during the capture.

Supported Capture Formats

In Studio 10, Pinnacle added support for HDV camcorders, a nice addition, as well as the ability to retrieve video from DVDs, a capability documented in "Importing Content from DVDs," in Chapter 6.

Pinnacle dropped support for the MMV format, which was used solely by Sony's small line of MicroMV camcorders. If you have one these camcorders, your options are to capture digitally using a different program or to capture using your camera's analog outputs.


Tips

  • Don't modify the MPEG capture parameters at the lower right of the Capture format screen (Figure 3.22), since this could lead to dropped frames . In default mode (Use Default Encoding Mode), Studio chooses the optimal mode (either Encode in Real Time, or Encode After Capturing), based upon your computer's CPU and the data transfer rate of your hard disk.

  • The Custom option mentioned in Step 3 should be used only by advanced users, since it presents additional encoding controls unfamiliar to most users.

  • If you're capturing video to include on DVD, VCD, or SVCD, stick to the presets and avoid the custom settings. These optical formats define video parameters very tightly, and custom settings could render your video files unusable in these projects.

  • If you're using the same captured video in different types of projects—for instance, to create both a DVD and VCD—use the lowest -common-denominator format. For instance, DVDs can incorporate video encoded for VCD and SVCD, but VCDs can't integrate video encoded for SVCD or DVD.

  • If you're capturing video in MPEG format simply to distribute it on CD-ROM or via the Internet, note that virtually every computer on the planet can now play back MPEG-1 files, since MPEG-1 decoders have been standard on Windows and Macintosh computers for years . However, MPEG-2 decoder capabilities are much less prevalent and generally not available for free. Thus, MPEG-1 is a much better format for general sharing.


 < Day Day Up > 
Pinnacle Studio 10 for Windows. Visual QuickStart Guide
Authors: Ozer J
Published year: 2005
Pages: 44-45/189
Buy this book on amazon.com >>

Similar books