Using Edit Mode
| < Day Day Up > |
| When you first enter Studio, you're in Edit mode (Figure 2.6), where you'll spend the bulk of your time. Capture mode and Make Movie mode, accessible via tabs at the upper left of the screen, enable their namesake activities. Figure 2.6. When you first run Studio, you're in Edit mode, where you'll spend most of your time.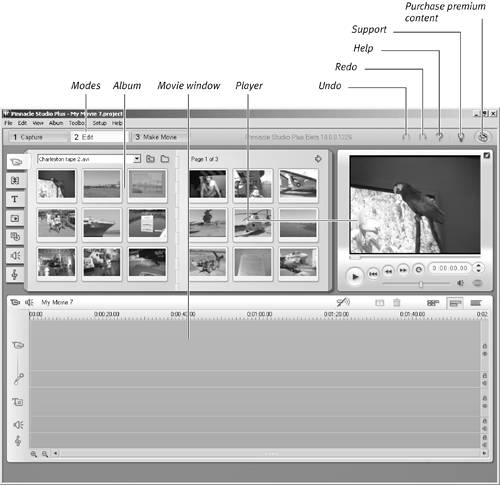 The Edit mode interface is composed of three windows: the Album, the Player, and the Movie window. While in Edit mode, you have access to Undo, Redo, and Help buttons at the upper right of the screen. The AlbumThe Album consists of seven windows, which you can select using the icons on the left panel (Figure 2.7). Three of these windows are for collecting video, audio, and still image files so that you can include them in a project (for details on how to do this, see Chapter 6). Figure 2.7. Use the tabs on the left side of the Album to navigate among the various content types.
The other four windows contain libraries of effects supplied by Pinnacle, offering transitions, titles, sound effects, and disc menus. For information on how to apply and customize these, see Chapters 8, 10, 11, and 12, respectively. The PlayerThe Player is where you preview content and effects contained in the various albums, as well as your editing progress in the Movie window (Figure 2.8). Click the DVD icon at the lower right, and you convert the Player into a DVD playback remote control for previewing your DVD titles. Note that this icon doesn't become active until you've added a DVD menu to your project (more on DVD authoring in Chapter 12). Figure 2.8. Polly want a cracker? The Player has the usual VCR-like playback controls, plus a scrubber that lets you manually move through the video files. The DVD button transforms the Player into a DVD remote control (see Chapter 12). In Studio, you can toggle to full-screen preview by clicking the arrow key at the upper-right corner of the Player, returning to the main screen by pressing Esc on your keyboard. As we'll see in "Setting Up a Dual-Monitor Display," later in this chapter, the arrow key also toggles between preview in the Player and preview in a second monitor. Note that you can't detach or enlarge the Player, because like all interface components, it's fixed, for simplicity. Since the Player is integral to virtually all editing operations, its use is discussed in most of the chapters in this book. The Movie windowThe Movie window has three views Timeline (shown in Figure 2.6), Storyboard, and Text (called Edit List view in the Studio menu) that you toggle using controls in the upper-right corner of the Movie window (see Figure 2.9). See Chapter 7 to learn how and when to use these modes. Three icons, the Enable Audio Scrubbing (to hear audio as you drag your cursor through the clip), the Razorblade (for splitting clips), and the Trash Can (for deleting clips), are available in all three modes. Figure 2.9. You can easily switch among the Timeline, Storyboard, and Text views of the Movie window. Note the omnipresent Razorblade, for splitting your videos, and the Trash Can, for deleting them.
Video toolbox. In the upper-left corner of the Movie window is a Camcorder icon (Figure 2.10), which you click to open the Video toolbox (Figure 2.11), revealing seven editing functions. Figure 2.10. The Camcorder icon opens and closes the Video toolbox.
Figure 2.11. The editing tools in the Video toolbox.
The Video toolbox offers the following functions:
You can click through the various options at will; click the Camcorder icon or the X in the upper right of all tools to close the Video toolbox. When I first started using Studio, the controls located in this tab were the ones I "lost" most often. You might click this window open and shut a few times to burn the location of these critical controls into your mind. Audio toolbox. If you hover the cursor over the right side of the toolbox, Studio reveals a Speaker icon in the upper-left corner of the Movie window (Figure 2.12). You can click this icon to open the Audio toolbox, which contains its own set of unique tools (Figure 2.13). Figure 2.12. The Speaker icon opens and closes the Audio toolbox.
Figure 2.13. The editing tools in the Audio toolbox.
The Audio toolbox provides the following functions (see Chapter 11 for more information):
|


 Tip
Tip| < Day Day Up > |
EAN: N/A
Pages: 189