| As the name suggests, Windows Media Video is Microsoft's video compression technology. To play files encoded in this format, viewers need Microsoft's Windows Media Player, which ships with all Windows computers and is freely downloadable at www.microsoft.com/windowsmedia. Microsoft offers players for all relevant Windows flavors and Macintosh (8.01 to OS X), but no Linux or Unix version (quel surprise!). Like the RealNetworks technology, the Microsoft technology can produce files that support multiple-bitrate connections, but only when streaming from a Windows Media server (which is available only for Windows XP) or from a RealNetworks Helix server. Microsoft's most recent release of Windows Media 9 supports multiple-resolution files within the multiple bitrates, but if you're working at this level, you should use Windows Media Encoder, not Studio. Studio is a great tool for casual Windows Media encoding, but doesn't expose all relevant encoding controls and doesn't support real-time encoding. To create Windows Media files 1. | After completing your project, click Make Movie at the top of the Studio interface. Then, at the left side of the Make Movie panel, click File (Figure 14.8).
| 2. | Click the Format drop-down list, and choose Windows Media (Figure 14.20).
Figure 14.20. Getting started with Windows Media. 
| 3. | Below the Status box, click the Settings button.
The Pinnacle Studio Setup Options dialog box opens with Windows Media as the File Type (Figure 14.21).
Figure 14.21. Here's the main Windows Media encoding screen. 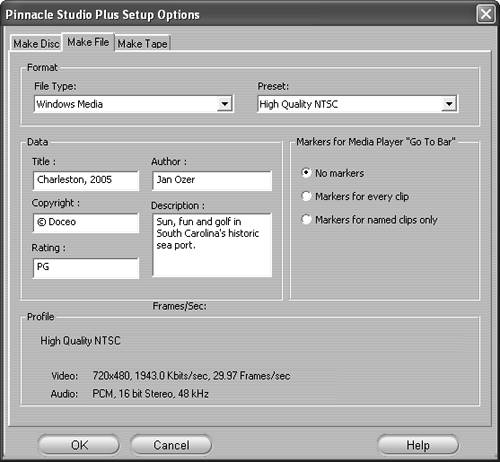
| 4. | Type information in the Title, Author, Copyright, Rating, and Description boxes.
This information will appear when the file is played (Figure 14.22). If the video is posted to a Web site, the description will be used to categorize the video by Internet search engines.
Figure 14.22. Windows Media Player displays author and content information in the Properties screen. 
| 5. | In the Preset drop-down list, select one of the following:
- Any preset other than Custom, and proceed to Step 6 (Figure 14.23).
Figure 14.23. Either choose a Preset here, or go Custom. 
- Select Custom, and proceed to Step 5.
Studio opens the Profile drop-down list (Figure 14.24).
Figure 14.24. If you choose the Custom route, select your Profile here. 
| 6. | In the Profile drop-down list, select the target profile.
| 7. | In the Markers for Media Player "Go To Bar" section, select the desired option (Figure 14.25).
Figure 14.25. File markers are definitely cool for longer videos. 
If you insert markers in the clip, viewers can jump to these markers using a menu in Microsoft's Windows Media Player (Figure 14.26).
Figure 14.26. Markers let your viewers jump to the scenes they really want to see in your video. 
If you enable markers and don't name your clips, Studio will enter a default name based on the project name and clip start point.
To name your clip, open it in the Clip Properties tool and enter the desired name in the Name field (Figure 14.27). See "Trimming with the Clip Properties Tool" in Chapter 7 for more information on the Clip Properties tool.
Figure 14.27. Windows Media markers are the only reason I know for naming your clips in the Clip Properties tool. Enter the name in the Name box on top of the Clip Properties tool. 
| 8. | Click OK to return to the Make Movie window (Figure 14.11).
| 9. | At the bottom of the Status box, click Create File.
Studio opens the Save File As dialog box (Figure 14.12).
| 10. | Type the file name and change the location if desired.
| 11. | Click OK to close the dialog box.
Studio starts encoding. You should see the Timeline scrubber moving through the video, the video updating in the Player, and progress in the bars beneath the Player window (Figure 14.13).
| 12. | To play the video after encoding, click the Windows Media Open File button in the Make Movie window (Figure 14.14).
|
What About HD? Okay, so you bought the Sony HDR-HC1 or maybe even the HDR-FX1 (you lucky dog), and you're happily shooting in HD. You know you can only produce standard-definition DVDs in the short term, but you want to view high-resolution files on your computer. What output format should you choose? Well, by now you must be thinking that I wake up every morning reciting "Use Windows Media," but to paraphrase Ronald Reagan, "Here I go again." Though you can produce HD files in MPEG-2, Windows Media produces better video at a lower data rate. As shown in Figure 14.28, there are even presets to simplify the process. Both of the Sony camcorders mentioned above record 1080/60i video (1080 lines of horizontal resolution, 60 interlaced fields of video per second), so use that preset to output your files. My tests confirmed that Studio delivered the promised 5 Mbps data rate with very good quality. Other HDV camcorders record at 720/30p (720 lines, 30 noninterlaced frames per second); use this Windows Media preset to reduce the data rate to a cozy 4 Mbps. Figure 14.28. Your best bet for exporting HDV at either of its native resolutions is Windows Media. Definitely use the presets. 
In my tests with a Beta version of Studio, it did not successfully downsample a 1080i file to 720p, though it produced several other non-HD files (like Windows Media, High Quality NTSC) without a problem. If you can't successfully play 1080i files on your computer, you might try downsampling to 720p and see if it's working. If not, use the High Quality NTSC preset. |
|