Flylib.com

Books Software


Creating DVD Menu Templates

 < Day Day Up > 

Creating DVD Menu Templates

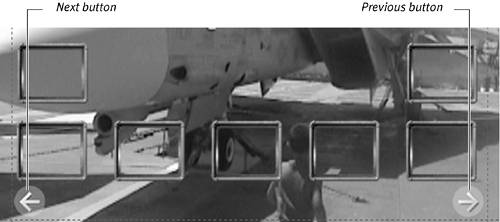
One of Studio's coolest features is its menu template function. You can create menu templates that Studio automatically populates when you add videos to the Timeline. Through your work in the previous section, "Working with Multiple Objects," the template is almost complete.

A complete template has three components : buttons for linking content, Next buttons, and Previous buttons. These allow Studio to automatically create menus and controls for navigating. Text and cute backgrounds are nice but not required. Our template-in-progress already contains the buttons for linking content; you will now see how to add the Next and Previous buttons.

See Chapter 12 for more on DVD menus.

To use existing Next and Previous buttons in your template

1.

Browse the Buttons Album until you find suitable buttons with the words next or previous in the name ( Figure 10.90 ).

Figure 10.90. To complete the template menu, you need Next and Previous buttons.


2.

Drag the buttons to the desired locations ( Figure 10.91 ).

Figure 10.91. Drag the Next and Previous buttons to the desired locations.


To create your own Next and Previous buttons

1.

Create the desired text or object.

2.

Open the drop-down menu at the top of the Buttons Album and choose Next Button ( Figure 10.92 ).

Figure 10.92. You also could use any object as a Next or Previous button and simply assign it the appropriate value.


3.

Repeat Steps 1 and 2 to create the Previous button.

To save a menu as a template

1.

From the File menu, choose File > Save Menu As.

Studio opens the Save Menu As dialog box.

2.

Name the file and save it in the Program Files > Pinnacle > Studio 10 > Menus > My Menus folder ( Figure 10.93 ).

Figure 10.93. Save the template.


Studio should default to this menu location; you should need to hunt for it only if you've saved menus before in another location.

 < Day Day Up > 
 < Day Day Up > 

Creating Rolls and Crawls

After all this work, there's only one way to close this chapter: with "The End" rolling onto the screen, or crawling across the screen—you pick. The grandparents are screaming for this DVD.

With rolls, you place the title object where you want it to end up, and Studio moves it from off-screen at the bottom of the window to the specified location.

With crawls, Studio moves the title object from off-screen on the right to off-screen on the left. You set the object at the desired height, and Studio does the rest.

To create a rolling title

1.

In the Title editor, position the title object at the desired stopping point ( Figure 10.94 ).

Figure 10.94. The perfect way to end this chapter: a rolling "The End" title.


2.

Among the title-type buttons at the upper left, click the Roll icon.

Studio produces the effect, which you can preview only in the Movie window.

To create a crawling title

1.

In the Title editor, position the title object at the desired height.

2.

Among the title-type buttons at the upper left, click the Crawl icon (Figure 10.94).

Studio produces the effect, which you can preview only in the Movie window.

Tips

  • To make the title roll or crawl more slowly, simply make the title longer by dragging it on the Timeline or entering a longer duration in the Title editor as shown in Figure 10.12.

  • You can easily mix effects—for instance, a scrolling title that fades to black—by placing two titles sequentially on the timeline. Be sure that the text in the second title aligns precisely with the stopping point of the text in the first title. Make this happen by copying the first title, pasting it into the Timeline next to the first title, and then reversing the motion on the second clip as described in the following tip.

  • To reverse a crawl or a roll and convert back to a static menu, click the Title icon among the title-type buttons (Figure 10.94).

  • Menus (that is, titles with buttons) can't roll or crawl.

  • Studio includes a "The End" title in the Titles Album, which provides the easiest way to create this effect.


 < Day Day Up >