Video Compression Basics
| < Day Day Up > |
| We covered basic file parameters in Chapter 4, but now it's time to apply them, so let's review. Any time you encode a file, you'll choose a number of output parameters. Figure 7.1 presents many of these parameters in a screenshot from Sorenson Squeeze. This is a popular encoding program used by many producers, particularly those producing multiple files in multiple distribution formats such as MPEG-2, RealVideo, Windows Media, QuickTime, and MPEG-4. Figure 7.1. Encoding parameters from Sorenson Squeeze 3.5, a easy to use high-quality encoding tool.From a workflow perspective, producers using Squeeze typically output video from their video editors in DV format, and then import these files into Squeeze to produce video in the ultimate target format. If you're encoding directly from your video editor, or using a third-party encoding tool, the key parameters discussed below will be presented in a different interface, but should be easy enough to find. Figure 7.1 displays the most relevant encoding parameters you'll typically access when rendering files for distribution.
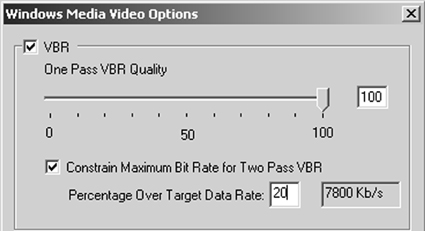
These are the basic file parameters presented in most encoding decisions. I'll discuss these parameters and others such as keyframe setting and selecting the audio sample rate and channel in the following sections. Advanced Encoding ParametersAs well as the basics mentioned above, you'll often see additional encoding controls that impact the quality and/or the compressed file size. Take CBR encoding compared to VBR encoding. As the names suggest, CBR applies a consistent data rate over the entire video file, while VBR adjusts the bitrate according to scene complexity. Both deliver a similar total file size, though the data rate at any given point in the file will probably be different. Figure 7.2 illustrates the differences between the two, showing one CBR stream and one VBR stream, both produced at an average data rate of 6Mbps (megabits per second); this is the typical data rate for MPEG-2 streams prepared for DVD. As you can see, the CBR stream stays at 6Mbps throughout the entire file, while the VBR stream changes frequently. During the first talking-head sequence, which has little motion, the data rate may drop to 4Mbps or less, while increasing to 8Mbps for subsequent higher motion sequences. Figure 7.2. VBR varies the bitrate according to the scene's complexity, while CBR encoding applies a consistent bitrate throughout.VBR can steal bits from the low-motion sequences to give to the high motion sequences, delivering a more consistent quality over the duration of the video. In contrast, CBR produces a consistent bitrate, but quality varies according to scene complexity. What are the downsides of VBR? For this type of encoding to work well, the codec must scan through the video file twice (called two-pass encoding) once to identify the high- and low-motion sequences and compute the optimal data rate allocation and then to encode the video. This means that VBR encoding usually takes longer than CBR. It's also worth noting that VBR encoding only starts to pay dividends with longer files, usually 10 minutes or longer. When encoding shorter files, those one or two minutes long you probably won't notice any quality difference at all. The Many Flavors of VBRThere are several varieties of VBR and those differences require further explanation. For example, VBR works best with two-pass encoding, but many programs also provide an option for "one-pass" VBR this encodes more quickly but produces an inferior data rate allocation between high- and low-motion sequences. Unless you're in a terrible hurry, always opt for two-pass encoding. The three types of VBR encoding, are shown in Figure 7.3 and explained here:
Square-Pixel OutputNow that you know what VBR is and how and when to use it, let's tackle the optimal resolution for your video output a surprisingly complex topic with some unexpectedly simple answers. Feel free to read ahead to the takeaways if you're familiar the explanation. It all starts with DV, which has a pixel resolution of 720x480 and a pixel aspect ratio of 4:2.66. (To calculate the aspect ratio, divide 720 by 4 and get 180, and then divide 180 into 480 to get 2.66). However, NTSC television has a display aspect ratio of 4:3. That's why if you measure the active screen on your television set, you'll get results like 8"x6" for the 10" diagonal TV set in the kitchen, and 16"x12" for the 20" set in the bedroom. Do the math on both of these sizes, and you get 4:3 (divide 16 by 4, which equals 4, then 12 by 4, which equals 3). So how does DV, with a frame aspect ratio of 4:2.66, display on a TV set with a 4:3 display aspect ratio? During display, the television set squeezes each line horizontally by about 11 percent. For this reason, NTSC pixels are said to be rectangular. In contrast, computer monitors display each video pixel at an even height and width, creating the so-called square pixels. Here's the problem. Display a 720x480 DV frame on a television set, and the set squeezes the frame to look like it's about 640x480 in resolution. Display the same frame on a computer screen and it looks 720x480. This is shown in Figure 7.4, which contains two pictures of my good friend Lisa. On the left is a frame extracted from the original DV file, which has a resolution of 720x480. On the right is a digital image of a television displaying the same frame. As you can see, Lisa looks noticeably more slender on the right, courtesy of the 11 percent squeeze that occurs when you display DV on a television set. Figure 7.4. The original DV frame shown on the computer screen left; the same shot squeezed by a television on the right.In essence, DV displayed on a television set looks "right" because it's squeezed by 11 percent before display. However, computers don't squeeze the pixels before display, so they look stretched in appearance, (shown on the left in Figure 7.4), unless you correct them. Now you understand the background, what are the takeaways?
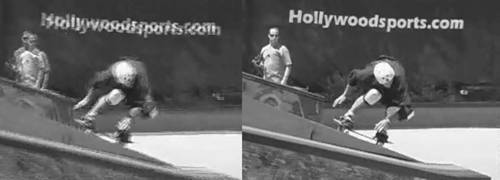
It's really a no-brainer as most templates default to 4:3 aspect ratios. However, some templates still default to a nonsquare resolution such as 176x144 or 352x240, and need to be corrected. In addition, when producing MPEG-2 video for computer display, say for using in a PowerPoint presentation, you need to use 648x480 rather than 720x480 to improve the look of the video inside the presentation. For more on this subject, go to www.extremetech.com/article2/0,3973,10083,00.asp. Progressive Display and DeinterlacingMost DV footage is captured in interlaced mode, which means that the camera shoots and displays 60 fields per second. The first field in the frame contains all the odd lines in the video frame (1,3,5), spread over the entire vertical height of the television set, while the second field contains all the even lines (2,4,6). This technique produces 60 visual impressions per second, promoting the appearance of smoothness. In contrast, computer monitors display in "progressive" mode, which means that each line displays in order (1,2,3) each time the entire screen refreshes, usually between 60 to 85 times a second. You can display interlaced video on a computer screen, but the slicing artifacts evident on the left in Figure 7.5 typically mar the output. Figure 7.5. The footage on the left is in interlaced mode, while the image on the right is in progressive mode after applying a deinterlacing filter. (Video courtesy of Travis White, Ulead Systems, Inc.) These artifacts are caused by the computer's attempt to display a complete frame comprised of two fields shot 1/60th of a second apart. In high-action footage such as this skateboard video, there's a lot of movement in a short period, producing two very dissimilar images, as you can see the frame on the left in Figure 7.5. Surprisingly, the video on the right was produced by the same video editor at the same data rate as the video on the left. The only difference is I rendered the video file on the right in progressive mode, which combined the two fields into one frame, and applied a deinterlacing filter. Interestingly, doing one without the other isn't enough. Simply choosing progressive output wouldn't eliminate the deinterlacing artifacts shown on the left, and deinterlacing without combining the two fields would have no effect. In short, when rendering video from interlaced sources like DV for display on a computer, always do the following:
Interlacing artifacts are most prominent in high-motion footage, where the difference between the two fields shot 1/60th of a second apart is most pronounced. That's why I used a skateboard video to illustrate the point. If you're shooting an interview or group discussion, with low-motion footage, these issues are less relevant. Finally, understand that not all programs allow you to output progressive video or feature deinterlacing filters. For this reason, if higher-motion sequences display the type of artifacts shown in Figure 7.4, you may have to purchase another editor or third-party tool to produce top-quality video. KeyframesOne term you'll encounter frequently during encoding is "key frame interval." All streaming media encoders use both interframe compression, which eliminates redundancy between frames, and intraframe compression, which compresses data within a frame. For example, JPEG is an intraframe technique, and is used by several streaming codecs to supply the intraframe component of their technologies. All interframe compression techniques use at least two kinds of frames, key frames and delta frames. Key frames (usually elided as one word, "keyframes") are compressed entirely with intraframe compression and don't reference any other frame in the video. In contrast, Delta frames store only the information that changed between itself and the immediately preceding frame, discarding information that's similar in the two frames. For example, in a newsroom setting, a keyframe stores the entire image, including the background wall, the set, and all details of the newscaster. In contrast, a delta frame contains only the information that changed from the immediately preceding frame. Since the background and large parts of the speaker's head and body don't change between frames, delta frames can be very small in these low-motion sequences, which is why talking-head sequences compress so effectively. During playback, the player first displays a keyframe to get the complete picture, and then displays the updated information from the successive delta frames. When viewers use the slider bar or other controls to move randomly through the video file, video playback must start on a keyframe, since delta frames don't contain the necessary information to display the entire frame. We like keyframes because they add quality to the video file and make it easier for viewers to randomly play the file. We don't like keyframes because they're substantially larger than delta frames, and the more keyframe there are, the harder it is for the encoder to reach the target data rate. In most high bitrate compression, such as MPEG-2, you typically have one keyframe (note, a keyframe is called an I-frame in MPEG-speak, as you can see on the bottom left of Figure 7.1 where the control to I Frame Rate.) In contrast, most streaming encoders insert a keyframe once every eight to ten seconds, with intervals of 40 seconds or longer fairly common. In general, I almost always accept the default values for keyframe intervals, or if a default value isn't supplied, insert a keyframe every eight seconds. |
| < Day Day Up > |
EAN: 2147483647
Pages: 110