Enhancing the Report
| | ||
| |
Congratulations! You have just created your first Oracle Report. As you can see, for basic reports, there is virtually no coding necessary. Most reports, however, have requirements that go beyond what the wizards can provide. Figure 4-13 is part of the Reports Builder called the Report Editor. In the top right of the screen are two rows of icons familiar to all users of Windows-based programs: the Minimize button (which looks like an underscore (_), the Restore Down button, which looks like one box in front of another, and the Close button, which is an X. Click the Restore Down button on the lower row of icons. Drag the Report Editor window over to the right. Your screen should look something like the one in Figure 4-14.

Figure 4-14: The Reports Builder showing the Object Navigator
Working with the Object Navigator
On the left-hand side of the screen is a window called the Object Navigator. It can be displayed at any time by either selecting Tools -> Object Navigator from the Reports Builder menu or by pressing F5. As a developer, you will get to know the Object Navigator well. The Object Navigator has an entry for every report object and provides a graphical, hierarchical view of all the objects that constitute your report. It organizes report objects into logical groups so that they can be retrieved and modified easily. Changes made in the object navigator will be automatically reflected in the graphical layouts of your report and vice versa. Under the example report entry (Chapter4-1), there are seven groupings: Data Model, Web Source, Paper Layout, Paper Parameter Form, Report Triggers, Program Units, and Attached Libraries. There are other groupings not under the Report grouping (Templates, PL/SQL Libraries, etc.) that will be discussed shortly.
Clicking the small plus sign to the left of Data Model expands the group to display more hierarchical report elements. All of the elements in the data model reflect the result of what was selected in the Reports Wizard when building the report.
| Note | When it comes time for the developer to go back and modify or enhance the report, there are three ways of accomplishing the task: 1) the Reports Wizard can be run again and the answers to the various questions, modified; 2) the developer can use the graphical editors to modify the report; or 3) the developer can use the object navigator to modify the attributes of elements on the report, add new elements, or remove existing elements. For this example, the modification of elements using the Object Navigator and Property Inspector will be demonstrated. |
Click on the small plus sign next to Queries. This element expands to include a sub-element named Q_1. (The name Q_1 and all of the other report elements in this example were chosen arbitrarily by the Reports Wizard.) There is no plus sign next to Q_1, which implies that this is the lowest level that can be drilled down to. But what, exactly, is Q_1 ? To find out more about this report element, click the small SQL icon to the left of Q_1. Your screen should look similar to the one in Figure 4-15.
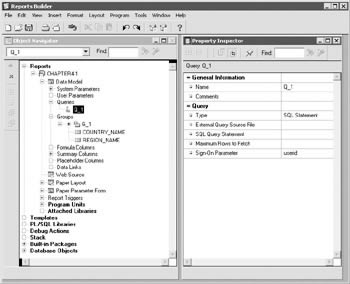
Figure 4-15: Reports Builder with the Property Inspector page displayed
Working with the Property Inspector
The Property Inspector lists all of the properties (attributes) of query Q_1. The help system included with Oracle Reports 10 g is context-sensitive, so any of the fields in the Property Inspector can be highlighted and F1 can be used to display the help screen associated with that particular property. Some of the fields have blanks in their right-hand column. This does not necessarily mean that there is not a value associated with the property. To see an example of this, click the row that says SQL Query Statement in the Property Inspector. A button appears in the right-hand column. Clicking that button will take you to the SQL Query Statement window that allows the developer to modify the query that drives this report. If you notice, the query is taken from the Reports Wizard demonstrated earlier in this chapter that was used to construct our report. If we wanted to modify the query (or if we were building the report from scratch), we could do so here, run the Reports Wizard to modify it using a wizard-based interface, or use the Data Model page of the Report Editor (discussed shortly) to do so graphically. Oracle Reports 10 g gives developers the flexibility to use the tool they are most comfortable with.
Like the Object Navigator, you will become very familiar with the Property Inspector. Almost every element on your report has properties that affect how it looks and behaves. The Property Inspector gives you the ability to view and modify these properties. The fields displayed on the Property Inspector change depending on what is selected in the Object Navigator. To see an example of this, click the plus sign next to Groups in the Object Navigator, then click the icon directly to the left of the element G_1. The Property Inspector changes to reflect the fact that groups have different properties than queries.
One of the most difficult concepts for many beginning Reports developers to grasp is the concept of scope when discussing an object s attributes. Some elements have parents (for lack of a better word) that can have properties assigned to them; others don t. To see an example of this, click the Q_1 element in the Object Navigator. You will notice that the properties for Q_1 are displayed in the Property Inspector. If you click on Queries, which is one level up in the hierarchy, there is nothing displayed in the Property Inspector. Therefore, element Q_1 does not have any parents with properties. The same cannot be said for groups. If you click the plus sign next to Groups in the Object Navigator, then the plus sign next to G_1, you ll see two elements under G_1 named COUNTRY_NAME and REGION_NAME. In this case, both the child elements (the two columns ) and the parent element (group G_1) have attributes. The Property Inspector can be used to select multiple objects simultaneously and see if any of the common attributes between them are different.
To see this functionality, click the G_1 element in the Object Navigator once so it is highlighted. While holding the control button down on your keyboard, single-click the COUNTRY_NAME and REGION_NAME elements in the Object Navigator. All three elements should now be highlighted. The Property Inspector changes to reflect the fact that multiple elements are now highlighted in the Object Navigator by stating Multiple Selection: G_1, COUNTRY_NAME, REGION_NAME underneath its toolbar. In the toolbar, the icon that looks like either a U or a rounded n becomes selectable (clicking the icon will toggle between these two selections). This icon represents the type of union that is occurring between the multiple fields highlighted in the Object Navigator. If the icon looks like a U (the set symbol for union), the Property Inspector shows all attributes for all objects selected. If the icon looks like an n (the set symbol for intersection), the Property Inspector will only display attributes that are common to the multiple elements you have selected (see Figure 4-16). If the attribute is undefined for the multiple selections, the Property Inspector will display a blank. If the attribute is not blank, but the same value for all objects selected, it will display the value. If the attribute is not blank, but is different for any of the objects selected, five asterisks are displayed. If any value is modified while in this mode, the change is propagated to all objects selected.
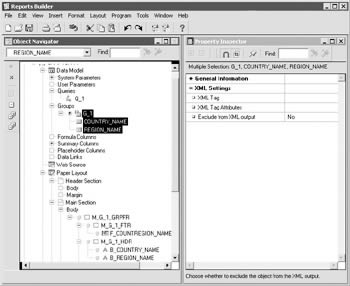
Figure 4-16: Multiple selections in the Object Navigator
| Note | In this example, using the Property Inspector to view the differences in attributes between three elements may seem trivial, but as you build more and more complex reports containing dozens (or even hundreds) of elements, this feature become invaluable. |
Under the data model heading, we ve looked at Queries, which are pretty self-explanatory, and groups, which are used to separate a query s data into sets and filter a query s data. If you click on G_1 in the Object Navigator, the properties for the group are displayed. In the middle of the Property Inspector are two properties: Filter Type and PL/SQL filter. Here, the developer has the ability to filter data at the group level (later you ll see how to filter data at the query level). If First or Last are selected, the developer must enter a number in the Number of Records field just below the Filter Type property. This value will return the first or last n records when the report is executed. By selecting PL/SQL as the filter type, the developer can write a PL/SQL block to limit the rows returned by the query.
| Note | Note that while this may sound similar to the conditional formatting discussed earlier, the PL/SQL blocks defined here can only be used to limit rows based on complex criteria or format rows returned by the query. It does not affect the actual display of the field on the report. |
Filter Types are very convenient for returning the first or last n number of rows from a query, but they aren t much use for conditional statements. You could write a PL/SQL block to filter out rows, but in most cases that is overkill as there are simpler methods to limiting the types of rows returned on a report. Two of the most common include altering the SQL statement to include a WHERE clause and providing a parameter form for the user , so that at run time end users can determine what data they would like to see on the report.
Limiting Rows Returned by a Query
Altering the query to include a WHERE clause restricting rows is very simple to do, but it carries with it the obvious limitation of inflexibility. Once the query is defined, it remains that way until a developer modifies it and generates a new report. In many circumstances, this is impractical . However, reports with fixed WHERE: clauses in them, commonly referred to as canned reports, are very useful in many organizations. Some examples of canned reports include daily (or monthly, quarterly, yearly, etc.) inventory reports, sales reports, HR reports, etc. For reports where the criteria for querying data changes frequently, canned reports are not a good fit.
| Note | Later in this chapter we will discuss creating reports with parameter forms that give end users the ability to select values before running their reports. For true ad-hoc reporting capabilities, however, Oracle provides a sophisticated tool called Oracle Discoverer 10 g that allows users to create their own reports based on their specific needs. Oracle Discoverer 10 g also has a full featured web development environment (unlike Oracle Forms 10 g and Oracle Reports 10g) called Discoverer Plus, that gives knowledgeable end users the ability to create their own Discoverer Reports via a web interface. Oracle Discoverer 10 g integrates seamlessly with Oracle Application Server 10 g and Oracle Application Server Portal. Oracle Discoverer 10g is discussed in detail in 11. |
To modify an existing query, select the query in the Object Navigator. In the Property Inspector, click the row that says SQL Query Statement. A button on the right side of the row appears. Clicking that button takes you to the SQL Query Statement editor. From here, you can click the Query Builder button to graphically build your query, use the Import SQL Query button to read the query from a file on disk, or simply edit the query in the edit window. Figure 4-13 displayed the results of the query with no WHERE change clauses. If we want our report just to reflect the countries in Asia, we can alter the query to look like this:
SELECT ALL REGIONS.REGION_NAME, COUNTRIES.COUNTRY_NAME FROM REGIONS, COUNTRIES WHERE (COUNTRIES.REGION_ID = REGIONS.REGION_ID) and region_name =
EAN: 2147483647
Pages: 192