Target Qualification
| | ||
| | ||
| | ||
Now that we have mapped our boundaries in the previous chapter's theatre of war creation, we need to determine what systems and services are available within those boundaries (beyond our border routers, packet filters, and firewalls). Any potential attack vectors must be qualified prior to building our attack profiles. We already have some information on certain services; however, there will most likely be many more services being provided publicly . We must use tools to find those services, identify or fingerprint them as well as underlying systems, and determine the most efficient attack methods . If we determine a web server is running the Apache web server software, there is not much need to use attack mechanisms meant for Microsoft Internet Information Services (IIS). Similarly, we do not want to waste time, bandwidth, and other resources testing Windows operating system platform vulnerabilities on a UNIX-based system. This simply isn't a good use of resources; thus, the reason we spend so much time qualifying our targets and planning our attacks. During this qualification phase, we will be discussing the following items:
-
Service identification methods and tools
-
An introduction to port scanning
-
The art of port scanning (and its inefficiencies )
-
Port scanning tools
Service Identification
There are various tools and methods used for classifying services by vendor, manufacturer, and platformeven just the services we have identified so far through our information gathering. These types of tools and identification methods are generally used to solicit more information about particular services such as e-mail, web, and other public applications. The more we know about a service and its platform, the more direct our attack can be.
Netcat and Telnet (TCP Connection Attempts)
Netcat: the TCP Swiss Army knife for both UNIX and Windows users. There are several uses for netcat from an attacker's perspective, ranging from connecting to hosts for service identification and fingerprinting to being installed on a remote connection as a listener once a system is compromised. For our purposes during our vulnerability assessment (more specifically while qualifying our targets), we will use netcat to connect to services to solicit information. This can be completed by running the netcat command to connect to a specific host a specific TCP port. The following example demonstrates using netcat to connect to one of Acme's MTAs (remember, one MX record points to maill.acmeexample.com). (We will be discussing MTA checks later in this section; the example below is used to show one of netcat's uses.)
root@scanner:~# nc maill.acmeexample.com 25 220 maill.acmeexample.com - MTA ready; TLS is available for use.
Even good old telnet can be used by UNIX and Windows users to assist in service discovery. By connecting with the telnet command to a specific TCP port, you may be able to determine if a service or application is listening and, if so, retrieve data regarding the version and vendor. Below, the same information is gathered with telnet as was previously gathered with netcat.
root@scanner:~# telnet maill.acmeexample.com 25 Trying 5.125.5.44 ... Connected to maill.acmeexample.com. Escape character is ' ^ ']'. 220 maill.acmeexample.com - MTA ready; TLS is available for use.
You don't have to make a successful connection to gather important information. Depending on your responses, you will know if a service is alive or not, possibly filtered or simply not available.
The following sections include several uses of the netcat and telnet commands. These tools are used to make the connections and other commands are used to solicit information from systems, platforms, and services.
Web Server Testing
Using netcat or telnet (as mentioned earlier) to connect to port 80 of your web server, you can issue commands that may provide you with information regarding server operating system and web server versions, internal IP addresses, and more. Vulnerability assessment tools can automate this process, but for quick connections to validate services, there are some basic HTTP commands that come in handy.
-
HTTP HEAD Can allow attackers to gather information about server version and in some cases even more, such as internal IP addresses
-
HTTP OPTIONS Can also be used for the same purpose
As an example, use telnet to connect to a domain on port 80 and make a HEAD/ HTTP/1.0 request. The following shows how this request displays that the server for somedomain.com is a Microsoft IIS 6.0 server.
root@scanner:~# telnet http://www.somedomain.com 80 Trying 123.456.789.111 ... Connected to http://www.somedomain.com. Escape character is ' ^ '] ' . HEAD / HTTP/1.0 HTTP/1.1 200 OK Connection: close Date: Tue, 18 Jan 2005 05 : 56 : 56 GMT Server: Microsoft - IIS/6.0 MicrosoftOfficeWebServer: 5 . 0_Pub X-Powered-By: ASP.NET Content-Length: 18126 Content-Type: text/html Set-Cookie: ASPSESSIONIDCCDTCSAR=CLEOPJACMFLCCDNACMKJGDAC; path=/ Cache-control: private Connection closed by foreign host.
The next example shows the same domain connection to port 80 and an HTTP OPTIONS request. This request is also used in an attempt to find the web server type and other information.
root@scanner:~# telnet http://www.somedomain.com 80 Trying 123.456.789.111 ... Connected to http://www.somedomain.com. Escape character is ' ^ ']'. OPTIONS / HTTP/1.0 HTTP/1.1 200 OK Allow: OPTIONS, TRACE, GET, HEAD Content-Length: 0 Server: Microsoft-IIS/6.0 Public: OPTIONS, TRACE, GET, HEAD, POST MS-Author-Via: MS-FP/4.0 MicrosoftOfficeWebServer: 5.0_Pub X-Powered-By: ASP.NET Date: Tue, 18 Jan 2005 06 : 07 : 24 GMT Connection: close Connection closed by foreign host.
| Tip | Some (more secure) web servers limit the request methods to GET and PUT. While this is a good practice, querying for "GET/HTTP/1.0" will still return a good deal of information. |
Again, you can see the information provides details about the web server infrastructure and services in use. In some cases (such as above), it is even possible to determine the operating system as well. The Server field can be modified by administrators in an attempt to deceive attackers, but in many cases, the other information shown in the previous two examples will still be available. This allows attackers the ability to still determine operating system and web server version by knowing what to look for in the responses. You must check these types of options during your vulnerability assessment just as attackers would during attack preparation.
To continue our Acme vulnerability assessment, we will send the HTTP HEAD and OPTIONS commands described earlier to Acme's web server to determine how much information is provided publicly. Both checks provided similar information, so for the purpose of space conservation, only the OPTIONS results are provided here:
root@scanner:~# nc http://www.acmeexample.com 80 options / http/1.0 HTTP/1.1 200 OK Date: Sat, 05 Feb 2005 20 : 57 : 06 GMT Server: ACMEWEB X-Powered-By: PHP/4 . 3 . 9 Content-Length: 1493 Connection: close Content-Type: text/html; charset=ISO-8859-1
As we can see above, the Acme web server does not provide information about the web server or operating system infrastructure. This is the preferred configuration as there is no reason to provide more information than necessary to the public (which includes attackers). One item to note is the use of PHP, which is identified as version 4.3.9 in use. This should be added to our map so we can ensure we check for PHP vulnerabilities on this host.
One other interesting area to mention regarding web server testing is the/robots.text file. The Robot Exclusion Protocol (REP) was designed by the World Wide Web Consortium (W3C) to provide a means of "excluding" web-enabled directories from being indexed by search engines and other robots or crawlers. Administrators could configure the REP file with files and/or directories so that search engines and crawlers would not index them. This results in average users not finding these files/directories when searching the Web.
For example, if a web page requiring authentication was indexed by a search engine or crawler, the result may include a login failure page, which may also be indexed. As a result, these failed login pages would be displayed to users when using the search engine. These types of pages become interesting to an attacker, so the REP file was developed to be populated with these types of pages/directories to avoid their being indexed.
In populating the REP file, now there is a consolidated location where an attacker may be able to gather information on suspicious web files or directories. If an administrator takes the time to ensure files/directories are not indexed, that may mean there is valuable information not available for public knowledge. By performing a GET for the/robots.txt file, an attacker may be able to find the web files and directories and subsequently the information not intended for public use (depending on an organization's administrators and what they may have populated in the REP file). As a result, during vulnerability assessments, you should at least check for a /robots.txt file and ensure it is not populated with sensitive data that could cause security breaches.
SMTP/MTA Testing
SMTP connections through a command line (netcat or telnet) can provide interesting information about an organization's e-mail infrastructure. Many e-mail servers will use banners that advertise name and version number. Additionally, sending e-mail to bogus e-mail accounts may provide information back regarding a mail server's platform, version, network mapping of e-mail server infrastructure (if mail relays and internal mail servers are used), and internal e-mail server information, such as internal IP addresses and hostnames. While checking your organization's SMTP infrastructure, you should also validate the use of role accounts (based on RFCs 822 and 2142 such as abuse@yourdomain.com and postmaster @yourdomain.com).
Our first example here shows a netcat connection to an MTA that displays default banners for a Microsoft Exchange 2000 server.
root@scanner:~# nc exchange.internal.acmeexample.com 25 220 exchange.internal.acmeexample.com Microsoft ESMTP MAIL Service, Version: 5.0 .2195 .6713 ready at Sat, 5 Feb 2005 15 : 02 : 34 -0700
Continuing our assessment, we will now check Acme's MTA. Since we already checked maill.acmeexample.com, we will now connect to the other MTA listed in DNS (mail2.acmeexample.com).
root@scanner:~# nc mail2.acmeexample.com 25 220 mail2.acmeexample.com - MTA ready; TLS is available for use.
As we can see, Acme's MTAs have the banners modified so platform and service information is not readily displayed.
In an organization with a default MTA configuration, it is quite possible the infrastructure will return a Non-Delivery Receipt (NDR) if a message is sent to a bogus account. Within that NDR, there may be a wealth of information. The excessive information may be supplied as a result of the MTA's NDR configuration, but there is also the possibility of gathering information about the path the e-mail took (providing information on MTAs, internal servers, etc.). The items we may see (providing potential attackers with too much information) include
-
NDRs Sent for Bogus (or Nonexistent) Accounts When sending a message to noone123@domain.com, the e-mail server responds that the account does not exist. (All e-mail to nonexistent accounts could be forwarded to the Postmaster of the target domain or deleted with no NDR to avoid sending back information to attackers.)
-
NDRs Containing Information about E-mail Platform and Infrastructure There is information about the infrastructure that helps fingerprint systems. Information provided in NDRs should be limited to only necessary information such as error codes for why the message could not be delivered. The NDR should not include the original message and certainly not any attachments, but also any excessive information such as mail server name, IP address, or even internal IP addresses should not be communicated back to the original sender through the NDR.
-
Sent NDRs Providing Headers to Potential Attackers These headers provide even more information such as relay and internal e-mail server structure, internal IP addresses, and so on.
When sending a bogus e-mail message to Acme (noone123@acmeexample.com), there is no response sent back to the sender. In reality, this message is not delivered to anyone (unless specifically configured to send all nonexistent user e-mail to a specific account or distribution list such as Postmaster) but there is never an NDR issued. This reduces the potential for attackers to solicit information. In order for an attacker to gather information about the infrastructure, he or she would need an Acme e-mail user to actively send or respond to a message in order to gather information out of legitimate e-mail message headers.
With any good vulnerability assessment, steps to ensure the organization has the appropriate communication methods in place in case of attack, breach, or other miscellaneous communication with the public should be tested . As you saw in previous chapters, various e-mail accounts should be configured to provide a means for the general public to get access to the appropriate internal resources in case of problems. An organization may use auto-responders; however, this should be done with careful consideration and protection to ensure auto-responders do not get caught in a loop with other auto-responders or become victim to a denial-of-service attack.
There are a few different methods to determine whether the appropriate role accounts exist. The example below is the result of an automated tool that checks MTAs with a passive mechanism to determine if the e-mail account exists without actually sending a message. Of course, the simplest method is to send a message to the various role accounts and wait for a reply. In your own organization, this may be feasible as you can solicit responses from the appropriate folks, but if you do not have contact with those responsible for the addresses, you may never know whether a message was delivered or not.
Sending PASSIVE RFC 2142 Probe Probing MX preference 10, maill.acmeexample.com rfc2142probe maill.acmeexample.com: connecting ... rfc2142probe maill.acmeexample.com: connect OK rfc2142probe maill.acmeexample.com: helo FAILED rfc2142probe maill.acmeexample.com: Abuse@acmeexample.com - - - > ACCEPTED rfc2142probe maill.acmeexample.com: NOC@acmeexample.com - - - > ACCEPTED rfc2142probe maill.acmeexample.com: Hostmaster@acmeexample.com - - - > ACCEPTED rfc2142probe maill.acmeexample.com: Postmaster@acmeexample.com - - - > ACCEPTED rfc2142probe maill.acmeexample.com: Security@acmeexample.com - - - > ACCEPTED rfc2142probe maill.acmeexample.com: completed.
Acme does in fact have each of the accounts configured according to our checks above. To verify there are no issues with our passive tool, a test message was sent to abuse@acmeexample.com (first one on the list) to validate findings. We received a reply to our message indicating an active account. Since the reply was received almost immediately, we can assume this is an auto-responder. Checks should be done to test auto-responders during the vulnerability assessment. Since auto-responders can be susceptible to denial-of-service attacks and e-mail routing loops, auto-responders must be configured to minimize these risks. These checks should include sending e-mail from an account with an auto-responder on it as well to determine whether or not the auto-responder is configured to prevent e-mail loops . Also, the auto- responder (s) should be checked by sending a significant amount of messages to the address to determine if it will cause a denial-of-service attack. This test is more difficult to conduct because of the required resources so it may be easier to ask to see the configuration options preventing denial-of-service attempts (since you are conducting the vulnerability assessment for your organization).
The checks included above are used to gather as much information as possible about the SMTP and MTA infrastructure in use. Remember, the purpose is to qualify (validate) your MTA targets so you can create an effective attack profile. For more information about e-mail infrastructure and its security, see Chapter 8.
Port Scanning
Port scanning has become a general term to encompass a lot of different types of probes, not exclusively UDP- or TCP-based. As part of the assessment, you'll need to explore several methods of gathering information about the target network and its publicly accessible applications. Multiple scanning methods may need to be used to find applications on well-defended networks.
Alternatives to Port Scanning
There are several discovery techniques used to identify available hosts and services (we have discussed some thus far) and, more importantly, qualify them for attack. Various software packages/tools exist to include ping sweepers, port scanners , and other network reconnaissance tools. Since the goal while gathering information is to find available services, your focus should be on using tools to find available services ( open ports and answering applications), not just available hosts. It is important to note that there can be valuable information gathered from conducting ping scans (ICMP scanning) if an organization does not properly filter traffic at its border. You may find interesting information from various Internet Control Message Protocol (ICMP) requests . Table 15-1 is a listing of ICMP types, some of which you may see when conducting ICMP scanning.
| ICMP Type | Type Name |
|---|---|
| ICMP Type 0 | Echo Reply |
| ICMP Type 3 | Destination Unreachable |
| ICMP Type 4 | Source Quench |
| ICMP Type 5 | Redirect |
| ICMP Type 6 | Alternate Host Address |
| ICMP Type 8 | Echo Request |
| ICMP Type 9 | Router Advertisement |
| ICMP Type 10 | Router Solicitation |
| ICMP Type 11 | Time Exceeded |
| ICMP Type 12 | Parameter Problem |
| ICMP Type 13 | Timestamp Request |
| ICMP Type 14 | Timestamp Reply |
| ICMP Type 15 | Information Request |
| ICMP Type 16 | Information Reply |
| ICMP Type 17 | Address Mask Request |
| ICMP Type 18 | Address Mask Reply |
| ICMP Type 30 | Traceroute |
| ICMP Type 31 | Datagram Conversion Error |
| ICMP Type 32 | Mobile Host Redirect |
| ICMP Type 33 | IPv6 Where-Are-You |
| ICMP Type 34 | IPv6 I-Am-Here |
| ICMP Type 35 | Mobile Registration Request |
| ICMP Type 36 | Mobile Registration Reply |
| ICMP Type 37 | Domain Name Request |
| ICMP Type 38 | Domain Name Reply |
| ICMP Type 39 | SKIP |
| ICMP Type 40 | Photuris |
| ICMP Type 41 | Experimental Mobility Protocols |
In the event an organization does not block ICMP traffic (or only blocks certain ICMP types), information may be gathered through ICMP scans. These can be conducted by configuring options with many of the port scanning tools available (such as NMAP).
| Note | ICMP scanning (along with port scanning) sends obvious signals to the target network about your activities. If you are responsible for the target network, this probably doesn't matter, but you should become familiar with multiple forms of scanning (ICMP, port, etc.) so you know what signs to look for if/when you are attacked . With your familiarity , you will see the signs and understand what the attacker is attempting to do. |
Since many organizations block all ICMP types or specifically " pings " at their borders, typical ping scans are only marginally useful. If ICMP is available publicly from your organization, ping scanners can be used as a high-level check that can be completed much quicker than more thorough scanning tactics. The other ICMP types can provide information such as network information and system timing (which could be used to help defeat time-based security measures). Port scanners, on the other hand, attempt connections to TCP and/or UDP ports. If a service is available, it must use a TCP/UDP port to communicate. Even if a service is not intentionally configured on a host, if a service port is open and answering (and not filtered by a firewall or packet filter), a port scanner will find this type of misconfiguration during scanning.
Many factors affect the success of port scanning. Scanner configurations, network latency, and the very nature of how traffic traverses the Internet all contribute to how accurate or misleading port scan results turn out to be. Just because an administrator configures a scanner to check for all ports across all routed net blocks, the scanner may not necessarily produce accurate results for all of these addresses and ports. Services that are actually available may not be reported as "live" and a port scanner can provide false positives, causing an administrator to believe a port is open when, in fact, it is not. Worse yet, it may indicate that a port is closed when, in fact, there is an open port with a live application. Filtering by firewalls and other packet filters further complicates port scans by disrupting communication paths, causing results that appear as closed ports when, in fact, the packet filter is simply dropping the port scanning packets before ever getting to the hosts.
The act of port scanning and achieving the most effective results is an art in the security world. Some port scan methods work better with some networks, while other networks require a completely different port scanning tool or technique to maximize results. The point is to develop a thorough understanding of the tools in use and the network being scanned, and not to rely on default point-and-click port scanners, which generally do not produce accurate results.
Understanding Port Scanning
To better understand how port scanners can produce varying results, one must understand how port scanning takes place. Most port scanning software provides configuration options for the administrator to optimize scanning and produce the most accurate results. The preconfigured options are then used by the scanner to conduct a series of connection attempts to determine available services. Finally, more sophisticated port scanners will also attempt to fingerprint applications and operating systems based on replies to connection attempts. The following list further details the main types of port scans conducted:
-
Open scanning
-
Half-open scanning
-
Stealth scanning
-
UDP scanning
While open scanning (also known as TCP connect scanning) produces more accurate results with less false positives, it is also the most bandwidth-intensive and easiest to recognize on the target network. Half-open scanning is generally less intensive but will produce more false positives and is still recognizable. One item to note is that rigorous half-open scanning can crash some systems (generally older systems) that contain antiquated IP network stacks. In this situation, half-open scanning can even be considered dangerous as the outage risk causes the scanning to become intrusive (rather than nonintrusive, or "passive").
| Note | Some systems with older IP network stacks suffer from resource starvation because memory or, more specifically, File Control Blocks (FCBs) are allocated for each connection when the first connection-request packet is received and processed . The system suffers the resource starvation attack once the FCB buffers are exhausted because they are never (or too slowly) released during half-open scanning. Newer stacks do not suffer from this problem because the full connection setup cost (in terms of memory) isn't paid until the full three-way handshake has been completed. |
Stealth scanning will be least likely to be noticed; however, due to the nature of the scan, it will also have the highest probability for false positives. Your first inclination may be to use open scanning for all vulnerability assessments; but remember, an attacker will most likely choose some form of stealth scanning to avoid or minimize exposure during information gathering (port scanning). You must choose what type of port scan to use when conducting your assessment based on these factors. Each of the types of scans will be discussed in more detail next.
When conducting open scanning, the port scanner will send a TCP packet with the SYN flag set (destined for a specific port) and the target host will send back a TCP packet with the SYN and ACK flags set if a port is open. The port scanner then should respond with another TCP packet, this time with the ACK flag set. This scanning technique completes a full three-way handshake between the port scanner and the target host. This process is completed for each of the ports configured to be scanned. The reduction in false positives happens because a complete connection to an active port is established during this type of scan just as if someone were requesting service from that application or port. Once the port scanner sends its TCP ACK packet, a connection is established on the port in question. In the event a port is not available when checked, after the port scanner sends its first TCP SYN packet, the target host may respond with a TCP RST or RST and ACK packet informing the port scanner the target is not listening on that port. Kind port scanners subsequently send a final TCP RST packet (or a series of FIN (finish) packets) to tear down (close) the connection. Of course, if nothing is returned after the initial TCP SYN is sent by the port scanner, the target may be unavailable, or there is a high likelihood the packet is being filtered somewhere between the scanner and the target. The following illustration provides an example of a port scanner using open scanning, which finds a listening port.
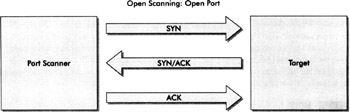
Next, the following illustration displays the same port scanner using open scanning and finding a closed port (or a port not in a listening state) on a target system.
Half-open scanning is also known as SYN scanning. This is because the port scanner sends a TCP packet with the SYN flag (again for a specified port) and the target host will send a TCP packet either with the SYN and ACK flags or with RST and ACK flags set (or nothing, indicating a filter or unavailable target as described earlier). If a TCP SYN and ACK packet is received from the target host, the port scanner assumes the specified port is open and in a listening state. The port scanner may subsequently send a TCP RST packet to tear down the connection.
| Note | There is no reason this TCP RST packet must be sent. Depending on the port scanning tool used, it may not be sent. Theoretically, sending the TCP RST packet is additional communication with the target host, which increases exposure and chance of detection. Attackers know the minimal traffic possible should be sent between them and the target(s) to reduce the potential for detection. |
Conversely, it a TCP packet with RST and ACK flags is received, the target host is assumed not to be listening on the specified port. The purpose of half-open scanning is to increase the speed of a port scan without decreasing reliability of results significantly.
Without the need to establish a full three-way handshake during the connection, half-open scanning techniques allow scanning more ports than open scanning under the same conditions. There was a time when half-open scanning was also used to avoid detection by intrusion detection systems (IDS). Since connections are never completed, the risk of being logged or flagged in basic intrusion detection sensors/alerts was reduced, aiding in the stealth of an attack. As attack techniques (particularly denial-of-service attacks) changed and SYN floods became more popular, intrusion detection systems became aware of detecting these types of attacks. Today's IDS are generally aware and capable of identifying half-open scanning. For reference, half-open or SYN scanning is depicted in the illustrations below.

Stealth scanning includes several scanning methods where port scanners attempt to avoid detection by IDS, firewalls, and other logging systems. Some of these include
-
TCP FIN Scans The port scanner sends a TCP packet with the FIN flag set to a system on a specified port. The TCP FIN packet essentially asks the remote connection to terminate the connection. This is why TCP FIN scans work. If the port is closed, the target sends a TCP RST packet. The TCP FIN packet (as outlined above) tells the remote connection there is no more data from the sender (per RFC 793), so a closed port on the remote host immediately resets the connection with a TCP RST packet (acting as an "error" or "connection refused " reply since no connection was in place in the first place). If the port is open or filtered, the target shouldn't respond. Remember the target may not respond if the network filters the packet, which increases the chances of false positives when using TCP FIN scans. TCP FIN scans are generally used to identify UNIX systems as older Microsoft Windows systems appear to have all ports closed during TCP FIN scans.
| Note | A TCP FIN packet sent through a stateful firewall (as described in Chapter 5) will result in no response whatsoever. The firewall is keeping state and knows a TCP FIN packet should not be sent since there isn't already a connection that is being asked to terminate. |
-
TCP XMAS Scans Also known as a XMAS tree scan, this type of scan sends FIN, URG, and PSH packets to ports. Again, open or filtered (as explained previously) ports do not respond and closed ports will respond with a RST packet.
-
TCP Null Scans No control flags are set when the scanner sends packets. No response means a port is open or filtered by a firewall or packet filter, while a RST means the port is closed. When a system receives a TCP packet with the null flag, it does not contain information directing the target system what to do (such as establish a connection, or any other commands); therefore, a TCP RST is sent when the target port is closed. Some packet filters and host-based firewalls block such packets along with the XMAS tree packet above.
| Note | An example packet filter that may cause port scanning inaccuracies is the "scrub" functionality within Open BSD's PF (Packet Filter) subsystem. Scrub is designed to help minimize the risk of attack from incoming packets with invalid TCP flags set. For more information, see http://www.openbsd.org/faq/pf/scrub.html. Several commercial firewall implementations exhibit the same functionality. |
Various other stealth scan types exist that attempt enumeration of specific items. Some of these include TCP ACK scans, TCP RPC scans, and TCP Windows scans as well as Reverse Ident and Fragmentation scanning.
In order to maintain stealth while using these techniques, sacrifices must be made. Many of these sacrifices affect performance/speed and the accuracy of results. One thing to keep in mind is that attackers are not on a time schedule like you will be when conducting your vulnerability assessments. Attackers do not work by a clock; they often work by a calendar. Attacks and port scans may be throttled down to as little as a single packet every few minutes in order to defeat intrusion detection thresholds. Attackers also have the ability to scan multiple times using different scan techniques. Each of these scans can be compared to eliminate false positives. The point is that your vulnerability assessment may uncover various items within your infrastructure but you must experiment somewhat in order to effectively "see" your network from the outside as an attacker.
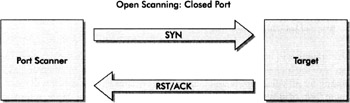
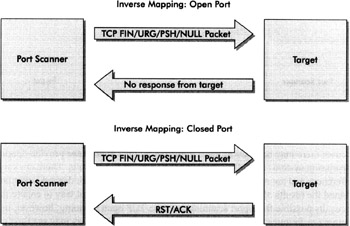
Several of the stealth scanning techniques outlined above rely on a technique called inverse mapping to achieve evasiveness. The concept of inverse mapping is generally quite simple. Rather than identifying all ports and classifying whether each is open or closed, inverse mapping scans receive TCP RST packets from target hosts when ports are closed. Ports are assumed to be open or, again, filtered by a firewall or packet filter if packets are sent that cause no response back to the port scanner and subsequently a timeout by the scanner itself (depending on the type of scan, the reason for the timeout varies). The key to identifying these types of stealth scans is that a connection never establishes when a port is open. Firewalls and packet filters can make port scans difficult to interpret because of the false positives created by filtered ports. The filtering causes nothing to be received back for any port (open or closed). This creates an image of all ports being open because no TCP RST packets were ever received from the closed ports. This must be accounted for when analyzing port scan results. If all ports appear to be open, retest using other port scan methods, manual tools, and an open mind. Getting back to inverse mapping and its principles, the following illustration shows the concept of inverse mapping in a graphical sense.
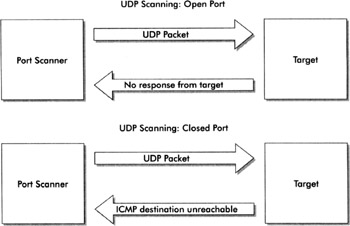
Some may argue that UDP scanning is considered a method of stealth scanning. Since it relies on many of the same techniques, this argument is somewhat valid; however, since several services rely on UDP only and have no affiliation to TCP, it is important to differentiate UDP scanning from TCP open scanning and stealth scanning. When attempting to identify open UDP ports and services, a UDP packet is sent to the specified port. If the target does not respond, it is assumed the port is open; however, because UDP is "connectionless," there is no guarantee the original UDP packet successfully made it to the target. When conducting vulnerability assessments on public services (essentially from one Internet presence to another), there are several factors (out of the administrator's control) that could create false positives. Generally, UDP packets are prioritized lower than TCP packets in network transmissions. So, if any portion of the path between the port scanner and target is heavily utilized, the chance for dropped scanning packets is much greater and there is no such thing as retransmission. If a port is closed during a UDP scan, the target responds with "ICMP destination port unreachable." The port scanner uses this message to catalog the port as closed. The following illustration provides a view of how UDP scanning takes place.
Vendor implementations of IP network stacks (software) vary from one platform to the next. In some cases there may be flaws in these implementations. Such flaws provide opportunities for fingerprinting systems as well as anomalies in port scanning results. There are simply too many differences and anomalies to include in this book, but be aware these do exist and learn to understand the results of your organization's port scans. The safest way to ensure the most accurate results possible from port scanning is to use TCP open scanning; however, using other scanning techniques will allow administrators to see what others may see (and glean) about their organizations' networks. Attackers certainly will not resort to using TCP open scanning exclusively; therefore, you must be able to identify various types of port scans from logs, intrusion detection systems, and other anti-attack mechanisms in place. You should also use different techniques during your vulnerability scans to determine whether or not different techniques produce different results.
Port Scanning Inaccuracies
Now that various port scanning techniques have been explained and some of the inaccuracies are outlined, you may be thinking that TCP open scanning is the best technique because it will give a foolproof view of your organization's network. We are here to tell you that "foolproof" is not necessarily the case. Even using open scanning, there is a significant chance the target host will not receive all of your packets and you (or your port scanner) will not receive all of the target's packets being returned.
A data model is provided to demonstrate some important characteristics of port scanning. The characteristics include
-
Just how much data is transferred during a port scan
-
How long it takes to conduct scans
-
How network latency, congestion, and general packet loss can provide port scanning results that may not be entirely accurate
The model includes both TCP and UDP scanning for the purpose of demonstration. The port scanning method in this case is not as important as the outcome of the data calculations; however, the number of packets and subsequently the number of octets (bytes) to transmit will change with different types of scans. This will affect the output numbers in the model. For simplicity, the model assumes the port scanner will send one packet and the target host will return one packet in a transmission checking for a port/service. The data model also includes timing considerations for completing port scans and can help an administrator determine whether to scan all ports or those known as vulnerability assessment ports, which include the first 1024 ports (01023) as well as the ports included in the NMAP-Services configuration.
| Note | The NMAP-Services configuration file comes with the NMAP software distribution and contains the first 1024 ports as well as several hundred other "popular" ports. NMAP is the most popular port scanning tool available and is discussed in more detail later in the chapter. |
These ports in the NMAP-Services file are included in both the "Well Known Ports" and "Registered Ports" ranges assigned by the IANA. IANA has three ranges:
-
Well Known Ports (01023)
-
Registered Ports (102449151)
-
Dynamic and/or Private Ports (4915265535)
Each of these ranges may contain services that are publicly accessible on the Internet; however, most services use ports in the first two ranges and are included in the NMAP-Services configuration.
Table 15-2 contains examples of input information for conducting our data model calculations. These inputs can and should change based on your organization's environment. Comments are included for each field to help the reader understand the inputs.
| Input Section | ||
|---|---|---|
| Host and Protocol Settings | ||
| IP nodes to probe (target network size ) | 512 | Number of nodes/hosts/IP addresses to be scanned in the target network |
| TCP ports to probe per node | 65535 | Total number of TCP ports available |
| UDP ports to probe per node | 65535 | Total number of UDP ports available |
| TCP probe packet size (octets/bytes) | 64 | IP Header + TCP Header + Padding |
| UDP probe packet size (octets/bytes) | 28 | IP Header + UDP Header |
| ICMP response packet size (octets/bytes) | 56 | IP Header + ICMP Header + "Destination Unreachable" message |
| Timing Settings and Approximations | ||
| Network speed (Mbits/sec) | 1.544 | Dedicated bandwidth in Mbits/sec between scanner and target host network |
| Target nodes to probe in parallel | 32 | Configured on the port scanner |
| Minutes required to probe a node (VA) | 0.667 | Time to complete vulnerability assessment port checks from below. Time varies based on port scanning system resources/performance. |
| Minutes required to probe a node (complete) | 32 | Time to complete all port checks. Time varies based on port scanning system resources/performance. |
| Other Network Variable Approximations | ||
| Approximate network latency (TCP RTT in ms) | 90 | Approximate network latency between port scanner and target network/hosts (roundtrip time in milliseconds ) |
| Approximate percentage of retransmissions | 3.94% | 3.5 * the percentage of latency above 80 milliseconds, which is the target latency for carrier networks. 3.5 is the multiplier to ascertain a more accurate percentage. |
| Approximate VA ports to probe per node | 3250 | 1024 privileged ports + 2226 ports currently in NMAP-Services |
Fields in the Input Section of the table are variable and must be input by the data model's user. In the example used, the target network to be scanned is a /23 network or 512 potential hosts/IP addresses. The effective throughput during the port scan is T-1 speed (1.544 Mbps) and our port scanner is configured to scan 32 hosts concurrently. The port scanner in use is capable of completing the VA ports for one node in 40 seconds (or .667 minutes) and all ports for one node can be completed in 32 minutes. These times are determined through experience working with your port scanner (different for each port scanner configuration and infrastructure). You should note the difference in time taken to complete a scan of VA ports and all ports. In many scenarios, it may not be feasible to scan all ports on every host. More information on the total time for port scanning is included in the output shown next. Our approximate retransmissions will be 3.94 percent for average communication between our port scanner and our target network. This percentage is determined by the percentage of latency (90 ms input) above our established target (80 ms consistent with targets of many carrier and large enterprise networks) and is multiplied by a 3.5 multiplier.
| Note | The multiplier may differ in various scenarios and should be tested for accuracy in your environment. This can be done through traffic analysis of your port scanning environment. If your environment contains less retransmissions and the latency is used as a constant, you will be able to adjust the multiplier to be more accurate for your environment. |
Table 15-3 contains output information, which is determined through calculations conducted using the input information. The first portion of the table includes data transfer considerations: how much network traffic is involved in the port scan. In this portion of the calculations, the total octets (or bytes) that will be transmitted is determined by multiplying the number of nodes by the number of TCP ports to probe and the TCP probe size (64 octets). This is added to the same information for the number of hosts multiplied by the UDP ports and the UDP probe size (28 octets). This calculation provides the number of total octets to be transmitted by the port scanner. Since UDP scanning solicits an ICMP response, the actual size of the UDP scanning results is larger than the UDP octets sent. As you can see in the examples, ICMP responses are 56 octets. You must do the same calculations for the expected response packets ( number of hosts * TCP ports * TCP probe size ) and add that to ( number of hosts * UDP ports * ICMP response packet size ). This will give the total expected response octets. Finally, add the two ( transmit and response ) and you have the potential amount of data (in octets or bytes) that must be transferred to conduct your port scan. For convenience, there is also a column in the data model to show this data transfer in gigabytes. As you can see, there is a significant amount of bandwidth involved in port scanning a large network.
| Output Section | |||
|---|---|---|---|
| Data Transfer Considerations | Total Octets | Gigabytes | Comments |
| Minimum # of octets/bytes to transmit (all ports) | 3,086,960,640 | 3.0146 | Total TCP and UDP bytes sent to the target network |
| Potential # of octets/bytes to receive (all ports) | 4,026,470,400 | 3.9321 | Total TCP and ICMP replies sent from target network to port scanner |
| Approximate # of octets/bytes to retransmit | 121,549,075 | 0.1187 | Total retransmission bytes based on retransmission percentage from inputs |
| Potential aggregate probe data to transfer | 7,234,980,115 | 7.0654 | Total network traffic to scan all ports in this scenario |
| Connectivity's Effect on Timing Considerations | |||
| Network speed (Mbits/sec) | 1.544 | ||
| Minimum theoretical transfer time (minutes) | 625 | Total number of minutes required to transfer the amount of data across the specified speed (theoretical because it does not account for network lags, congestion, system resource deficiencies, etc.). Used to compare actual port scan times | |
| Timing Considerations and Comparison | |||
| Minimum time to probe all nodes, all ports (hours) | 8.53 | Number of hours to complete scanning on all ports based on simultaneous host and total time to scan one host | |
| Minimum time to probe all nodes, VA ports (minutes) | 10.67 | Number of minutes to complete scanning on only the VA ports based on simultaneous host and total time to scan one host | |
| Internet Latency and Packet Loss Considerations | |||
| Total potentially available ports inside target network | 67,107,840 | Total number of ports based on the inputs | |
| Margin of error (percentage of potential misses) | 1.18% | One-third of retransmissions | |
| Total number of ports potentially missed by probes | 792,791 | Potential number of ports that could be missed due to retransmissions, latency, etc. | |
The second and third output portions of the data model demonstrate time factors for port scanning. The second portion displays the amount of time in minutes required to transfer that much data based on the network speed. This number is theoretical in that it does not account for other traffic, latency, and so on; however, it can be used to help make determinations on time windows for port scanning. This number is determined by taking the total amount of data to be transferred (in octets) and multiplying it by 8 to determine bits. This must then be divided by the network speed (don't forget to account for the megabytes by dividing speed by 1024). This total must be divided by 1000 and finally by 60 to determine minutes. The formula for this is:
((( total octets * 8) / ( network speed * 1000)) / 1000) / 60
On the third portion, the calculations are based on inputs for average time taken to complete a single node (both VA ports and all ports). The calculation is completed by total number of hosts * minutes required to complete port scan for a node (the top is all ports, the bottom is only VA ports). Note "all ports" is displayed in hours (total was divided by 60).
The last portion displays how ports can be completely missed during scanning due to network latency and congestion. Again, comments are included for each field to help the reader understand what is displayed. The first field in this portion is the number of hosts multiplied by the total number of ports (all TCP ports and UDP ports added together). The second field uses the approximate retransmission percentage and multiplies it by 1/3, assuming that 1/3 of retransmissions will be lost in transit. The final field is the total number of ports potentially missed based on the total number of ports multiplied by the number of retransmissions lost.
As you can see, in order to properly gather information about hosts during vulnerability assessments, there is a significant effect on networks and the amount of bandwidth required, time required by administrators, and a good eye to determine if/when data may not be accurate. As stated previously, port scanning is as much an art as it is a procedure and administrators must learn to analyze port scan results and adjust as necessary to yield the most effective scan possible. In doing so, the target qualification portion of the vulnerability assessment can be considered a success.
Port Scanning Tools
Now that you have an idea of how port scanners work and some limitations or inaccuracies associated with them, we will review some of the more popular port scanners available as well as some configuration hints to help achieve the most accurate port scanning and target qualification as possible.
Network Mapper (NMAP)
One of the most widely used port scanners today is NMAP. It is maintained and available for download at http://www. insecure .org. It can run in both UNIX and Windows environments (with the appropriate libraries and configuration). NMAP is a command line tool natively and provides capabilities for various scanning techniques (as described earlier in this chapter). It can also conduct various fingerprinting techniques including operating system fingerprinting. NMAP functionality is also embedded in (or can be added to) several other tools (such as Nessus, which will be discussed later in the chapter) to provide preliminary port scanning for the other tools to conduct additional analysis. The information below shows options available within NMAP.
root@scanner:~# nmap - -help Nmap 3.75 Usage: nmap [Scan Type(s)] [Options] <host or net list> Some Common Scan Types ('*' options require root privileges) * -sS TCP SYN stealth port scan (default if privileged (root)) -sT TCP connect() port scan (default for unprivileged users) * -sU UDP port scan -sP ping scan (Find any reachable machines) * -sF,-sX,-sN Stealth FIN, Xmas, or Null scan (experts only) -sV Version scan probes open ports determining service & app names/versions -sR RPC scan (use with other scan types) Some Common Options (none are required, most can be combined): * -O Use TCP/IP fingerprinting to guess remote operating system -p <range> ports to scan. Example range: 1-1024, 1080, 6666, 31337 -F Only scans ports listed in nmap-services -v Verbose. Its use is recommended. Use twice for greater effect. -P0 Don't ping hosts (needed to scan http://www.microsoft.com and others) * -Ddecoy_host1,decoy2 [, ...] Hide scan using many decoys -6 scans via IPv6 rather than IPv4 -T <ParanoidSneakyPoliteNormalAggressiveInsane> General timing policy -n/-R Never do DNS resolution/Always resolve [default: sometimes resolve] -oN/-oX/-oG <logfile> Output normal/XML/grepable scan logs to <logfile> -iL <inputfile> Get targets from file; Use '-' for stdin * -S <your_IP>/-e <devicename> Specify source address or network interface - -interactive Go into interactive mode (then press h for help) Example: nmap -v -sS -O http://www.my.com 192.168.0.0/16 '192.88-90.*.*' SEE THE MAN PAGE FOR MANY MORE OPTIONS, DESCRIPTIONS, AND EXAMPLES root@scanner:~# The following output is an example when conducting an NMAP port scan for ports 11024 on the host http://www.acmeexample.com using TCP connect scanning (the -sT flag), not pinging the host first (the -P0 flag), and using the operating system fingerprinting (the -O flag).
| Note | For the purpose of brevity, only the following example is shown for the Acme assessment examples. Normally, you would conduct port scanning on all IP addresses you have identified in your vulnerability assessment thus far. |
root@scanner:~# nmap -P0 -sT -O -p 1-1024 http://www.acmeexample.com Starting nmap 3.75 (http://www.insecure.org/nmap/) at 2005-02-05 13:09 MST Interesting ports on http://www.acmeexample.com (5.125.5.44): (The 1020 ports scanned but not shown below are in state: closed) PORT STATE SERVICE 22/tcp open ssh 25/tcp open smtp 80/tcp open http 443/tcp open https MAC Address: 00:50:8B:D3:8E:DE (Compaq Computer) Device type: general purpose Running: Linux 2.4.X2.5.X OS details: Linux 2.4.0 - 2.5.20 Uptime 225.257 days (since Fri Jun 25 07:16:21 2004) Nmap run completed - - 1 IP address (1 host up) scanned in 1026.706 seconds root@scanner : ~#
Normally, you would want to conduct scanning on more than just the first 1024 ports (such as ports in the NMAP-Services file). Additionally, the -v option (verbose) provides more information during your scan and should be used (it was intentionally left out of this example for brevity). Finally, NMAP will not port scan hosts if ping requests are not responded to. Since many organizations do not allow ICMP responses, the -P0 option should be used to bypass the ping request by NMAP altogether.
| Note | Inaccurate results may be displayed if requesting ping responses prior to port scans with NMAP. Unless conducting ping sweeps , it is recommended to use the -P0 option. |
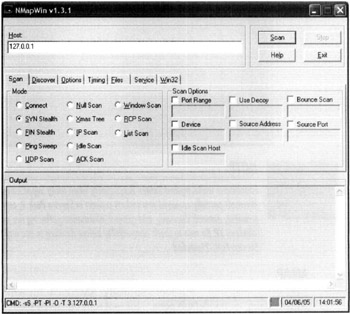
For folks insisting on user interfaces and the ability to point and click, tools such as NMapWin have been developed which utilize NMAP's powerful port scanning capabilities through an easy-to-use graphical user interface. The screenshot at right is from NMapWin and shows some of the configuration options available. The latest version of NMapWin contains an NMAP version that is considerably behind the current version; therefore, any new options in NMAP may not be readily available in NMapWin.
NMAP and NMapWin's capabilities to scan hosts and address blocks provides analysts with a powerful and flexible port scanner capable of tackling most port scanning needs.
SuperScan
A free for noncommercial use port scanner developed by Foundstone, SuperScan provides a good port scanner for Windows users. The port scanning techniques are more limited than NMAP; however, SuperScan does provide several other embedded commands (such as ping, traceroute, DNS zone transfer, whois, and so on) in an attempt to provide Windows users with many of the same tools available in UNIX. It also has the ability to conduct banner grabbing to help identify systems/services. The following screenshot is the main screen of SuperScan Version 4.0.
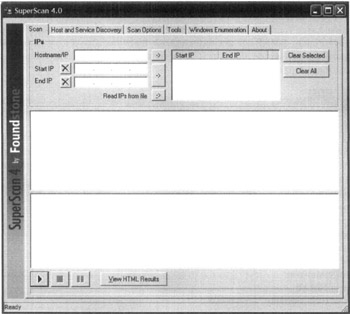
| Note | Foundstone warns against limited functionality when using SuperScan with Windows XP Service Pack 2. Microsoft partially removed raw sockets support in Service Pack 2, and several applications involved in port scanning, network discovery, and general information gathering are now either limited or incompatible with Windows XP. Be sure to check compatibility before deciding to use any tool on systems with Windows XP with Service Pack 2 installed. |
AMAP
Application mapping is this tool's specialty. AMAP has the ability to find applications even when running on nondefault ports. This tool runs on UNIX platforms and transmits messages to target hosts and analyzes the results. It works well to assist NMAP or other port scanners in finding and identifying processes/services. For example, if NMAP finds a port listening but cannot identify it, you can use AMAP to further research the open port and attempt to determine the application or service running. AMAP does not conduct any of its own port scanning; however, it can use NMAP output as an input or be directed at a port manually.
Target Qualification Remarks
In order to effectively qualify targets for attack during your vulnerability assessment, you as the "attacker" must be able to accurately determine what services are running and how those services are publicly available from within your organization. Using tools mentioned in this section allows you to apply more directed attack vectors to your systems and addresses included in your theatre of war. These attack vectors will be explained in detail in the following section.
As for our Acme assessment example, port scanning and target qualifications have been completed on all IP addresses included in our theatre of war. The findings are too numerous to mention here; however, each of these findings will be used to develop our attack profiles for Acme systems. Continuous examples will be used as we move through the attack phase of the assessment.
| | ||
| | ||
| | ||
EAN: 2147483647
Pages: 120