Recording Changes to Documents
This chapter has focused on the many ways you can edit and revise a document so that it is ready to be viewed by others. Under certain circumstances, you might be working on a document that several other people are also working on. For example, there might be one or more writers and one or more reviewers or editors. If you work in this type of environment, this topic will show you how Word can help you track all the various editing changes and suggestions made by the people in your workgroup.
Tracking Changes
You can use Word s Track Changes feature to track the changes made to a document. When this feature is turned on, Word marks any deletions, insertions, and formatting changes. Some changes are marked in the text of the document, and others are displayed in balloons that appear in the margin. The way that changes are marked varies depending on whether you are in Normal view or Print Layout view.
Microsoft Office Specialist: Track, accept, and reject changes to documents
Follow these steps to turn on Track Changes and then make a few changes:
-
On the Tools menu, click Track Changes .
Word displays the Reviewing toolbar, and the letters TRK appear in black on the status bar, indicating that the Track Changes feature is turned on.
-
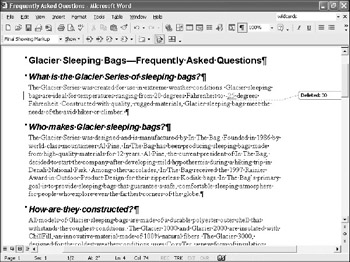
In the first text paragraph of the FAQ, select 30 and type 25 .
Word inserts 25 in colored text with an underline so that the temperature reads “ 25 . It also displays a line in the left margin and a balloon indicating that you deleted 30 in the right margin, as shown in this graphic:
Word uses a different editing color for each person who edits the document, so you can tell at a glance who made what changes. You can select your own color or use the color Word assigns to you. Word might change the color that indicates your edits from time to time, depending on how many people are tracking their changes in the document.
-
In the How are they constructed ? text paragraph, select ChillFill , and click the Italic button.

Personalize edits and comments To change the way tracked changes are displayed in a document, click the Show button on the Reviewing toolbar and then click Options. In the Track Changes options area of the Track Changes dialog box, you can change the way insertions are marked (the default is an underline), change the color of tracked changes, and change the formatting by selecting the options you want from the appropriate drop-down lists. In the Balloons area, you can specify the width of the balloons and in which margin you want them to appear. By default, any changed lines are marked with a black line in the outside margin. You can change these options in the Changed lines area of the dialog box. Click OK to implement your changes.
To change the formatting of balloon text, comment references, or comment text, on the Format menu, click Styles and Formatting. Word displays the Styles and Formatting task pane. In the Pick formatting to apply list, right-click the style you want to change, and click Modify Style. (If the style you want to change is not listed, click the down arrow to the right of the Show box at the bottom of the window, and click Custom to display the Format Settings dialog box. Select the check boxes for the styles you want displayed, and then click OK.) In the Modify Style dialog box, change any options as necessary, and then click OK.
Word does not mark the format change in colored text or with an underline, but displays a line in the left margin and a balloon in the right margin, indicating that there has been a change.
-
Repeat step 3 to italicize CozyTec in the same paragraph.
-
Point to either newly italicized word to display the name of the person assigned to the computer where the change was made, the date, and the type of change.
Reviewing Changes
Microsoft Office Specialist: Track, accept, and reject changes in documents
After changes have been made to a document, you can review them and accept or reject them as necessary. Follow these steps to review the changes made to the FAQ:
-
Press Ctrl+Home to move to the top of the document.
-
On the Reviewing toolbar, click the Next button to highlight the first change made in the document.
-
The original number was correct, so click the Reject Change/Delete Comment button to restore the original number.
-
Click Next , and then click the Reject Change/Delete Comment button again.
Word removes 25 from the document, which removes both the Track Changes formatting and the line in the margin that indicates the change.
Accepting or rejecting all changes at once To accept all changes made to a document in one step, click theAccept Change button s down arrow on the Reviewing toolbar and click Accept All Changes inDocument. To reject all changes in a document in one step, click the Reject Change/Delete Comment button s down arrow and then click Reject All Changes inDocument, or click Delete AllComments in Document to remove all comments.
Sending documents for review When the person you want to review a document can be most easily contacted by e-mail, you can send the document to him or her from within Word. With the document open , click SendTo and then Mail Recipient (forReview) on the File menu. Word opens a message window with the document already attached and the Reviewing toolbar displayed. All you have to do is type the recipient s address on the To line and click Send.
Viewing proposed changes If you want to view the effects of changes to a document without first accepting or rejecting them, you can use the settings in theDisplay for Review box on the Reviewing toolbar. Click the box s down arrow and click Final in the list to view a clean copy of the document as it will look with the changes accepted. Click Original to view a copy of the document as it will look with the changes rejected. The other two options show the document with the changes marked on the screen.
-
Click the Next button again to move to the word ChillFill .
-
You want to keep this formatting change, so click the Accept Change button.
-
Click Next , and then click the Accept Change button again to accept the formatting change to CozyTec .
-
Click the Next button again.
Word displays a message box stating that there are no more changes to this document.
-
Click OK to close the message box.
-
On the Reviewing toolbar, click the Track Changes button to turn off Track Changes.
Comparing and Merging Documents
Microsoft Office Specialist: Compare and merge documents Merge input from several reviewers
Another method for reviewing the changes in a document is to use Word s Compare and Merge feature. This feature is useful if changes have been made without using Track Changes. For example, suppose you send the FAQ to a coworker for review and he or she edits it without tracking changes and then saves it. To quickly identify the changes, you can compare the two documents using the Compare and Merge feature.
Follow these steps to create a second version of the FAQ and then compare and merge it with the original:
-
On the File menu, click Save As , and save a new version of the FAQ document as Frequently Asked Questions2 .
-
Make a few changes to Frequently Asked Questions2 so that you will have something to compare, and then save the document.
-
On the Tools menu, click Compare and Merge Documents .
Reviewing changes by reviewer and type If several reviewers have made changes to a document, you might want to look at each reviewer s changes in turn. On the Reviewing toolbar, click the Show button, and then click Reviewers. Deselect the check boxes of the reviewers whose changes you don t want to review. To review changes by all reviewers at once, click the Show button, click Reviewers, and then click All Reviewers. To display changes by type, click the Show button, and then deselect either Comments, Insertions and Deletions, or Formatting to hide that type of change. Select the type again to display that type of change.
Word displays the Compare and Merge Documents dialog box, which looks similar to the Open dialog box.
-
Select Frequently Asked Questions as the document you want to compare with the open document.
-
Click the Merge button s down arrow.
Word gives you the option of merging the changes into the original document (Frequently Asked Questions), merging the changes into the current document (Frequently Asked Questions2), or merging the changes into a new document.
-
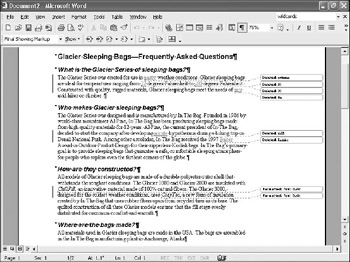
Click Merge into new document .
Word merges the two documents and displays a new document that shows the differences as tracked changes. The new document looks similar to the one shown in this graphic (we ve changed the zoom percentage to 75% so that you can see more of the document):
Merging multiple versions of a document If several reviewers make changes and/or comments in separate copies of an original document, you can merge all of the changes into one document, and then review each change from that document. Open the first document, and on the Tools menu, click Compare and Merge Documents. Open one of the documents that you want to merge. Click the Merge button s down arrow, and click Merge into current document or Merge into new document. Repeat this procedure until all the changed documents are merged into one document.
-
Close the new document without saving it.
-
Close Frequently Asked Questions2 , and then reopen Frequently Asked Questions .
Inserting a Comment
Microsoft Office Specialist: Insert, view, and edit comments
Sometimes reviewers of a document might have a question or an issue they want addressed. Instead of embedding text in the document, they can insert comments. If you are working in Print Layout or Web Layout view, the comments appear in balloons in the margin of the document. In Normal view, the comments appear in a separate pane at the bottom of the document or when you point to them. (If you are working on a network, you can also use discussion comments.) Follow these steps to insert a comment in the Glacier sleeping bag FAQ:
Information about: Discussion comments, page 115
-
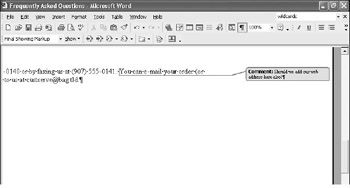
In Print Layout view, scroll the How do I order? text paragraph into view, and click an insertion point to the left of the sentence that begins You can e-mail your order .
-
On the Reviewing toolbar, click the New Comment button.
You can also click Comment on the Insert menu. Word displays a balloon the same color as your tracked changes in the right margin of the document and inserts colored lines to indicate where the new comment will appear.
-
In the balloon, type Should we add our web address here also?
Editing comments You can edit comments in two ways. You can click an insertion point directly in the comment balloon, edit the comment as you would normal text, and then click outside the balloon to complete the change. You can also click the Reviewing Pane button on the Reviewing toolbar. Then locate the comment you want to edit in the pane across the bottom of the window, click an insertion point, and edit the text as usual.
Viewing multiple comments You can view the comments added to a document in two ways. You can cycle through the comments, looking at them one at a time, by moving to the top of the document and on the Reviewing toolbar, clicking the Next and Previous buttons to move from one comment to another. If the document also contains tracked changes and you don t want to review those changes yet, click the Show button, and click Insertions and Deletions and Formatting to toggle the display of those changes off. You can then cycle through just the comments. The second method for viewing comments is to display the Reviewing pane by clicking the Reviewing Pane button on the Reviewing toolbar. Word displays the pane at the bottom of the window, listing all changes and comments in the order in which they appear in the document. To hide the pane, click the Reviewing Pane button again.
The result is shown in this graphic:
-
Click anywhere outside the balloon to save the comment.
Responding to a Comment
Microsoft Office Specialist: Insert, view, and edit comments
Before we finish this chapter, let s respond to the comment by deleting it and then adding a sentence about ordering from the company web site. Follow these steps to make these changes:
-
Press Ctrl+Home .
-
On the Reviewing toolbar, click the Next button.
Word moves to the first comment in the document, which in this case is the only comment.
-
On the Reviewing toolbar, click the Reject Change/Delete Comment button.
-
With the insertion point still located to the left of the sentence that begins You can e-mail your order , type You can also place orders on our web site at www.inthebag.tld.
Word recognizes www.inthebag.tld as a web address and formats the text as a hyperlink.
-
Save your changes.
-
Turn off the Reviewing toolbar, and close the Frequently Asked Questions document.
Information about: Inserting hyperlinks , page 117
EAN: N/A
Pages: 74
- Challenging the Unpredictable: Changeable Order Management Systems
- Distributed Data Warehouse for Geo-spatial Services
- Healthcare Information: From Administrative to Practice Databases
- A Hybrid Clustering Technique to Improve Patient Data Quality
- Development of Interactive Web Sites to Enhance Police/Community Relations