Creating and Customizing Forms
In Chapter 8, you saw how you can use a form to enter and view the information in a database table one record at a time. When we introduced forms, we mentioned that you can create different kinds of forms to accomplish different kinds of tasks . You can also design custom forms. A detailed discussion of customization is beyond the scope of this course, but we do want to give you a taste of it here. In this topic, we ll create and then customize a form for entering information in the Customers table.
| |
When you want to copy a record from one table to another, you can use the Copy and Paste buttons , provided that the fields in the two tables are compatible. If Access has a problem when pasting the record, it puts the record in a Paste Errors table. By scrutinizing the Paste Errors table, you can usually discover the problem and fix it. You can then cut and paste the record from the Paste Errors table into the desired table.
| |
Creating a Form by Using the Form Wizard
If you want to create a form that displays only a few fields from a table that contains many fields, you can use the Form Wizard. Follow these steps to create a form for entering information in the Customers table:
-
With Forms selected on the Objects bar, click the New button on the Database window s toolbar.
Access displays the New Form dialog box.
-
Click Form Wizard , and then click OK .
The first page of the Form Wizard is displayed, as shown in this graphic:

On this page, you can select the table on which you want to base the form and the specific fields you want to include.
-
Click the Tables/Queries text box s down arrow, and click Table: Customers in the drop-down list.
All the fields in the Customers table are now listed in the Available Fields box.
-
Click the >> button to move all the fields to the Selected Fields box, and then click Next .
You could click the Finish button to accept the default settings in the three remaining pages and jump directly to the new form s window, but let s check out the wizard s other pages.
-
Select each layout option to explore what s available. Then select the Columnar option, and click Next .
The page shown in this graphic appears:
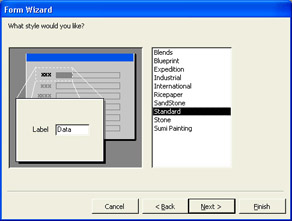
-
Click each style listed on the right in turn , noticing their effect in the window to the left. Then click Sumi Painting , and click Next .
The wizard s final page appears, as shown in this graphic:
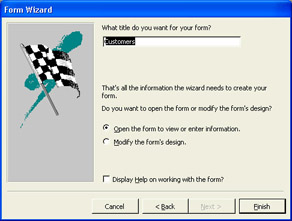
Customers is fine as a title for the form, so you could click Finish at this point to work with the default form. But you want to make a few adjustments to the form s design before you start using it.
-
Click the Modify the form s design option, and then click Finish to display your new form.
-
Double-click the title bar of the Toolbox toolbar to dock it at the left edge of the screen.
The new form looks like the example shown in this graphic:
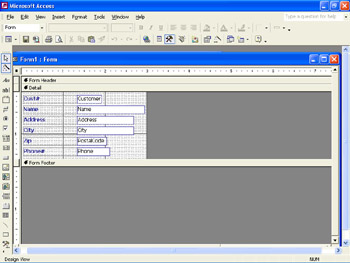
The Form window is divided into three sections: the Form Header area, which can contain information such as a title or date that you want to appear at the top of the form; the Detail area, which displays transparent boxes called labels and white boxes called controls for each of the fields you selected for inclusion in the form; and the Form Footer area, which, like the Form Header, can contain information such as a title or date that you want to appear at the bottom of the form. Two other sections, Page Header and Page Footer, are not visible in the form now on your screen. They contain elements you want to appear on every page of a multipage form. The window also displays horizontal and vertical rulers and gridlines that can help you position controls on the form.
-
Save the Customers form.
| |
You can create a blank form by clicking Form in the New Object button s drop-down list, and then double-clicking Design view in the New Form dialog box. Access switches to Design view and displays a form containing only the Detail area, ready for you to add the controls you want. To add Form Header and Form Footer or Page Header and Page Footer sections, choose the corresponding command on the View menu.
| |
| |
Graphs are sometimes the most logical way to present data because they enable people to quickly make visual comparisons. In Access, you graph data in a form. You select the table you want to work with, click the New Object button s down arrow, select Form, and then doubleclick Chart Wizard. (You might need to install the feature first.) The Chart Wizard then helps you plot your data.
| |
Customizing a Form
To get a feel for how to customize a form, let s move some labels and controls in the form you just created so that its fields are grouped more logically:
-
Scroll the Access window so that you can point to the Form window s bottom border.
The pointer changes to a double-headed arrow.
-
Hold down the left mouse button, and drag upward to decrease the height of the Form window. Then scroll back to the top of the Access window.
Changes to form layout, unlike changes to content, are not saved automatically. So as you follow these steps, save your work often by clicking the Save button, in case of computer crashes or power surges
-
Click the Name control.
Small squares called handles appear around the control s border.
-
Point to any border (not a handle) of the selected control.
-
When the pointer changes to an open hand, hold down the left mouse button, and then drag the control and its label to the right of the Customer control.
You can use the gridlines and rulers to help align the controls.
-
Select and drag the Phone control and its label under the Customer control.
-
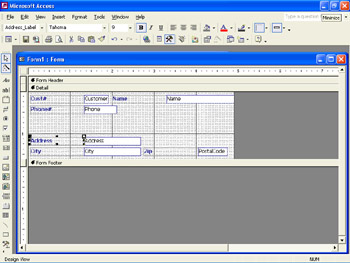
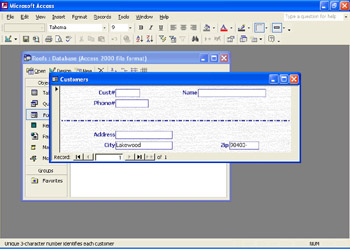
Select and drag the City control and its label down into the space formerly occupied by the Phone control, and drag the PostalCode control down and to the right of the City control. Then drag the Address control down so that it sits just above the City control.
The fields are now arranged in two groups on the form, as shown in this graphic:
-
Select all the labels by holding down the Shift key and clicking each in turn. Then click the Align Righ t button on the Formatting toolbar.
| |
To move a control and its label so that they maintain their relative positions on a form, select the control, point to its border, and drag the open hand that appears. To move a control independently of its label, select the control, point to the large handle in its upper-left corner, and drag the pointing hand that appears. Similarly, to move a label independently, select the label, point to its large handle, and drag the pointing hand.
| |
Using the Toolbox Toolbar
The Toolbox provides many tools with which you can customize forms. We ll experiment a bit with a few tools here, but you might want to practice using some of the other tools to see what s possible. If you need help identifying any of the tools, click What s This? on the Help menu, point to the tool you want to know more about, and click. Let s use the Toolbox s Line tool to draw a line to separate the two groups of fields in our form:
-
Click the Line button on the Toolbox toolbar, and then position the cross-hair pointer to the right of the ¾-inch mark on the vertical ruler.
-
Hold down the left mouse button, and drag a straight line until the pointer is aligned with the 5 ½-inch mark on the horizontal ruler.
-
Click the Save button to save your changes to the form.
-
Click the View button to switch to Form view, where the form looks like the one shown in this graphic:
-
Enter the following customer records, pressing Tab to move from field to field and to start a new record:
Cust#
Name
Address
City
Zip
Phone#
28
Western Construction Co.
2611 Central Way
5550154
30
Durahomes
4969 Market St. #211
Pinedale
98412
5550165
33
Shurbuilt
966 8th Street
5550142
34
Lakewood City Const. Dept.
28 Central Way
5550166
35
James Brady
511 Shoreline Drive
Pinedale
98412
5550121
41
Marcus Wilson
1701 Airport Way
5550182
45
Roberts Construction
743 Stewart Road
5550144
-
Close the Customers form.
| |
When you move controls around on a form, the original tab order is maintained . In other words, pressing the Tab key still moves you from field to field in the original order. To change the tab order so that you can move from field to field in a logical way, in Design view, select a control, click the Properties button, and then on the Other tab change the Tab Index setting to the order you want.
| |
EAN: N/A
Pages: 116