Adding an Output Device
This chapter mentioned that you can set up AutoCAD for more than one output device. You can do this even if you have only one printer or plotter connected to your computer. You might want multiple printer configurations in AutoCAD for many reasons. You might want to set up your system so that you can print to a remote location over a network or the Internet. Some printer configurations are strictly file-oriented , such as the AutoCAD DWF format for Internet Web pages or raster file output. (See Chapter 21 for more on .dwf files.)
AutoCAD works best with printers and plotters configured as Windows system devices. Although you can add devices through the AutoCAD Plot Manager, Autodesk recommends that you set up your plotters and printers as Windows devices and then use the System Printer option in AutoCAD to select your output device. (In Windows XP, choose Control Panel Printers And Faxes Add A Printer to configure a new printer.)You can use the Add-A-Plotter Wizard to create predefined settings for your system printer so that you can quickly choose a printer or plotter setup.
You can also configure additional printers through the AutoCAD Plot Manager; this method also uses the Add-A-Plotter Wizard. Here's how it's done:
-
Choose File Plotter Manager to open the Plotters window. Your view of the Plotters window might look a little different depending on your operating system, but the same basic information is there.
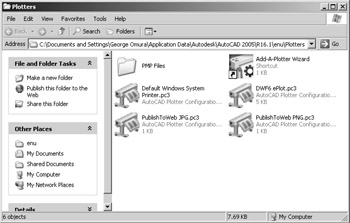
You can also open this window by clicking the Add Or Configure Plotter button in the Output tab of the Options dialog box. It's just an Explorer window showing you the contents of the Plotters folder under the main AutoCAD folder.
-
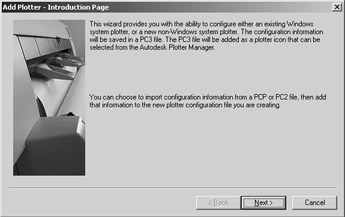
Double-click the Add-A-Plotter Wizard icon to open the Add Plotter dialog box.
-
Click Next. The next screen of the wizard lets you select the type of setup you want. Here you are offered three options: My Computer, Network Plotter Server, and System Printer. The My Computer and the Network Plotter Server options offer plotter options based on Auto- CAD-specific drivers. The main difference between these two options is that the Network Plotter option asks you for a network server name . Otherwise, they both offer the same set of options. The System Printer option will use the existing Windows system printer as the basis for the setup.
-
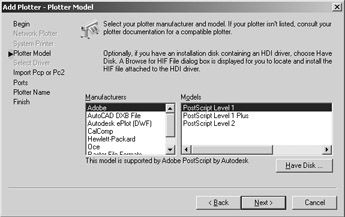
If you click the My Computer radio button and then click Next, you see a listing of plotter models that are supported by AutoCAD directly through AutoCAD's own drivers. If you use a PostScript device, or if you want to convert drawings to raster formats, this is the place to select those options.
-
After you've made a selection, click Next. You are then asked if you want to use an existing PCP or PC2 configuration file for the selected plotter. PCP and PC2 configurations files are plotter configuration files from earlier releases of AutoCAD.
-
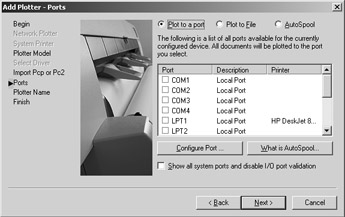
Unless you plan to use one of those files, click Next on the Import PCP Or PC2 screen. If you selected My Computer in step 4, the Ports screen opens.
If you selected a different option in step 4, skip this option, and the Plotter Name screen opens.
-
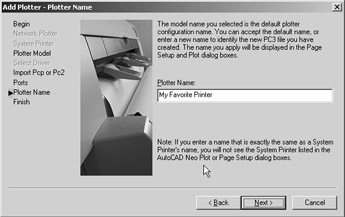
Enter a name for this configuration in the space provided; then click Next to open the Finish screen.
-
This screen gives you the option to make adjustments to the configuration you've just created by clicking the Edit Plotter Configuration button. Click Finish to exit the AddPlotter Wizard. Your new configuration appears in the Plotters window.
In step 8, you can further adjust the plotter settings by clicking the Edit Plotter Configuration button to open the Plotter Configuration Editor dialog box.
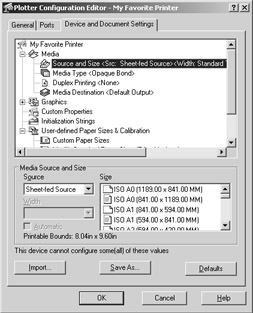
This editor lets you fine-tune your plotter settings. For example, you can calibrate your plotter for more accurate scaling of your plots, or if you're creating a raster file output configuration, you can create a custom page setting for extremely high resolution raster images.
After you've set up a plotter, the plotter information is stored as a file with the .pc3 filename extension in the Plotters subfolder of the main AutoCAD folder.
| |
If your work involves producing manuals, reports , or similar documents, you might want to add the Raster File Export option to your list of plotter configurations. The Raster File Export option lets you plot your drawings to a wide range of raster file formats including CALS, JPEG, PCX, Targa, Tiff, and BMP. You can then import your drawings into documents that accept bitmap images. Images can be up to 8000 8000 pixels (set through the Plotter Configuration Editor) and can contain as many colors as the file format allows. If you need several different raster formats, you can use multiple instances of this or any plotter configuration.
If you want to convert your 3D wireframe models into 2D line drawings, add the AutoCAD DXB File output format. This format lets you plot a 3D image to a file. You can then import the resulting .dxb file by choosing Insert Drawing Exchange Binary.
Yet another option is to add an HPGL output device to your AutoCAD setup and then plot your 3D model to an HPGL file. You can then use the Convert PLT To DWG Express tool (choose Express File Tools Convert PLT To DWG) described in Chapter 19 to import an HPGL plot file into an AutoCAD drawing.
| |
Editing a Plotter Configuration
In step 7 of the previous exercise, you exited the AddPlotter Wizard without editing the newly created plotter configuration. You can always go back and edit the configuration by opening the Plotters window (choose File Plotter Manager) and double-clicking the configuration you want to edit.
You can also double-click the .pc3 file of the configuration you want to edit.
Many users will use their Windows system printer or plotter for other applications besides Auto- CAD, and frequently the AutoCAD settings for that printer will be different from the settings used for other applications. You can set up AutoCAD to automatically use its own settings so you don't have to reconfigure your Windows system printer every time you switch applications. To do so, take the following steps:
-
Choose File Page Setup Manager to open the Page Setup Manager dialog box.
-
Click the Modify button to open the Page Setup dialog box.
-
Select the printer that you want to configure in the Name drop-down list of the Printer/ Plotter group .
-
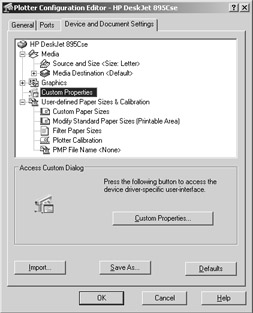
Click the Properties button just to the right of the drop-down list to open the Plotter Configuration Editor dialog box. A list box displays all the properties of the printer or plotter. Not all these properties are editable, however. Each time you click a property in the list box, the lower half of the dialog box displays the options associated with that property.
-
Click the Custom Properties item in the list box. The lower half of the dialog box displays the Custom Properties button.
-
Click the Custom Properties button. You'll see the Windows system printer options. These are the same options you see when you edit the properties of your printer by choosing Start Settings Printers.
-
Adjust these settings the way you want them when you plot from AutoCAD and click OK.
-
Back in the Plotter Configuration Editor dialog box, click the Save As button. A standard file dialog box appears.
-
Enter the name of the plot configuration you've set up, or accept the default name, which is usually the name of the Windows printer or plotter, and click OK.
-
Click OK in the Plotter Configuration Editor dialog box; then click OK in the Page Setup dialog box.
The Plotter Configuration Editor offers a wide variety of options that are fairly technical in nature. If you want to know more about the Plotter Configuration Editor, see Appendix B.
EAN: 2147483647
Pages: 261