Adding a Landscape and People
There's nothing like adding landscaping and people to a rendering to add a sense of life and scale. Computer images, in particular, need landscape props because they tend to appear cold and somewhat lifeless. AutoCAD offers a set of prebuilt landscape objects to help soften the appearance of your rendering.
Let's add a few trees and people to the Facade model:
-
 Choose View Redraw and then choose View Render Landscape New. You can also click the Landscape New tool on the Render toolbar to open the Landscape New dialog box.
-
Click Quaking Aspen in the Library list and then click Preview to view the item.
-
Use the slider just below the Preview button and change the Height value from 20 to 100, the highest setting.
-
Click the Position button, and then click the point indicated in the first image in Figure 17.28 to place the tree in front of the buildings . You might have to adjust your view.
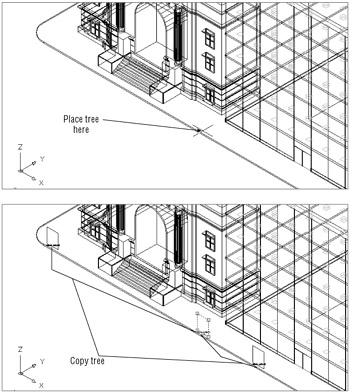
Figure 17.28: Placing the trees in the Facade model -
Click the View Aligned check box to deselect this option. You'll learn more about View Aligned later in this section.
-
Click OK. The tree appears as a rectangle with a text label telling you what it is, as shown in the second image in Figure 17.28.
-
Copy the tree to the positions indicated in the second image in Figure 17.28.
-
Now render the view. You will see a view similar to Figure 17.29.
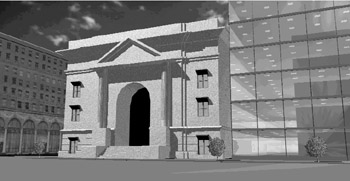
Figure 17.29: The rendered view of the model with the trees
The trees you added are actually two-dimensional bitmap images. If you view the model from a glancing angle, the trees will begin to look thinner, and you will see that they are indeed two-dimensional. You can use two options in the Landscape New dialog box to reduce the 2D effect. The View Aligned option you turned off in step 5 forces the tree to align to your point of view, so you never see the object edge-on. Another option, Crossing Faces, creates two images of the object to appear. Each image is crossed over the other, creating an almost 3D look.
| |
If you use the List tool to find out what the landscape objects are, you would find that they are called Plant or People. Does AutoCAD 2005 have some object types you don't know about? The answer is maybe.
Since AutoCAD 14, third-party developers have been able to add new object types that aren't native to the program itself. This is a fairly revolutionary idea. AutoCAD uses this capability by adding Plant and People objects. However, there is a problem with adding new object types: you need the third-party application to view and edit the objects you create. When the application is not present, the new objects become what Autodesk calls proxies. You can edit proxies with a limited set of editing tools. The level of " editability "is determined by the application that created the proxies.
As far as AutoCAD's rendering tools are concerned , the application is always present, so you can always edit the trees and people.
The ability to add custom object types to an AutoCAD drawing has some far-reaching implications. Autodesk and other third party developers have used custom objects to enhance their add-on products, and you, the end user , can benefit in many ways. For example, Autodesk's own Architectural Desktop application adds a variety of custom 3D objects to AutoCAD such as walls and doors for building design. The Landscape tool in AutoCAD offers some examples of how custom objects can be applied to AutoCAD.
| |
There are a few things wrong with the rendering shown in Figure 17.29. The trees are too small and they appear to be shaded on the wrong side. The shadows on the trees don't reflect the location of the Distant Light setting in the model. The street is also unusually empty for a daytime scene. You can easily fix the trees by using standard AutoCAD editing tools. You can also add some people by using the Landscape New tool in the Render toolbar. Here are the steps:
-
Redraw the screen and then click one of the trees to expose its grips.
-
Click the grip at the base of the tree, right-click the mouse, and choose Rotate from the shortcut menu.
-
Type 180
 to rotate the tree 180 degrees.
 -
Click the grip again, right-click the mouse, and this time choose Scale.
-
Enter 2.4
to increase the size of the tree by 2.4 times. -
Repeat steps 1 through 5 for each of the other trees.
-
Open the Landscape New dialog box again and select People #1 from the list.
-
Enter a Height value of 66 , and then use the Position button to place the people at the entrance of the Facade building (see Figure 17.30). The people will appear as triangles in the Wireframe view. (Make sure you use the Nearest Osnap override to place the people.)
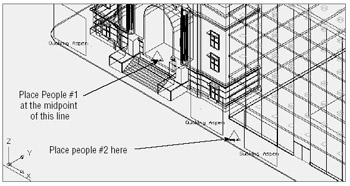
Figure 17.30: Placing people in the scene -
Click OK. Then repeat steps 7 and 8 to place People #2 in front of the office building between the trees (see Figure 17.30).
-
Render the view. Your view will look similar to Figure 17.31.
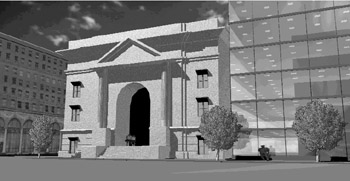
Figure 17.31: The view after rendering, with the trees adjusted and people added
The shadows of the trees now match the sun's location, and they are a size better suited to the model. However, notice that the people are not lit very well. This is because you did not turn off the View Aligned option when you placed them. Therefore, they are facing your view tilted slightly away from the sun. This has the effect of darkening their image.
You can choose View Render Landscape Edit to change the settings for landscape objects. You will be prompted to select an object. After you do, the Landscape Edit dialog box opens, which is identical to the Landscape New dialog box. From there, you can change the settings for the selected landscape object.
EAN: 2147483647
Pages: 261
- Step 3.2 Use PuTTY / plink as a Command Line Replacement for telnet / rlogin
- Step 3.4 Use PuTTYs Tools to Transfer Files from the Windows Command Line
- Step 4.7 Using Public Key Authentication for Automated File Transfers
- Step 6.2 Using Port Forwarding Within PuTTY to Read Your E-mail Securely
- Step 6.3 X11 Forwarding