9.3. Developing a Custom JSF Tag In Chapter 7, we wrote a custom JSP tag. Now we're going to write a custom JSF tag. There are similarities between the two types of tag. For example, we use a Tag Library Definition (TLD) file to define both JSP and JSF custom tags, and we use tag handlers to handle both. However, there are also important differences: The JSP custom tag extends javax.servlet.jsp.tagext.TagSupport; the JSF custom tag extends javax.faces.component.UIComponentBase. The JSF custom tag has another class, called a renderer, which puts information into the view (in our case, a JSP page). The renderer extends javax.faces.render.Renderer.
Figure 9-4 shows how the tag class and the renderer fit together with the tag library and the JSP that uses the library. Figure 9-4. Custom tag files and interactions 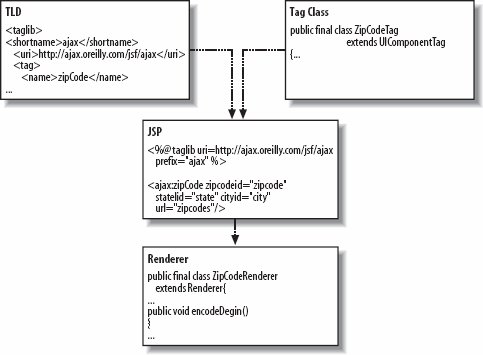
Let's start with what we know. We want a tag to display city and state information based on a zip code. We'll first need to write a TLD file to define the tag. The TLD file must have a parent tag of <taglib>; within that any number of <tag>s can be defined. In this case, we only need to define one tag. Then, in the <tagclass> element, we'll define the class that supports the tag. In this example, it is the full class name of the ZipCodeTag class. 9.3.1. Writing the TLD File The Tag Library Definition file, presented in Example 9-5, defines a single tag: zipCode. This tag contains three fields: zip code, state, and city. Example 9-5. The TLD file for JSF <taglib> <tlibversion>1.0</tlibversion> <jspversion>1.1</jspversion> <shortname>ajax</shortname> <uri>http://ajax.oreilly.com/jsf/ajax</uri> <info>adds Ajax-enabled tags to your JSP</info> <tag> <name>zipCode</name> <tagclass>com.oreilly.ajax.ZipCodeTag</tagclass> <bodycontent>empty</bodycontent> <attribute> <name>zipcodeId</name> <required>true</required> </attribute> <attribute> <name>stateId</name> <required>true</required> </attribute> <attribute> <name>cityId</name> <required>true</required> </attribute> <attribute> <name>url</name> <required>true</required> <rtexprvalue>true</rtexprvalue> </attribute> </tag> </taglib>
|
This TLD file is the same as the one used in Chapter 7 to create an Ajax JSP tag. It defines four inputs for this tag: zipcodeId, stateId, cityId, and url. The <required> tags indicate that all of these inputs are required; none are optional. The TLD works in tandem with the tag handler and the renderer to transfer data from the web page to the JSF application. We'll look at the tag handler next. 9.3.2. Writing the Tag Handler Now that we have the TLD, we need to write a tag handler. This tag handler must extend javax.faces.webapp.UIComponentTag. It's very similar to a familiar JSP tag handler, but it requires two new methods: in addition to the usual getters and setters, we need to implement the methods getrendererType( ) and getComponentType( ). The former passes the name of the tag to the renderer, and the latter passes the type to the component on the web page. The code for our tag handler, ZipCodeTag, appears in Example 9-6. Example 9-6. ZipCodeTag.java package com.oreilly.ajax; import java.io.IOException; import javax.faces.component.UIComponent; import javax.faces.context.FacesContext; import javax.faces.el.ValueBinding; import javax.faces.render.Renderer; import javax.faces.webapp.UIComponentTag; public final class ZipCodeTag extends UIComponentTag { private String zipcodeId = "0"; private String stateId = ""; private String cityId = ""; private String url = ""; public String getCityId( ) { return cityId; } public void setCityId(String city) { this.cityId = city; } public String getStateId( ) { return stateId; } public void setStateId(String state) { this.stateId = state; } public String getUrl( ) { return url; } public void setUrl(String url) { this.url = url; } public String getZipcodeId( ) { return zipcodeId; } public void setZipcodeId(String zipcodeId) { this.zipcodeId = zipcodeId; } public String getComponentType( ) { return "oreilly.ajax.ZipCode"; } public String getRendererType( ) { return "ZipCode"; // ZipCodeRenderer } public void release( ) { zipcodeId = null; stateId = null; cityId = null; url = null; } protected void setProperties(UIComponent component) { super.setProperties(component); ZipCode input = null; try { input = (ZipCode) component; } catch (ClassCastException cce) { throw new IllegalStateException( "Component " + component.toString( ) + " not expected type. Expected: ZipCode. Perhaps you're missing a tag?"); } FacesContext context = getFacesContext( ); if (cityId != null) { if (isValueReference(cityId)) { ValueBinding vb = context.getApplication( ).createValueBinding(cityId); component.setValueBinding("cityId", vb); } else { input.setCityId(cityId); } } } }
|
The ZipCodeTag class extends UIComponentTag, a class from the JavaServer Faces library. Most of ZipCodeTag should be familiar. It uses setters and getters to manage the tag's parameters: the zip code, state, and city. The JSF application uses the release( ) method to reset the values. The setProperties( ) method binds the tag parameters to the values passed back from the server. The two unfamiliar methods are really very simple. The faces-config.xml file defines a <component-type>, and ZipCodeTag.getComponentType( ) simply returns the fully qualified class name of this type as a String. Likewise, getrendererType( ) simply returns the name of the renderer we'll be using (in this case, just the string "ZipCode"). Note that it doesn't require a fully qualified class name. 9.3.3. Creating a Renderer and Render Kits The <render-kit> element in the configuration file defines how the view will be rendered. A component does not directly create its output. Instead, it calls a renderer, which is contained in a render kit and is responsible for creating a particular kind of output. The default render kit, which we will use in this example, contains renderers for HTML. Other render kits might contain renderers for other markup languages and produce output for other displays, such as mobile displays. The renderer for ZipCodeTag, presented in Example 9-7, uses the encodeBegin( ) method to inject the JavaScript into the JSP page. The renderer also inserts the HTML elements that we need, such as the city, state, and zip code fields. Example 9-7. ZipCodeRenderer writes information directly into the web page public final class ZipCodeRenderer extends Renderer { public boolean getRendersChildren( ) { return true; } public void encodeBegin(FacesContext context, UIComponent component) throws IOException { ResponseWriter writer = context.getResponseWriter( ); Map attributeMap = component.getAttributes( ); Object o = attributeMap.get("zipcodeId"); writer.startElement("script", component); writer.writeAttribute("type", "text/javascript", null); // this should be an attribute, like cityId String src = "scripts/ora-ajax.js"; writer.writeAttribute("src", src, null); writer.endElement("script"); writer.startElement("div", component); writer.writeAttribute("id", "ajaxDivId", null); writer.write("Hola This is a div"); writer.endElement("div"); writer.write("\n"); writer.startElement("table", component); writer.startElement("tr", component); writer.startElement("td", component); writer.write("Zip Code: "); writer.endElement("td"); writer.startElement("td", component); writer.startElement("input", component); writer.writeAttribute("onblur", "retrieveCityState( );", null); writer.writeAttribute("type", "text", null); writer.writeAttribute("id", "zipcodeId", null); writer.endElement("td"); writer.endElement("tr"); writer.startElement("tr", component); writer.startElement("td", component); writer.write("City: "); writer.endElement("td"); writer.startElement("td", component); writer.startElement("input", component); writer.writeAttribute("type", "text", null); writer.writeAttribute("id", "cityId", null); writer.endElement("td"); writer.endElement("tr"); writer.startElement("tr", component); writer.startElement("td", component); writer.write("State: "); writer.endElement("td"); writer.startElement("td", component); writer.startElement("input", component); writer.writeAttribute("type", "text", null); writer.writeAttribute("id", "stateId", null); writer.endElement("td"); writer.endElement("tr"); writer.endElement("table"); writer.write("\n"); } public void encodeEnd(FacesContext context, UIComponent component) { } }
|
The renderer extends javax.faces.render.Renderer and overrides its encodeBegin( ) and encodeEnd( ) methods. encodeBegin( ) injects information at the start of the tag, and encodeEnd( ) writes information at the end. We use encodeBegin( ) to insert the reference to our JavaScript library, ora-ajax.js.  | We could have hardcoded the JavaScript as a String and written it directly into the page, as we did in Chapter 7. There are advantages to doing this: it ensures that the JavaScript will always be there (no extra file is needed), and it prevents the JavaScript from being changed, which can introduce unexpected behavior. However, the disadvantages of hard-wiring the JavaScript are significant. One major consideration is that it is harder to change the JavaScript code when you're developing and debugging the library; instead of changing a text file, you must change a Java class, which in turn requires you to recompile and redeploy. This could be a serious disadvantage if many changes to that file are required. |
|
The javax.faces.context.ResponseWriter class has some useful methods at its disposal. Methods such as startElement( ), endElement( ), and writeAttribute( ) allow you to write markup to a client without being tied to a specific implementation. For example, in a different render kit, these methods could generate the correct markup to work with a cell phone. Using the ResponseWriter is fairly simple and intuitive. In our renderer, the following code: writer.startElement("td", component); writer.write("State: "); writer.endElement("td"); writer.startElement("td", component); writer.startElement("input", component); writer.writeAttribute("type", "text", null); writer.writeAttribute("id", "stateId", null); writer.endElement("td");
writes this table tag: <td><input type="text" ></td>
The application is just about ready to make the Ajax call. We have our TLD, our tag handler, and our renderer. All we're missing is the ora-ajax.js file. We'll attack that next. 9.3.4. Writing the JavaScript Support File The ora-ajax.js file is inserted into the HTML generated by our JSP by the <ajax:zipCode> tag. This file is presented in Example 9-8. Example 9-8. ora-ajax.js function retrieveCityState( ) { var zip = document.getElementById("zipcodeId"); // the url in this case must be .faces to be detected var url = "ZipCode-Ajax.faces?zip=" + escape(zip.value); if (window.XMLHttpRequest) { req = new XMLHttpRequest( ); } else { if (window.ActiveXObject) { req = new ActiveXObject("Microsoft.XMLHTTP"); } } req.open("Get", url, true); req.onreadystatechange = callbackCityState; req.send(null); } function populateCityState( ) { var jsonData = req.responseText; var myJSONObject = eval("(" + jsonData + ")"); var city = document.getElementById("cityId"); city.value = myJSONObject.location.city; var state = document.getElementById("stateId"); state.value = myJSONObject.location.state; } function callbackCityState( ) { if (req.readyState == 4) { if (req.status == 200) { if (window.XMLHttpRequest) { nonMSPopulate( ); } else { if (window.ActiveXObject) { alert("mspopulate"); msPopulate( ); } } } } } function nonMSPopulate( ) { var resp = req.responseText; var parser = new DOMParser( ); var dom = parser.parseFromString(resp, "text/xml"); cityValue = dom.getElementsByTagName("city"); var city = document.getElementById("cityId"); city.value = cityValue[0].childNodes[0].nodeValue; stateValue = dom.getElementsByTagName("state"); var state = document.getElementById("stateId"); state.value = stateValue[0].childNodes[0].nodeValue; } function msPopulate( ) { var resp = req.responseText; var xmlDoc = new ActiveXObject("Microsoft.XMLDOM"); xmlDoc.async = "false"; xmlDoc.loadXML(resp); cityValue = xmlDoc.getElementsByTagName("city"); var cityField = document.getElementById("cityId"); cityField.value = cityValue[0].firstChild.data; stateValue = xmlDoc.getElementsByTagName("state"); alert("state" + stateValue); var state = document.getElementById("stateId"); state.value = stateValue[0].firstChild.data; }
|
This JavaScript file is no different from the JavaScript support used in previous chapters of this book. The retrieveCityState( ) method configures the XMLHttpRequest with a URL and callback method. The callback method, callbackCityState( ), determines whether or not the browser is a Microsoft product and calls the appropriate procedure to populate the form fields. |