Section 8.2. Adding Ajax to Struts with DWR


8.2. Adding Ajax to Struts with DWR

There is really nothing special about adding Ajax support to a Struts application. Once you understand how to add Ajax support to a regular application, you'll find that adding it to a Struts application follows the same rules: you have a JSP that either calls an Ajax library such as Prototype or DWR or contains your own implementations of Ajax features written in JavaScript. Using an established library such as DWR is more efficient than writing your own Ajaxian code, because it will already have been tested against many browsers and should support browsers that you haven't even tried.

In Chapter 6, we used Scriptaculous to build a shopping application, but that application lacked a way to add new products. Now we'll explore how to use Struts and DWR to add new products to the PRODUCTS table in the database.

Figure 8-4 shows what the application's product management page will look like after the coding in this section is implemented.

Figure 8-4. The initial view of the Product Manager


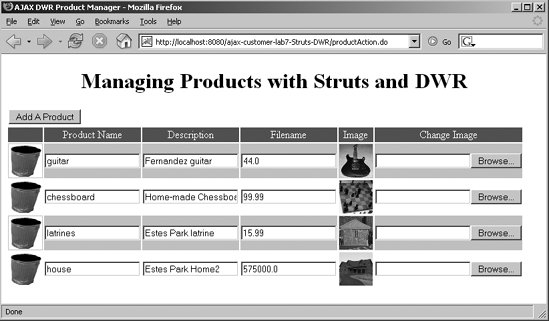
The DWR framework introduced in Chapter 6 is well suited to working with Struts, and because it automatically generates much of the JavaScript that is needed for Ajax, using DWR minimizes the amount of JavaScript that you need to write.

Let's look back at the database tables we used for the shopping cart example in Chapter 6. The tables are shown in Figure 8-5.

Figure 8-5. The shopping cart database tables


Figure 8-5 was generated using the MySQL ODBC driver. Notice that the table names are lowercase (e.g., products). That's how tables appear when you use MySQL on Microsoft Windows: the table names revert to lowercase, and the column references in the queries are not case-sensitive.


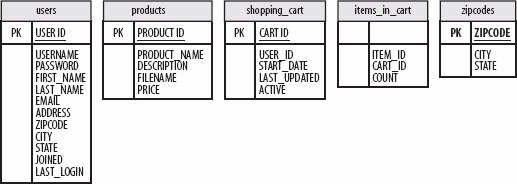
We have written support for all but the PRODUCTS table. In order to add a product to this table, we currently have to add a row manually and then copy the product's picture (a PNG file) to the correct directory. This application will make it easier to add or modify products.

There is no real difference between a Struts application and a standard servlet/JSP application when using Ajax techniques. In both cases, the JavaScript in the JSP calls methods in the model. Struts actions can answer the Ajax calls, but using Struts actions is only suggested, not required. In this application, Struts actions will not answer the Ajax calls; we'll use DWR to tie the ProductManager directly to the JavaScript calls.

The JSP for this application lists the existing products while allowing the user to add products to the database. A div wraps the product list; this div is dynamically updated each time a new product is added.

Figure 8-6 shows the sequence of events that adds a product to the database. The Product Manager makes a call through the browser to the ProductManager application. The browser issues a request to get the image path, which is the path (on the server) where the images are stored. Next, the browser issues a call to the DWR layer, requesting the product list. DWR marshals the request to an instance of the Java ProductManager class, which returns the list.

Figure 8-6. The Product Manager Struts Ajax application


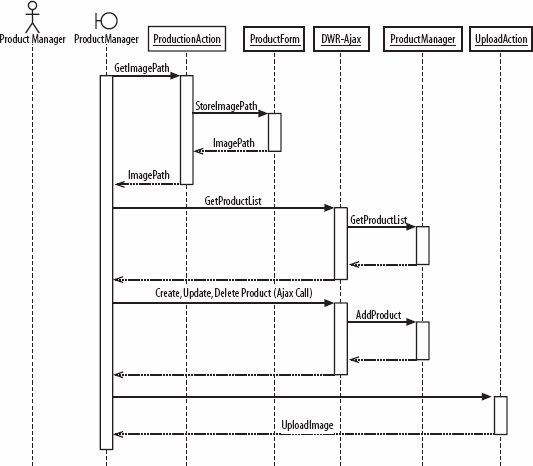
The next part of the sequence is a Create, Update, or Delete command, depending upon what the user needs to do next. Each of those commands is passed to the ProductManager through the DWR library.

The last command is UploadImage. This is not an Ajax call, because of security limitations; JavaScript isn't allowed to access files on the user's filesystem, so to put new images on the server, the JSP calls the Struts UploadAction.

8.2.1. Uploading Files

Struts is only used to initialize the locations of the image files and to upload the product images. The Struts form that passes the image data to UploadAction is called UploadForm (Example 8-9). This form uses a special Struts class called FormFile, which allows a Struts form to hold a file. The file can later be manipulated by the corresponding action (in our case, UploadAction).

Example 8-9. UploadForm.java

 import org.apache.struts.action.*; import org.apache.struts.upload.FormFile; public class UploadForm extends ActionForm {     private FormFile uploadFile;     private int productId;     public int getProductId( ) {         return productId;     }     public void setProductId(int productId) {         this.productId = productId;     }     public FormFile getUploadFile( ) {         return uploadFile;     }     public void setUploadFile(FormFile uploadFile) {         this.uploadFile = uploadFile;     } } 

UploadForm is a simple Java bean that transfers data between the HTML form and the UploadAction (Example 8-10), which does the work. Again, UploadAction can't use Ajax because JavaScript does not have access to the filesystem. We have to use the <input type="file" /> tag in the JSP and let the HTML tag do the work of browsing for a file.

Example 8-10. The UploadAction

 public class UploadAction extends Action {     static String productsDirectory = null;     private String getFilePath( ) throws FileNotFoundException, IOException {     String resourceFilepath = this.getServlet().getServletContext( ).getRealPath(             "/shopping.properties");     Properties configs = new Properties( );     configs.load(new FileInputStream(resourceFilepath));     String dir = this.getServlet().getServletContext( ).getRealPath("")+             "/"+configs.getProperty("products.directory");     return dir; } public ActionForward execute(         ActionMapping mapping,         ActionForm form,         HttpServletRequest request,         HttpServletResponse response) throws Exception {     UploadForm myForm = (UploadForm)form;     int productId = myForm.getProductId( );     // process the FormFile     FormFile myFile = myForm.getUploadFile( );     String fileName = myFile.getFileName( );     byte[] fileData = myFile.getFileData( );     FileOutputStream out = new FileOutputStream(getFilePath( )+"/"+fileName);     out.write(fileData);     out.close( );     ProductManager.updateProductById(productId,"FILENAME",fileName);     return mapping.findForward("success"); } 

Although we can't use Ajax to upload the image, this drawback is hardly noticeable in light of all the other features that use Ajax. For example, one of the most common tasks that a product manager would perform would be to change a product's price. This is really easy using Ajax: simply editing the PRICE field and then moving to another field fires the JavaScript:onchange event and updates the database.

8.2.2. Creating the JSP

Now that we've written our actions, let's dig into the fun stuff.

The productmanager.jsp page (Example 8-11) starts by including several JavaScript files, only one of which we're responsible for writing (oreillyProductManager.js). The next file, dwr/interface/ProductManager.js, is generated automatically by DWR; the remaining two files are DWR's support libraries (engine.js and util.js).

Example 8-11. productmanager.jsp

 <html> <head>     <title>AJAX DWR Product Manager</title>     <script src='/books/4/163/1/html/2/scripts/oreillyProductManager.js'></script>     <script src='/books/4/163/1/html/2/dwr/interface/ProductManager.js'></script>     <script src='/books/4/163/1/html/2/dwr/engine.js'></script>     <script src='/books/4/163/1/html/2/dwr/util.js'></script>     <style type="text/css">         .productlist {border:1; border-color:#cccccc;}     </style> </head> <body onload='populateData( )'>     <div>         <h1><center>Managing Products with Struts and DWR</center></h1>         <table>             <tr>                 <td>                     <input type="button" value="Add A Product" name="name"                            onclick="newProduct( )" />                 </td>             </tr>         </table>     </div>     <div  ></div> </body> </html> 

The function populateData( ) is called the first time the page is loaded. There is a button (Add A Product) for adding a new product, and there is a <div> () that we'll populate with the product list.

8.2.3. Writing the DWR Configuration File

Now for the DWR configuration file, dwr.xml (Example 8-12). It's so simple that it's actually exciting. (When was the last time you were excited by a configuration file?) The JavaScript that DWR generates is defined within the <allow> tag. The <create> tag defines the name of the JavaScript file to be generated (ProductManager.js) and included in the JSP; this file is linked to the actual Java class that responds to the Ajax requests.

Example 8-12. The DWR configuration file, dwr.xml

 <dwr>     <allow>         <create creator="new" javascript="ProductManager"                 >             <include method="getProduct"/>             <include method="addProduct"/>             <include method="getJSONProducts"/>             <include method="updateProductById"/>             <include method="deleteRow"/>         </create>         <convert converter="bean" match="com.oreilly.ajax.Product">             <param name="include" value="productName,description,filename,price"/>         </convert>     </allow> </dwr> 

The <create> tag defines the JavaScript support for a given Java class. In this case, DWR creates a JavaScript ProductManager object that supports the ProductManager class (com.oreilly.ajax.ProductManager).

The <include> tags define the Java methods that are supported by JavaScript generated by DWR.

The <convert> tag builds a JavaScript bean from com.oreilly.ajax.Product with the values passed in through the <param> tag. This allows the application to retrieve data from DWR and display it in the browser.

8.2.4. Displaying the Products in the Browser

We still have to write some JavaScript to populate the div in productmanager.jsp. That JavaScript code is included toward the top of productmanager.jsp in a file called oreillyProductManager.js.

The most complex part of the JavaScript is the loop that populates the product table. If the product table is appended directly to the div's innerHTML, the table won't work correctly in some browsers. A safer, browser-independent way to populate the div is to build a separate string that contains all the HTML for the table. After the table has been built, you can then set innerHTML to the string with one JavaScript statement. That's what happens in the updateProductList( ) function, as you can see in Example 8-13.

Example 8-13. oreillyProductManager.js

 function newProduct( ) {     ProductManager.addProduct(populateData) } function populateData( ) {     ProductManager.getJSONProducts(updateProductList); } function updateProductList(jsonData) {     var myJSONObject = eval('(' + jsonData + ')');     productsdiv = document.getElementById('products');     var output = "<table id='myTable' class='tableWrapper'>"+                  "<tbody id='myTbody'><tr><td class='trh'>&nbsp;</td>"+                  "<td class='trh'>Product Name</td>"+                  "<td class='trh'>Description</td>"+                  "<td class='trh'>Price</td>"+                  "<td class='trh'>Image</td>"+                  "<td class='trh'>Change Image</td></tr>";     for (i=0;i<myJSONObject.products.length;i++) {         output += "<tr class='tr" + (i%2) + "'>";         output += "<td class='col2'>"+"<input type='image' width='50'                   height='50' src='/books/4/163/1/html/2/images/garbagecan.png'"+                   " value=\""+myJSONObject.products[i].id +                   "\" onclick='deleteRow(this.value);' /></td>";         output += "<td class='col0'><input type=\"text\" value=\""+                   myJSONObject.products[i].name +                   "\" id=\"name_"+myJSONObject.products[i].id +                   "\" onchange=\"updateProductById("+myJSONObject.products[i].id+                   ",\'PRODUCT_NAME\',this.value)\" /> </td>";         output += "<td class='col1'><input type=\"text\" value=\""                   + myJSONObject.products[i].description +                   "\" id=\"description_"+myJSONObject.products[i].id +                   "\" onchange=\"updateProductById("+myJSONObject.products[i].id                   +",\'DESCRIPTION\',this.value)\" /> </td>";         output += "<td class='col2'><input type=\"text\" value=\"" +                   myJSONObject.products[i].price +                   "\" id=\"price_"+myJSONObject.products[i].id +                   "\" onchange=\"updateProductById("+myJSONObject.products[i].id                   +",\'PRICE\',this.value)\" /> </td>";         output += "<td class='col2'><img width='50' height='50' src='/books/4/163/1/html/2/"                   +myJSONObject.products[i].imagepath+"' /></td>";         output += "<td class='col3'>"                   +"<form name='theuploadform' method='post'                   action='uploadAction.do'" +" enctype='multipart/form-data' >"                   +"<input id='uploadFile' type='file' name='uploadFile'                   value='change'"+" onchange='submit( )'></input>"                   +"<input type='hidden' value='"+myJSONObject.products[i].id                   +"' name='productId' /></form></td>";     }     output += "</tbody></table>";     alert (output);     productsdiv.innerHTML = output; } function isNumber(allegedNumber) {     var numberRegExp = /(^\d+$)|(^\d+\.\d+$)/     if (numberRegExp.test(allegedNumber)) {         return true     }     else {         return false;     } } function deleteRow(rowId) {     ProductManager.deleteRow(rowId,populateData); } function updateProductById(id,column,newValue) {     if (column == 'PRICE') {         if (isNumber(newValue)) {             ProductManager.updateProductById(id,column,newValue,populateData);         }         else {             alert(newValue+' is not a number. Price must be a number.');         }     }     else {         ProductManager.updateProductById(id,column,newValue,populateData);     } } function uploadFile(formdata) {     filename = formdata.form.filename.value;     alert('uploading file'+filename);     formdata.form.submit( ); } 

The populateData( ) method is certainly the most complicated. It builds the table that contains the current product list, which is used to fill in the empty div in the JSP. The product list is full of JavaScript triggers that call the Ajax DWR functions and use Ajax to communicate with the servlets. The for loop in populateData( ) connects all of the list's fields to JavaScript triggers: for example, the garbage can (<input type='image'...>) is attached to the onclick event, which calls the deleteRow( ) function, and the Product Name field and many of the other fields are attached to the onchange event TRigger, which calls updateProductById( ). These functions (deleteRow( ), updateProductById( ), and so on) each perform some operation via Ajax. In turn, DWR delegates the Ajax operation to a method in the server's ProductManager class. The JavaScript arranges for populateData( ) to be called when the Ajax operation has completed.

The servlet generates the image filenames (<img src=...>) from data in the database. Look back at the PRODUCTS table in Figure 8-5. The FILENAME field contains the name of the image file for a product.

8.2.5. Viewing the DWR-Generated JavaScript

The heart of this application is the ProductManager Java class, which we'll discuss shortly. This class is mapped to JavaScript functions through dwr.xml. The archive, dwr.jar, holds the key to how the files get mapped. If you want to see the JavaScript that DWR creates, you can append the JavaScript file path that DWR uses to the root URL of your application. We've already seen that DWR is generating the file dwr/interface/ProductManager.js. If you take that file URL and append it to the application's root URL, you gethttp://localhost:8080/ajax-customer-lab7-Struts-DWR/dwr/interface/ProductManager.jsp. When you browse to that URL, you will see the JavaScript that DWR produces in the browser window (Example 8-14).

Example 8-14. JavaScript code produced by DWR

 function ProductManager( ) { } ProductManager.getProduct = function(p0, callback) {     DWREngine._execute('/ajax-customer-lab7-Struts-DWR/dwr',             'ProductManager',             'getProduct',             p0, callback); } ProductManager.getJSONProducts = function(callback) {     DWREngine._execute('/ajax-customer-lab7-Struts-DWR/dwr',             'ProductManager',             'getJSONProducts',             callback); } ProductManager.updateProductById = function(p0, p1, p2, callback) {     DWREngine._execute('/ajax-customer-lab7-Struts-DWR/dwr',             'ProductManager',             'updateProductById',             p0, p1, p2, callback); } ProductManager.deleteRow = function(p0, callback) {     DWREngine._execute('/ajax-customer-lab7-Struts-DWR/dwr',             'ProductManager', 'deleteRow', p0, callback); } ProductManager.addProduct = function(callback) {     DWREngine._execute('/ajax-customer-lab7-Struts-DWR/dwr',             'ProductManager', 'addProduct', callback); } 

The DWR code won't be formatted this nicely (with linefeeds and such), but it will still give you an idea of what is going on behind the scenes. This is where DWR puts the JavaScript functions that support the calls defined in dwr.xml.

It's important to understand how DWR maps JavaScript calls into Java method calls on the ProductManager class. For example, our JavaScript calls a method like this:

 ProductManager.deleteRow(rowId, populateData) 

That method corresponds to the following JavaScript function:

 ProductManager.deleteRow = function(p0, callback) 

However, the deleteRow( ) function in the Java ProductManager class has only a single argument:

 static public boolean deleteRow(String productID) 

Consequently, DWR adds an argument to each Java method exposed to the JSP. That additional argument is the name of a JavaScript callback method that's called when the Ajax operation has completed. In this example, we use that callback to call populateData( ), which performs its own Ajax operation: it gets the current product list from the server and (as its callback) invokes updateProductList( ) to redisplay the list.

8.2.6. Writing the ProductManager Class

In this application, the only class we need in order to support our Ajax functionality is ProductManager (Example 8-15). The methods we need in ProductManager.jsp are mapped in dwr.xml and defined in ProductManager.java. The ProductManager class is fairly big, but it contains everything we need to manage the products. There is a method to change product information (updateProductById( )) and a method to delete a product (deleteRow( )); there is also a method to add a product (addProduct( )) and a method to return all products formatted in a JSON string (getJSONProducts( )).

Example 8-15. The ProductManager Java class

 public class ProductManager {     static public String imagePath;     public static String getImagePath( ) {         return imagePath;     }     public static void setImagePath(String imagePath) {         ProductManager.imagePath = imagePath;     }     static public Product getProduct(String productName) {         Product product = new Product( );         Connection con = DatabaseConnector.getConnection( );         String sqlString = "";         try {             sqlString = "SELECT * FROM PRODUCTS WHERE PRODUCT_NAME='" + productName                     + "';";             Statement select = con.createStatement( );             ResultSet result = select.executeQuery(sqlString);             if (result.next( )) { // process results one row at a time                 product.setProductName(result.getString("PRODUCT_NAME"));                 product.setDescription(result.getString("DESCRIPTION"));                 product.setFilename(result.getString("FILENAME"));                 product.setPrice(result.getFloat("PRICE"));                 product.setProductId(result.getInt("PRODUCT_ID"));             }         }         catch(Exception e) {             System.out.println("exception caught getting Product" + sqlString + " "                     + e.getMessage( ));         }         finally {             if (con != null) {                 try {                     con.close( );                 }                 catch(SQLException e) {                 }             }         }         return product;     }     static public boolean updateProductById(int id, String column,             String newValue) {         boolean result = false;         String sqlString = "UPDATE PRODUCTS SET "+column+ " = '"+newValue                 +"' WHERE PRODUCT_ID='" + id + "';";         Connection con = DatabaseConnector.getConnection( );         try {             Statement select = con.createStatement( );             result = select.execute(sqlString);         }         catch(Exception e) {             System.out.println("exception caught updating Product"                     + sqlString + " " + e.getMessage( ));         }         finally {             if (con != null) {                 try {                     con.close( );                 }                 catch(SQLException e) {                 }             }         }         return result;     }     static public Product getProductById(String productID) {         Product product = new Product( );         Connection con = DatabaseConnector.getConnection( );         String sqlString = "";         try {             sqlString = "SELECT * FROM PRODUCTS WHERE PRODUCT_ID='" + productID                     + "';";             Statement select = con.createStatement( );             ResultSet result = select.executeQuery(sqlString);             if (result.next( )) { // process results one row at a time                 product.setProductName(result.getString("PRODUCT_NAME"));                 product.setDescription(result.getString("DESCRIPTION"));                 product.setFilename(result.getString("FILENAME"));                 product.setPrice(result.getFloat("PRICE"));                 product.setProductId(result.getInt("PRODUCT_ID"));             }         }         catch(Exception e) {             System.out.println("exception caught getting Product" + sqlString + " "                     + e.getMessage( ));         }         finally {             if (con != null) {                 try {                     con.close( );                 }                 catch(SQLException e) {                 }             }         }         return product;     }     static public boolean deleteRow(String productID) {         Product product = new Product( );         Connection con = DatabaseConnector.getConnection( );         String sqlString = "";         boolean result = false;         try {             sqlString = "DELETE FROM PRODUCTS WHERE PRODUCT_ID='" + productID                     + "';";             Statement select = con.createStatement( );             result = select.execute(sqlString);         }         catch(Exception e) {             System.out.println("exception caught deleteing Product" + sqlString                     + " " + e.getMessage( ));         }         finally {             if (con != null) {                 try {                     con.close( );                 }                 catch(SQLException e) {                 }             }         }         return result;     }     public static String addProduct( ) {         Connection con = DatabaseConnector.getConnection( );         try {             PreparedStatement ps = con.prepareStatement(                     "INSERT INTO PRODUCTS (PRODUCT_NAME) values(?)");             ps.setString(1,"New Product");             ps.executeUpdate( );         }         catch(Exception e) {             System.out.println("exception caught inserting New Product into product                                table");         }         finally {             if (con != null) {                 try {                     con.close( );                 }                 catch(SQLException e) {                 }             }         }         return getJSONProducts( );     }     public static String getJSONProducts( ) {         return getProducts( );     }     public static String getProducts( ) {         Product product = new Product( );         String title = "products";         Connection con = DatabaseConnector.getConnection( );         StringBuffer jsonString = new StringBuffer("\r\n{\"" + title + "\": [");         String sqlString = "";         try {             sqlString = "SELECT * FROM PRODUCTS ORDER BY PRODUCT_ID DESC;";             Statement select = con.createStatement( );             ResultSet result = select.executeQuery(sqlString);             while (result.next( ))  { // process results one row at a time                 product.setProductName(result.getString("PRODUCT_NAME"));                 product.setDescription(result.getString("DESCRIPTION"));                 product.setFilename(result.getString("FILENAME"));                 product.setPrice(result.getFloat("PRICE"));                 product.setProductId(result.getInt("PRODUCT_ID"));                 jsonString.append("\r\n{\"description\":\"" +                                   product.getDescription( ) +                                   "\",\"name\":\"" + product.getProductName( ) +                                   "\",\"filename\":\"" + product.getFilename( ) +                                   "\", \"price\":\"" + product.getPrice( ) +                                   "\", \"id\":\"" + product.getProductId( ) +                                   "\",\"imagepath\":\"" + imagePath +"/" +                                   product.getFilename( ) + "\"},");             }             int lastCharIndex = jsonString.length( );             jsonString.deleteCharAt(lastCharIndex - 1);             jsonString.append("\r\n]}");         }         catch(Exception e) {             System.out.println("exception caught getting Product" + sqlString + " "                     + e.getMessage( ));         }         finally {             if (con != null) {                 try {                     con.close( );                 }                 catch(SQLException e) {                 }             }         }         return jsonString.toString( );     } } 

Look back at the dwr.xml configuration file in Example 8-12 and examine the methods listed in the <include> tags (nested in the <create> tag). Each method that is exposed to the JSP file is exposed through an <include> tag. For example, to expose the ProductManager's addProduct( ) method to the JSP, we added the <include method="addProduct"/> element within the <create> tag.

So, now that all the machinery is in place and wired together, how does it work? Our JSP is almost empty. Although it displays a list of products, nothing in the page looks like it's capable of displaying that list: instead of a table or a list, there's just an empty div with the ID products and the CSS class productList. So, how do we get the list of products to work with? The JSP calls the JavaScript function populateData( ) (defined in oreillyProductManager.js) when it is loaded; that function delegates the call to ProductManager.getJSONProducts( ) and arranges for our JavaScript function updateProductList( ) to be called when the data returns. In turn, this is one of the methods mapped to the ProductManager by dwr.xml, via the automatically generated JavaScript file. Our ProductManager class implements getJSONProducts( ); it gets the current product list from the database, marshals it as a JSON object, and returns it to the browser, which passes it to updateProductList( ).

So, there's a lot going on behind the scenes. Let's look a bit further and see what happens when a user clicks on the delete icon (the trash can). It shouldn't be any surprise that updateProductList( ) contains code to create a cell with a trash can image in each row of the product table. This cell is tied to the deleteRow( ) function, which is called when the onclick event occurs. In turn, DWR maps deleteRow( ) (in the generated JavaScript file) to the deleteRow( ) method in ProductManager. The generated JavaScript also arranges for populateData( ) to be called when the deletion has been processed, and as we've seen, populateData( ) retrieves the current list of products and displays them.

8.2.7. DWR Is Cool Because...

DWR connects straight to your Java classes. You don't need to write any of the supporting JavaScript that you normally need when connecting server-side Java to a JSP. This is essentially what we need to do when we are writing Ajax applications on Java.

DWR doesn't have any fancy widgets, but that's not what it's all about. The widgets are left to other libraries or the developer.


Ajax on Java
Ajax on Java
ISBN: 0596101872
EAN: 2147483647
Year: 2007
Pages: 78

flylib.com © 2008-2017.
If you may any questions please contact us: flylib@qtcs.net