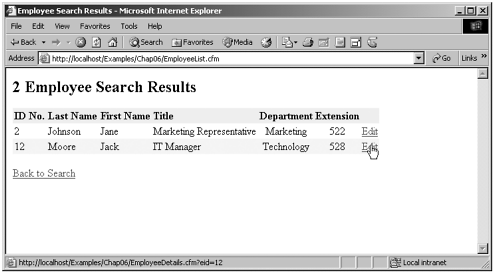
| We want our administrative staff to be able to update employee information in the database via a web form. We will use the employee search form that we created in Step 5, "Using Forms with ColdFusion MX," as well as a slightly amended Employee Search Results page. Open your browser and go to http://localhost/Examples/Step06/EmployeeSearch.cfm to display the Employee Search page. Enter the letter "J" in the First Name search box and click the Search button. You should see results similar to those shown in Figure 6.1. Figure 6.1. The amended Employee Search Results page.  On the Employee Search Results page, notice that we have replaced the Email column with an Edit link. The code for the link is as follows: <A HREF="EmployeeDetails.cfm?eid=#EmployeeID#">Edit</A> This link will pass the EmployeeID number for a particular employee to our edit form via a URL scope variable. (Note the link information in the status bar of Figure 6.1.) We will use this information to pull a particular employee record to populate our form. -
Open your text editor and type the code in Listing 6.1 or open the completed EmployeeDetails.cfm file from the CompletedFiles\Examples\Step06 folder. Listing 6.1 Code for EmployeeDetails.cfm [View full width] <!--- File: EmployeeDetails.cfm Description: Form to edit employee details Author: Created: ---> <!--- If users arrive at this page without a URL.eid variable redirect them back to the search page ---> <CFIF NOT IsDefined("URL.eid")> <CFLOCATION URL="EmployeeSearch.cfm" > </CFIF> <!--- get employee details for chosen employee using the URL.eid variable passed ---> <CFQUERY NAME="qEmployeeDetails" DATASOURCE="Staff"> SELECT * FROM Employees WHERE Employees.EmployeeID = #URL.eid# </CFQUERY> <!--- get department information to build CFSELECT menu ---> <CFQUERY NAME="qDepartments" DATASOURCE="Staff"> SELECT DepartmentID, DepartmentName FROM Departments ORDER BY DepartmentName </CFQUERY> <HTML> <HEAD> <TITLE>Employee Details</TITLE> </HEAD> <BODY> <H2>Edit Employee Details</H2> <!--- set the action page for this form ---> <CFFORM ACTION="EmployeeUpdate.cfm" METHOD="POST" > <!--- include a hidden field to pass the EmployeeID to the action page ---> <CFOUTPUT> <INPUT TYPE="hidden" NAME="EmployeeID" VALUE="#qEmployeeDetails.EmployeeID#"> </CFOUTPUT> <TABLE BORDER="1" CELLSPACING="0" CELLPADDING="5" BORDERCOLOR="#000000"  BGCOLOR="#FFFFCC"> <TR> <TD> Employee ID </TD> <TD> <CFOUTPUT> <B>#qEmployeeDetails.EmployeeID#</B> </CFOUTPUT> </TD> </TR> <TR> <TD> First Name: </TD> <TD> <CFINPUT TYPE="Text" NAME="FirstName"VALUE="#qEmployeeDetails.FirstName#" BGCOLOR="#FFFFCC"> <TR> <TD> Employee ID </TD> <TD> <CFOUTPUT> <B>#qEmployeeDetails.EmployeeID#</B> </CFOUTPUT> </TD> </TR> <TR> <TD> First Name: </TD> <TD> <CFINPUT TYPE="Text" NAME="FirstName"VALUE="#qEmployeeDetails.FirstName#"  MESSAGE="Please enterfirstname" REQUIRED="Yes" MAXLENGTH="50"> </TD> </TR> <TR> <TD> Last Name: </TD> <TD> <CFINPUT TYPE="Text" NAME="LastName" VALUE="#qEmployeeDetails.LastName#" MESSAGE="Please enterfirstname" REQUIRED="Yes" MAXLENGTH="50"> </TD> </TR> <TR> <TD> Last Name: </TD> <TD> <CFINPUT TYPE="Text" NAME="LastName" VALUE="#qEmployeeDetails.LastName#"  MESSAGE="Please enter last name" REQUIRED="Yes" MAXLENGTH="50"> </TD> </TR> <TR> <TD> Department: </TD> <TD> <CFSELECT NAME="DepartmentID" QUERY="qDepartments" VALUE="DepartmentID" DISPLAY="DepartmentName" SELECTED="#qEmployeeDetails.DepartmentID#" REQUIRED="Yes"> </CFSELECT> </TD> </TR> <TR> <TD> Title: </TD> <TD> <CFINPUT TYPE="Text" NAME="Title" VALUE="#qEmployeeDetails.Title#" MESSAGE="Please enter last name" REQUIRED="Yes" MAXLENGTH="50"> </TD> </TR> <TR> <TD> Department: </TD> <TD> <CFSELECT NAME="DepartmentID" QUERY="qDepartments" VALUE="DepartmentID" DISPLAY="DepartmentName" SELECTED="#qEmployeeDetails.DepartmentID#" REQUIRED="Yes"> </CFSELECT> </TD> </TR> <TR> <TD> Title: </TD> <TD> <CFINPUT TYPE="Text" NAME="Title" VALUE="#qEmployeeDetails.Title#"  REQUIRED="Yes" SIZE="30" MAXLENGTH="50"> </TD> </TR> <TR> <TD> Email: </TD> <TD> <CFINPUT TYPE="Text" NAME="Email" VALUE="#qEmployeeDetails.Email#" REQUIRED="Yes" SIZE="30" MAXLENGTH="50"> </TD> </TR> <TR> <TD> Email: </TD> <TD> <CFINPUT TYPE="Text" NAME="Email" VALUE="#qEmployeeDetails.Email#"  REQUIRED="Yes" SIZE="30" MAXLENGTH="50"> </TD> </TR> <TR> <TD> Extension: </TD> <TD> <CFINPUT TYPE="Text" NAME="Extension" VALUE="#qEmployeeDetails.Extension#" REQUIRED="Yes" SIZE="30" MAXLENGTH="50"> </TD> </TR> <TR> <TD> Extension: </TD> <TD> <CFINPUT TYPE="Text" NAME="Extension" VALUE="#qEmployeeDetails.Extension#"  VALIDATE="integer" REQUIRED="Yes" SIZE="5" MAXLENGTH="5"> </TD> </TR> <TR> <TD> Date Hired: </TD> <TD> <CFINPUT TYPE="Text" NAME="DateHired" VALUE="#DateFormat(qEmployeeDetails. VALIDATE="integer" REQUIRED="Yes" SIZE="5" MAXLENGTH="5"> </TD> </TR> <TR> <TD> Date Hired: </TD> <TD> <CFINPUT TYPE="Text" NAME="DateHired" VALUE="#DateFormat(qEmployeeDetails.  DateHired,"MM/DD/YYYY")#" VALIDATE="date" REQUIRED="Yes"><FONT COLOR="##CC0000" DateHired,"MM/DD/YYYY")#" VALIDATE="date" REQUIRED="Yes"><FONT COLOR="##CC0000"  SIZE="1">MM/DD/YYYY</FONT> </TD> </TR> <TR> <TD> </TD> <TD> <INPUT TYPE="submit" VALUE="Update"> </TD> </TR> </TABLE> </CFFORM> </BODY> </HTML> SIZE="1">MM/DD/YYYY</FONT> </TD> </TR> <TR> <TD> </TD> <TD> <INPUT TYPE="submit" VALUE="Update"> </TD> </TR> </TABLE> </CFFORM> </BODY> </HTML> -
Save the file as EmployeeDetails.cfm in your Examples\Step06 folder.
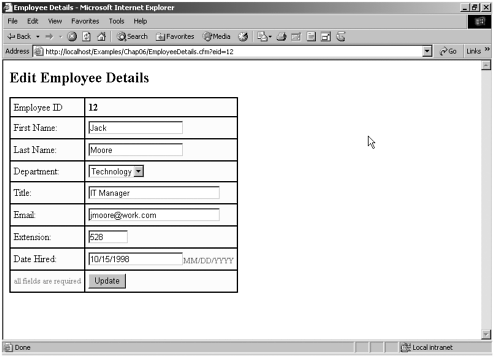
At the top of this template, we have included some code to check for the presence of a URL scope variable called eid. If this variable is not present, we redirect the browser back to the Employee Search page using the <CFLOCATION> tag. <CFIF NOT IsDefined("URL.eid")> <CFLOCATION URL="EmployeeSearch.cfm" > </CFIF> We are doing this because our qEmployeeDetails query depends on the URL.eid variable in its WHERE clause. If a user tried to type the URL for this page directly into his browser (http://anysite/EmployeeDetails.cfm), our query would break in a spectacular fashion, and the user would be left with an unsightly error message. We can avoid this scenario by redirecting requests without an URL.eid variable back to the search page. If a user does arrive with an URL.eid variable, we then execute two queries: one to retrieve the employee information we will use to populate our form and another to populate a Departments select list. Next we begin our form. We are using a <CFFORM> here so that we can take advantage of some client-side form validation. Table 6.1 summarizes the form elements present and their purpose and validation rules. Note the use of the SIZE and MAXLENGTH attributes. These attributes function the same with either <CFINPUT> or plain HTML <INPUT> tags. The SIZE attribute determines how big the form control will appear on our web page, whereas the MAXLENGTH attribute determines the maximum number of characters the form field will accept. We use the MAXLENGTH attribute to make sure the form will not accept any values that are larger than the values the underlying database will accept. For example, our database will only accept LastName values that are 50 characters or less, so we want to make sure users cannot enter values larger than that into the form. Table 6.1. Employee Details Form Fields| Element Name | Purpose | Validation |
|---|
| EmployeeID | This hidden field passes the EmployeeID number to the action page. | None. This field is hidden from the user. | | FirstName | Displays current FirstName value. | Required entry. MAXLENGTH="50" | | LastName | Displays current LastName value. | Required entry. MAXLENGTH="50" | | DepartmentID | Displays current DepartmentID value. | Required; chosen from list of values. | | Title | Displays current Title value. | None. MAXLENGTH="50" | | Email | Displays current Email value. | None. MAXLENGTH="50" | | Extension | Displays current Extension value. | Must be an integer. MAXLENGTH="5" | | DateHired | Displays current DateHired value. | Must be a date. |
Notice that we use the form element's VALUE attribute to prefill the form elements with information from the database. Also note that, because <CFINPUT> tags are ColdFusion tags and we are referencing the query values within the tag itself, we do not need to surround the form with <CFOUTPUT> tags. (Note, though, that <CFOUPUT> tags were required for the one HTML <INPUT> tag we are using for our hidden field.) In addition, notice that we are prefixing each field reference with its query name to identify the variable's scope. The <CFSELECT> tag uses the qDepartments query as its source and uses fields from that query in its VALUE and DISPLAY attributes. We use the qEmployeeDetails. DepartmentID value to set the SELECTED option to match the current value of the selected employee. If you follow an Edit link from the Employee Search Results page, you should see a form similar to the one in Figure 6.2. Figure 6.2. The Employee Details edit page.  After the action page for this form is complete, users will be able to alter the contents of these fields and update the corresponding values in the database. NOTE Note that we are not giving users the capability to change the EmployeeID value for our employees. This value is the primary key value for each employee and should never change. For more information about primary key values, see the sidebar "The Key to Primary Keys."
The Key to Primary Keys In a database, each record in a table should have one field that uniquely identifies that record. For example, we might have people on our staff with the same name; consequently, we cannot use their name to uniquely identify them. Therefore, we assign them an employee ID number. Although two staff members might, by coincidence, share the same name, no two employees should ever have the same employee ID number. This unique field is referred to as a primary key field. In our Employees table, we are using EmployeeID as our primary key field. Each employee has a unique ID number that never changes. For example, if employee number 7 leaves the company, staff members with employee IDs greater than 7 do not all reshuffle to fill the missing slot; they retain their original ID number, and the number 7 is just discarded and never used again as an employee ID number. Because each primary key value must be unique, the assignment of this unique value frequently is left to the database system. Microsoft Access uses a field type called "autonumber" to accomplish this. An autonumber field simply increments a number value with each new addition to the table. For example, if the last EmployeeID was 12, the next EmployeeID will be 13. If employee number 7 is deleted, the autonumber field does not really care; it continues in its sequence, and the next employee would be 14 and so on. Once assigned, these autonumbers never change and are never reassigned. You don't have to use autonumber fields; you can assign your own unique values to each record, such as a social security number or a SKU (stock keeping unit) number. You just have to make sure that each value in the field is unique and never repeated throughout the table. In our Employees table, we are using an autonumber field to assign EmployeeIDs to our staff. Consequently, we do not want to give users the capability to change this value and cause potential conflicts. |
|