Flylib.com

Books Software


Language Selection


Language Selection

Using your mouse, select the language you prefer to use for the installation (see Figure A-10). Selecting the appropriate language will also help target your time zone configuration later in the installation. The installation program will try to define the appropriate time zone based on what you specify on this screen.

click to expand
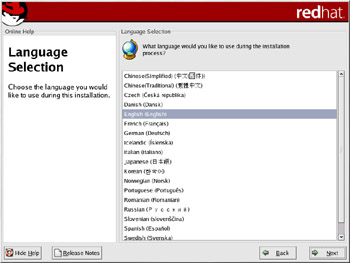
Figure A-10: Language Selection

Once you select the appropriate language, click Next to continue.


Keyboard Configuration

Using your mouse, select the correct layout type (for example, U.S. English) for the keyboard you prefer to use for the installation and as the system default (see Figure A-11). Once you have made your selection, click Next to continue.

Tip 

To change your keyboard layout type after you have completed the installation, use the Keyboard Configuration Tool. Type the redhat-config-keyboard command in a shell prompt to launch the Keyboard Configuration Tool. If you are not root, it will prompt you for the root password to continue.

click to expand
Figure A-11: Keyboard Configuration


Mouse Configuration

Choose the correct mouse type for your system. If you cannot find an exact match, choose a mouse type that you are sure is compatible with your system (see Figure A-12). To determine your mouse’s interface, follow the mouse cable back to where it plugs into your system and use the following diagrams. If you are installing Red Hat Linux on a laptop computer, in most cases the pointing device will be PS/2 compatible.

click to expand
Figure A-12: Mouse Configuration

  • The port for a serial mouse will look similar to:

  • The port for a PS/2 mouse will look similar to:

  • The port for a USB mouse will look similar to:

  • The port for an AT (Advanced Technology) mouse will look similar to:

If you cannot find a mouse that you are sure is compatible with your system, select one of the Generic entries, based on your mouse’s number of buttons , and its interface.

Tip 

If you have a scroll mouse, select the MS IntelliMouse entry (with your proper mouse port) as the compatible mouse type.

If you have a PS/2, USB, or Bus mouse, you do not need to pick a port and device. If you have a serial mouse, choose the correct port and device that your serial mouse is on. The Emulate 3 buttons checkbox allows you to use a two-button mouse as if it had three buttons. In general, the graphical interface (the X Window System) is easier to use with a three-button mouse. If you select this checkbox, you can emulate a third, “middle” button by pressing both mouse buttons simultaneously .

Tip 

To change your mouse configuration after you have completed the installation, use the Mouse Configuration Tool. Type the redhat-config-mouse command at a shell prompt to launch the Mouse Configuration Tool. If you are not root, it will prompt you for the root password to continue. To configure your mouse to work as a left-handed mouse, reset the order of the mouse buttons. To do this, after you have booted the system, type gpm -B 321 at the shell prompt.


Installation Type

Choose the type of installation you would like to perform (see Figure A-13). Red Hat Linux allows you to choose the installation type that best fits your needs. Your options are Personal Desktop, Workstation, Server, Custom, and Upgrade.

click to expand
Figure A-13: Choosing Install or Upgrade

To perform an upgrade, please refer to the “What It Means to Upgrade” section of this appendix.