Implementing Virtual Hosting with Apache and Tomcat
If you want to use Apache to serve the static files of your virtual hosts and Tomcat to serve the dynamic content, you need to add an AJP connector to server.xml. Remove the HTTP connector from your server.xml, and add the configuration as shown in Listing 13-10.
Listing 13-10: Adding an AJP Connector to server.xml
<Server port="8005" shutdown="SHUTDOWN"> <Service name="Virtual Hosting Tomcat with Apache"> <!-- Define a Coyote/JK2 AJP 1.3 Connector on port 8009 --> <Connector port="8009" enableLookups="false" debug="0" protocol="AJP/1.3" /> <!-- The rest of the file remains the same -->
Now you need to configure Apache to pass all requests for dynamic content to Tomcat. The first port of call is the workers2.properties file, as shown in Listing 13-11.
Listing 13-11: The workers2.properties File for virtual hosting
[channel.socket:localhost:8009] # define the worker [ajp13:localhost:8009] channel=channel.socket:localhost:8009 # Uri mapping [uri:/*.jsp] group=ajp13:localhost:8009
Here you instruct Apache to pass all requests for *.jsp files to Tomcat. Tomcat will then process them according to the virtual host they’re requesting. To serve static files from Apache, you first need to generate the settings for each Web application using Ant or a similar tool (see
Listing 13-12: The jk2.conf File for www.catalinabook.com
# Must be included in a virtual host context for www.catalinabook.com Alias /jsp "C:/home/sites/catalinabook.com/webapps/jsp" <Directory "C:/home/sites/catalinabook.com/webapps/jsp" > Options Indexes FollowSymLinks DirectoryIndex AddHandler jakarta-servlet2 .jsp </Directory> <Location "/jsp/WEB-INF" > AllowOverride None Deny from all </Location> <Location "/jsp/META-INF" > AllowOverride None Deny from all </Location>
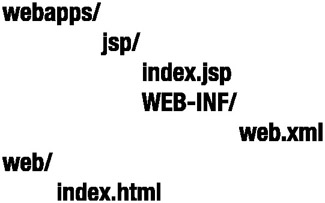
As the comment at the beginning of this file says, you must include this file in the appropriate virtual host definition to protect Tomcat’s files. Apache’s virtual hosts must match Tomcat’s virtual hosts so that there’s a seamless integration of static pages and dynamic content. In this case you’ll use the Web directory for static content instead of the ROOT Web application. Figure 13-10 shows this configuration.

Figure 13-10: The virtual hosting configuration when using Apache
Therefore, the Apache setup will be as shown in Listing 13-13.
Listing 13-13: The Apache Setup for Virtual Hosting with Tomcat
NameVirtualHost www.catalinabook.com NameVirtualHost www.jasperbook.com NameVirtualHost www.tomcatbook.com <VirtualHost www.catalinabook.com> ServerName www.catalinabook.com DocumentRoot "C:/home/sites/catalinabook.com/web" Include "C:/home/sites/catalinabook.com/webapps/jsp/WEB-INF/jk2/jk2.conf" </VirtualHost> <VirtualHost www.jasperbook.com> ServerName www.jasperbook.com DocumentRoot "C:/home/sites/jasperbook.com/web" Include "C:/home/sites/jasperbook.com/webapps/jsp/WEB-INF/jk2/jk2.conf" </VirtualHost> <VirtualHost www.tomcatbook.com> ServerName www.tomcatbook.com DocumentRoot "C:/home/sites/tomcatbook.com/web" Include "C:/home/sites/tomcatbook.com/webapps/jsp/WEB-INF/jk2/jk2.conf" </VirtualHost>
Each virtual host corresponds to a Tomcat virtual host and has a document root corresponding to the Web directory in the host’s installation directory. Any requests that don’t match the setting in workers2.properties (that is, any non-JSP pages) will be served from here. If you want to continue to use the ROOT directory, you can change the DocumentRoot directive to point to it.
To test the setup, copy index.html from each host’s ROOT directory into its Web directory and change it as shown in Listing 13-14.
Listing 13-14: The Index File Served by Apache
<html> <head><title>Welcome to catalinabook.com</title> <body> <h1>Welcome to catalinabook.com on Apache</h1> <hr/> <p> Click <a href="jsp/index.jsp">here</a> to access the dynamic section of the site. </p> </body> </html>
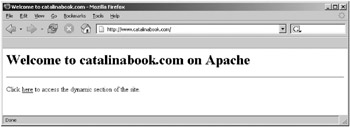
The JSP pages stay the same because they’re still served by Tomcat. Now start Apache, and restart Tomcat. Browse to http://www.catalinabook.com, and you should see the index page as served by Apache (see Figure 13-11).

Figure 13-11: The index page on the Apache server
If you click the link to the dynamic section, you’ll see the JSP page as before.
Setting a JVM for Each Virtual Host
In the previous example all the virtual hosts are in the same request-processing engine, so trusted contexts in these virtual hosts (which can access Tomcat internal objects, load/unload other Web applications, and so on), such as the manager Web application, have access to the common Tomcat internal classes and can encroach on each other’s territory.
One possible solution is to set up one <Engine> per virtual host in the same server.xml file. Since each <Service> container element in the file can have only one child <Engine> element, this would mean adding one service per virtual host with the accompanying engine. Also, since every service has its own set of connectors, this requires setting up different connectors listening on different ports for each engine. Therefore, you’ll have to use Apache as a front end.
While the previous technique removes the problem of sharing information between the virtual hosts, a relaxed Tomcat security policy can still give one domain enough privileges to bring down the whole Tomcat process. The more secure, albeit more resource-intensive, solution to these security problems is to have one Tomcat process per virtual host.
Tomcat depends on two environment variables to find its internal classes and the configuration-specific files.
-
CATALINA_HOME is needed for Tomcat to function properly. Tomcat uses this variable to find its internal classes and libraries.
-
CATALINA_BASE is used by Tomcat to find the location of the configuration files and directories, such as the Web application directories. If CATALINA_BASE isn’t set, it defaults to the value of CATALINA_HOME.
Therefore, to maintain separate Tomcat processes, all you have to do is set the value of CATALINA_BASE to a different area of the disk for each server instance. Each server has its own server.xml file, which contains only one virtual host definition, different connector port numbers, and different directories for logs, scratch areas, and so on.
For the previous three virtual hosts, you’d store their configurations in directories under /home/sites/<domain-name>/catalina. So in this case, www.catalinabook.com’s CATALINA_BASE would be /home/sites/www.catalinabook.com/catalina, www.jasperbook.com’s CATALINA_BASE would be /home/sites/www.jasperbook.com/catalina, and www.tomcatbook.com’s CATALINA_BASE would be /home/sites/www.tomcatbook.com/catalina.
Ensure that only the virtual host definition of www.catalinabook.com is present in /home/sites/www.catalinabook.com/catalina/conf/server.xml, and the default host of the <Engine> is set to this domain. The rest of the configuration is as before. Listing 13-15 shows the listing for www.catalinabooks.com.
Listing 13-15: server.xml for www.catalinabooks.com Using a Separate JVM
<Server port="8005" shutdown="SHUTDOWN"> <Service name="Virtual Hosting Tomcat"> <!-- Define a Coyote/JK2 AJP 1.3 Connector on port 8009 --> <Connector port="8009" enableLookups="false" debug="0" protocol="AJP/1.3" /> <Engine name="Catalina" defaultHost="www.catalinabook.com"> <!-- Global logger unless overridden at lower levels --> <!-- Tomcat 5.0.x only --> <!-- <Logger className="org.apache.catalina.logger.FileLogger" prefix="catalina_log." suffix=".txt" timestamp="true"/> --> <Host name="www.catalinabook.com" debug="0" appBase="C:/home/sites/catalinabook.com/webapps" unpackWARs="true"> <Valve className="org.apache.catalina.valves.AccessLogValve" directory="C:/home/sites/catalinabook.com/logs" prefix="catalinabook.com.access." suffix=".log" pattern="common"/> <!-- Tomcat 5.0.x only --> <!-- <Logger className="org.apache.catalina.logger.FileLogger" directory="C:/home/sites/catalinabook.com/logs" prefix="catalinabook.com." suffix=".log" timestamp="true"/> --> </Host> </Engine> </Service> </Server>
For the server.xml file of www.jasperbook.com and www.tomcatbook.com, do the following:
-
Change the <Server> port to 8105 and 8205, respectively.
-
Change the AJP connector to port 8010 and 8011, respectively.
-
Ensure that only one virtual host definition is present and the default host of the <Engine> element is set to this domain
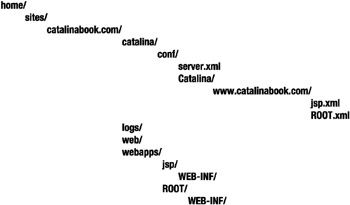
You’ll also have to have a directory for the Web application context XML files for each engine/host pair. Create a CATALINA_BASE/conf/Catalina/www.catalinabook.com directory, and copy jsp.xml and ROOT.xml there. Repeat this for the other two hosts. Figure 13-12 shows the final directory structure for www.catalinabook.com.

Figure 13-12: The directory structure for the www.catalinabook.com host
You’ll have to modify (or, in the case of Tomcat 5.5, create) the jk2.properties file in /home/sites/<domain-name>/catalina/conf to contain the following line, with the appropriate port for the virtual host:
# The setting for www.tomcatbook.com channelSocket.port=8011
The only change on the Apache side is in workers2.properties, because the three virtual hosts are already set up in Apache’s httpd.conf file. Create a new workers2.properties file, as shown in Listing 13-16.
Listing 13-16: The workers2.properties File for Separate Virtual Hosts
# Only at beginning. In production comment it out. [logger.apache2] level=DEBUG # Socket channels. [channel.socket:localhost:8009] [channel.socket:localhost:8010] [channel.socket:localhost:8011] # Define the workers. [ajp13:localhost:8009] channel=channel.socket:localhost:8009 [ajp13:localhost:8010] channel=channel.socket:localhost:8010 [ajp13:localhost:8011] channel=channel.socket:localhost:8011 # Uri mappings. [uri:www.catalinabook.com/*.jsp] group=ajp13:localhost:8009 [uri:www.jasperbook.com/*.jsp] group=ajp13:localhost:8010 [uri:www.tomcatbook.com/*.jsp] group=ajp13:localhost:8011
The three workers correspond to the three hosts you’ve already configured in Tomcat. Notice the corresponding port numbers.
You now need to start each of the instances with a new CATALINA_BASE each time. Run the batch file shown in Listing 13-17 if you’re on Windows.
Listing 13-17: Running the Three Virtual Hosts Using a Windows Batch File
@echo Running three Tomcat workers set CATALINA_BASE=C:\home\sites\catalinabook.com\catalina start /B catalina start set CATALINA_BASE=C:\home\sites\jasperbook.com\catalina start /B catalina start set CATALINA_BASE=C:\home\sites\tomcatbook.com\catalina start /B catalina start
Run the batch file shown in Listing 13-18 if you’re on a Unix-like system.
Listing 13-18: Running the Three Virtual Hosts Using a Unix Shell Script
CATALINA_BASE=/home/sites/catalinabook.com/catalina catalina start CATALINA_BASE=/home/sites/jasperbook.com/catalina catalina start CATALINA_BASE=/home/sites/tomcatbook.com/catalina catalina start
Now stop all the instances of Apache and Tomcat, and start the Tomcat instances using the earlier script. Now start Apache, and test the installation as you did for the previous Apache examples. You should see no change in functionality.
EAN: 2147483647
Pages: 94