Chapter 6: Using Tomcats Administration Tools
As Tomcat has evolved over the years, its administration tools have become more and more sophisticated. Tomcat 5’s administration tools have been designed for use in a number of ways, each of which suits a different style of administration. In this chapter, you’ll see the manager Web application, which you can use to deploy and manage Web applications, and the admin application, which you can use to configure Web applications.
Both these applications have Web interfaces you can use to administer the Tomcat server, but you can also use the manager application via HTTP request parameters or with Apache Ant. I’ll discuss all these options.
Using the Manager Application
The manager application is provided as part of the Tomcat 5 distribution and is stored in the CATALINA_HOME/server/webapps directory by default. It’s a special Web application that allows you to manage other Web applications while the Tomcat server is running. You can, for example, deploy, undeploy, start, and stop Web applications on the server using this tool.
The manager application is necessary for a number of reasons. First, without the manager application, you need write access to Tomcat’s installation directory to deploy a Web application, because this is where you copy an expanded Web application, WAR file, or context XML file. This requires you to have access to the server’s file system, which isn’t always possible or desirable in a high-security environment.
Second, you can remove a Web application only by deleting the files on the server’s file system. This has the same drawbacks as previously mentioned. However, Tomcat will still have the context name configured in memory, which may cause problems in future deployments if you try to add another application with the same name. Another problem with this approach is that the Web application is removed permanently from the server and not just made unavailable, which may be a better option.
Third, if the host’s autoDeploy setting is false, then you can’t deploy any applications on a running server, even if you have access to the file system.
Fourth, if the host’s deployOnStartup setting is false, then no new Web applications will be deployed when the server starts up after being shut down. Both of these settings combined will make it more difficult for unauthorized users to deploy Web applications on the server, so they may be part of a secured server’s setup.
As it stands, Tomcat seems to be fairly inflexible. You must have access to the file system, and the server must be configured to allow automatic deployment. This is where the manager application comes in. You can use it to solve all the problems mentioned and have a choice as to how to go about it.
The following is a list of the tasks you can carry out with the manager application:
-
You can deploy a new Web application.
-
You can list the currently deployed Web applications, with session information.
-
You can reload a Web application.
-
You can list the operating system and JVM properties.
-
You can list the available global JNDI resources.
-
You can list the available security roles.
-
You can display session statistics.
-
You can start a stopped application.
-
You can stop an existing application.
-
You can undeploy a Web application.
Setting Up the Manager Application
The manager application is a powerful addition to Tomcat’s functionality. For this reason you can access it only if you’re an authenticated user. The system of authentication is the same for the manager application as it is for other Web applications running on a Tomcat server, as described in Chapter 11.
The default realm for the manager application, as defined in CATALINA_HOME/conf/Catalina/localhost/manager.xml, is the user database defined in server.xml. Recall from Chapter 4 that this is conf/tomcat-users.xml.
By default, access to the manager application is disabled in Tomcat, by virtue of omitting any valid users or roles from tomcat-users.xml. To set up the manager application, add a user with the manager role to this file. You can, for example’s sake, add the manager role and then alter an existing user, such as tomcat, as follows:
<role rolename="manager"/> <user username="tomcat" password="tomcat" roles="tomcat, manager"/>
| Note | If you used the Windows installer, you would have already defined an admin password for Tomcat and tomcat-users.xml will be configured for you. |
If Tomcat is running, restart it to read the updated tomcat-users.xml. Next, check the URL http://localhost:8080/manager/html. You’ll be asked for a username and password, so enter the details of the user that you configured. If your details are correct, you’ll see the screen as in Figure 6-1.
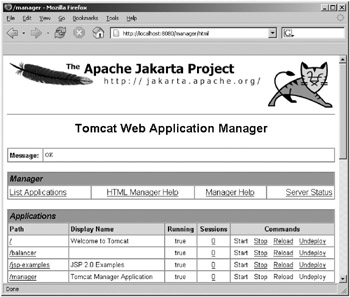
Figure 6-1: The Tomcat manager application’s HTML interface
Configuring the Manager Application
As with other Web applications, you can change the settings for the security manager to suit your own preferences. The security manager comes with a context XML file and a deployment descriptor, both of which you can modify as you would any other configuration file. The default manager.xml file is in the CATALINA_HOME/conf/Catalina/localhost directory. Listing 6-1 shows the file for Tomcat 5.0.x and Tomcat 5.5.
Listing 6-1: The Default manager.xml File
<!-- Tomcat 5.0.x --> <Context path="/manager" docBase="${catalina.home}/server/webapps/manager" debug="0" privileged="true"> <!-- Link to the user database we will get roles from --> <ResourceLink name="users" global="UserDatabase" type="org.apache.catalina.UserDatabase"/> </Context> <!-- Tomcat 5.5 --> <Context docBase="${catalina.home}/server/webapps/manager" privileged="true" antiResourceLocking="false" antiJARLocking="false"> <!-- Link to the user database we will get roles from --> <ResourceLink name="users" global="UserDatabase" type="org.apache.catalina.UserDatabase"/> </Context> This file sets the name of the Web application to manager, tells Tomcat that it can find this Web application in CATALINA_HOME/server/webapps/manager, and allows this Web application access to container servlets. This last setting is important, as the manager application uses the manager container servlet to perform its duties. The Tomcat 5.5 settings are the defaults and allow resources to be locked by clients.
The <ResourceLink> element sets up a source of user information for authentication in this Web application. This can quite easily be changed to match any realm you’ve set up in server.xml. As it stands, this file allows you to use the manager application, assuming you’ve set up an authorized user as previously described.
If you want to allow more than one role to access the manager Web application, or you want to change the authentication mechanism to fit in with your server’s setup, then you’ll have to modify the manager application’s web.xml file. Most of this file is given over to servlet definitions and servlet mappings, which you should leave as they are, but the end of the file contains security-related configuration.
Listing 6-2 shows the security-related configuration.
Listing 6-2: Security-Related Configuration from the Manager Application’s web.xml File
<!-- Define reference to the user database for looking up roles --> <resource-env-ref> <description> Link to the UserDatabase instance from which we request lists of defined role names. Typically, this will be connected to the global user database with a ResourceLink element in server.xml or the context configuration file for the manager Web application. </description> <resource-env-ref-name>users</resource-env-ref-name> <resource-env-ref-type> org.apache.catalina.UserDatabase </resource-env-ref-type> </resource-env-ref> <!-- Define a Security Constraint on this Application --> <security-constraint> <web-resource-collection> <web-resource-name>HTMLManager and Manager command</web-resource-name> <url-pattern>/jmxproxy/*</url-pattern> <url-pattern>/html/*</url-pattern> <url-pattern>/list</url-pattern> <url-pattern>/sessions</url-pattern> <url-pattern>/start</url-pattern> <url-pattern>/stop</url-pattern> <url-pattern>/install</url-pattern> <url-pattern>/remove</url-pattern> <url-pattern>/deploy</url-pattern> <url-pattern>/undeploy</url-pattern> <url-pattern>/reload</url-pattern> <url-pattern>/save</url-pattern> <url-pattern>/serverinfo</url-pattern> <url-pattern>/status/*</url-pattern> <url-pattern>/roles</url-pattern> <url-pattern>/resources</url-pattern> </web-resource-collection> <auth-constraint> <!-- NOTE: This role isn't present in the default users' file --> <role-name>manager</role-name> </auth-constraint> </security-constraint> <!-- Define the Login Configuration for this Application --> <login-config> <auth-method>BASIC</auth-method> <realm-name>Tomcat Manager Application</realm-name> </login-config> <!-- Security roles referenced by this web application --> <security-role> <description> The role that is required to log in to the Manager Application </description> <role-name>manager</role-name> </security-role> </web-app>
The <resource-env-ref> element defines the user database that Tomcat uses to authenticate users. Recall that the name user is defined in manager.xml, which in turn is a reference to the global user database. You’ll find details of changing the user database to another type of authentication scheme in Chapter 11.
The <security-constraint> element defines the resources on the server that are covered by the security mechanism and sets which roles are allowed access to them. In this case, all the servlets defined earlier in web.xml are covered, and only users with the manager role are allowed to access them. This element works in combination with the <security-role> element, which defines the roles used in this Web application’s authentication scheme.
If you change the <auth-method> element to anything other than BASIC, tools such as Ant won’t be able to use the manager application because they can’t use any other kind of authentication. Therefore, you must balance the security needs of your server with the way you administer using the manager application. Using DIGEST or FORM authentication makes the manager application more secure but prevents you from using Ant.
| Note | You’ll see more mappings in web.xml than manager commands listed in this chapter. This is for backward compatibility with scripts that were written for older versions of Tomcat. The deprecated commands (install and remove) aren’t available from the HTML interface, and install now calls undeploy in the manager servlet. |
If you want to allow users with other roles to access the manager application, add <role-name> elements in the <auth-constraint> element. Once you’ve done this, add a <security-role> element, with appropriate subelements, for each role you want to add. For example, if you want to allow users with the admin role to use the manager application, alter web.xml as shown in Listing 6-3.
Listing 6-3: Allowing a User with the Admin Role to Use the Manager Application
<auth-constraint> <!-- NOTE: This role isn't present in the default users' file --> <role-name>manager</role-name> <role-name>admin</role-name> </auth-constraint> </security-constraint> ... <!-- Added as part of Tomcat Chapter 6 --> <security-role> <description> The role that is required to log in to the Manager Application </description> <role-name>admin</role-name> </security-role>
Using the Manager Application
The simplest way of using the manager application is through its Web interface. Once you’ve logged in at http://localhost:8080/manager/html, you’ll see the Web interface as shown in Figure 6-1. All the functions of the manager application are available through this interface. Many of the HTML interface commands listed in this section will prompt you for confirmation. This is a sure sign that your actions may affect users accessing your server. If you want to continue, you should click OK.
It’s also possible for you to use request parameters to administer the Web application with scripts. The manager application can provide its responses in plain text so that they can be parsed easily. Some of these plain text messages appear in the status message section of the Web interface, though the Web interface takes a number of the other responses and displays them in user-friendly HTML tables. An example of this is the list of deployed Web applications that you’ll see in the “Listing Web Applications” section.
The manager application commands that are issued via the Web browser have the following format:
http://{hostname}:{port}/manager/{command}?{parameters} The various parts of the URL are as follows:
-
hostname: The host on which the Tomcat instance is running.
-
port: The port on which the Tomcat instance is running.
-
command: The manager command you want to run. The allowed values for command are deploy, list, reload, resources, roles, sessions, start, stop, and undeploy. You’ll look at these in more detail later in the chapter. The manager application understands two other commands: install and remove. These are retained for backward compatibility, though install is now identical to undeploy and is mapped to the undeploy code in the manager servlet. remove is deprecated; you can still use it if you want, though you’ll never feel the need. Therefore, I won’t describe it in this chapter.
-
parameters: The parameters passed to the commands listed previously. These are command specific and are explained in detail, along with the specific command, in a moment. Many of these parameters contain the context path to the Web application (the path parameter) and the URL to the Web application file (the war parameter). The context path for the ROOT application is an empty string. For all other Web applications, the context path must be preceded by /.
A number of problems could occur while working with the manager application. The “Troubleshooting” section lists the possible causes of failure.
Listing Web Applications
You can list the applications that are deployed on this server by clicking the List Applications link. This is the default when you first visit the Web interface (see Figure 6-2). You can click a Web application’s name to run it. The HTML Manager Help and Manager Help links take you to help pages that are part of the manager Web application.
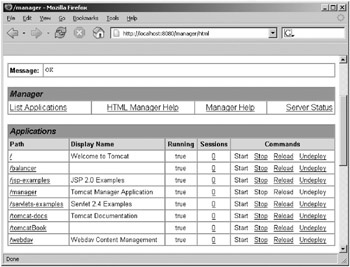
Figure 6-2: Listing Web applications with the Web interface
The message bar at the top of the page gives you a status message related to the commands you run. In this case, the listing was successful, so you get the “OK” status message.
To list the running applications using request parameters, use the following command:
http://localhost:8080/manager/list
For Tomcat 5.0.x this will list the running Web applications as shown in Figure 6-3.
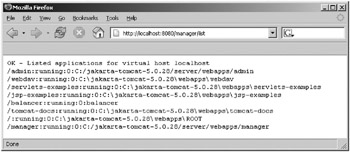
Figure 6-3: Listing Web applications with the Tomcat 5.0.x manager application
The listing has the following structure:
webapp name:status:number of active sessions:path to web application
For Tomcat 5.5 you’ll see the running Web applications as shown in Figure 6-4.
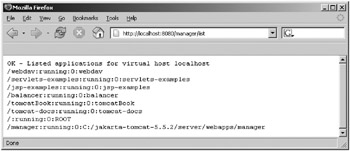
Figure 6-4: Listing Web applications with the Tomcat 5.5 manager application
Here the path to the Web application is relative to the application base directory or an absolute path if the Web application isn’t within the application base directory.
Checking the Status of the Server
Click on the Server Status link to check the server’s status. You’ll see a screen like that in Figure 6-5.
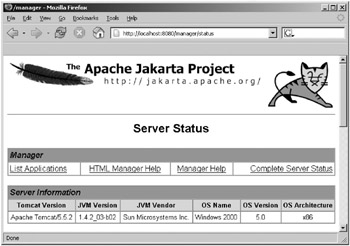
Figure 6-5: Viewing the server’s status with the manager application
The sections shown in Figure 6-5 are straightforward and show the server version and other related information. You can find the real server information below these sections (see Figure 6-6).
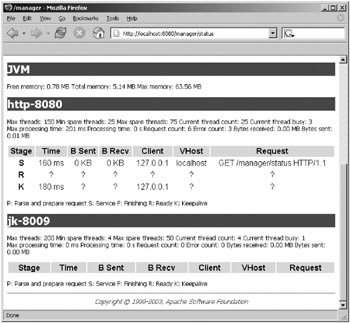
Figure 6-6: Extended server information in the manager application
The JVM section gives details of the JVM that Tomcat uses. The other headings, in this case http-8080 and jk-8009, are the connectors for this host. Their setup and details appear below each one, and you can use this information when dealing with performance issues, and so on.
For a Web application–by–Web application breakdown, click the Complete Server Status link at the top of the screen, as shown in Figure 6-5. The new information appears below that as shown in Figure 6-6.
No alternative method exists for obtaining this server information.
Starting, Stopping, and Restarting Web Applications
The links under Commands are fairly self-explanatory. Stopping a Web application doesn’t remove it from the server but makes it unavailable. Any user who tries to access it will be given a 503 unavailable error code. The Web application is still deployed, and its name is unavailable for new Web applications. Figure 6-7 shows the results of stopping a Web application.
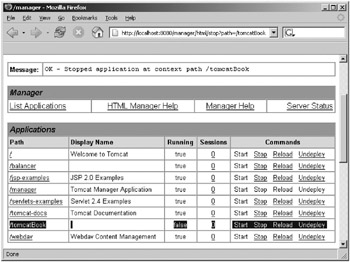
Figure 6-7: Stopping a Web application with the manager application
The running status of the tomcatBook Web application is now “false,” and the Start link is activated. Again, note the status message that tells you the action completed successfully. Another important aspect of Figure 6-7 is the URL that the Web interface uses to stop the Web application. This is how you stop the Web application using HTTP request parameters to activate the manager application without the help of the Web interface.
The following is the stop command. Remember to start the Web application’s path with /.
http://localhost:8080/manager/stop?path=/webapp
If the command is successful, you’ll get the following message:
OK - Stopped application at context path /webapp
This success message is similar to those you’ll receive for all the other commands.
Starting the Web application is just a matter of clicking the Start link, and if any configuration or code changes, you can restart it by clicking the Restart link.
You can also use the following:
http://localhost:8080/manager/start?path=/webapp http://localhost:8080/manager/reload?path=/webapp
Undeploying Web Applications
If you want to permanently remove a Web application, click the Undeploy link. It’s important to realize that this command will delete any files associated with the Web application, as long as they’re in Tomcat’s directory structure. In other words, the manager application will delete the expanded Web application if it’s in webapps, delete the original WAR file if it’s in webapps, and delete the context XML file in the subdirectory of conf. If the Web application is based elsewhere, the files aren’t deleted, but the Web application is no longer available as a Web application and its name is available for new Web applications.
The Web application will shut down gracefully and will no longer appear in the Web interface of the manager application.
The HTTP request parameter version of this command is as follows:
http://localhost:8080/manager/undeploy?path=/webapp
Checking Session Information
If you want basic information on the sessions that are active on a Web application, click the number of active sessions. You’ll be given the information shown in Figure 6-8.
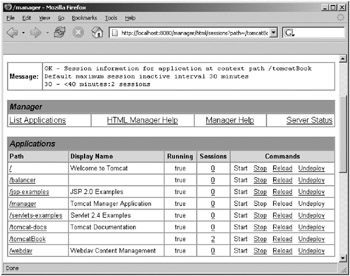
Figure 6-8: Session information using the manager application
In this case, the default session timeout is 30 minutes, and the tomcatBook Web application has two sessions listed. A session is listed if it’s inactive for less than the timeout value plus ten minutes.
The following is the basic command:
http://localhost:8080/manager/sessions?path=/webapp
This will produce the same message as in Figure 6-8, though without any of the HTML wrapping.
Deploying Web Applications
The section below the Web application list allows you to deploy a new Web application. You can deploy a Web application using a context XML file, a WAR file, or a Web application directory, each of which must be on the server’s machine. You can also deploy a WAR from a remote machine.
Figure 6-9 shows the options.
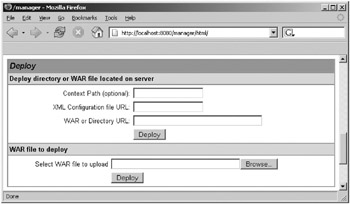
Figure 6-9: The Web application deployment section of the manager application
Deploying Web Applications from the Local Machine
The context path is optional; if you omit it, the manager application will assign the name of the directory, WAR file, or XML file to the Web application. You have the following two ways to specify the location of the Web application:
-
As a file in the host’s application base directory, which is webapps by default
-
In the form file:/absolute/path/to/application
The second method applies to directories, WAR files, and context XML files. Figure 6-10 shows how to deploy a Web application from a WAR file in the C:\dev\webapps directory. Note the direction of the path separators and the use of the appropriate form field.
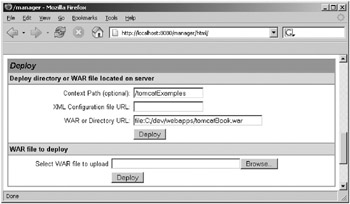
Figure 6-10: Deploying a local WAR with the manager application
If the Web application is installed successfully, you’ll receive an “OK—Deployed application at context path /path” status message, and the new application will appear in the Web application list.
This is the most complicated command when using request parameters, and it also differs from the command used by the Web interface. The three possible parameters are as follows:
-
path: This is the path that will be used to access the Web application once it has been deployed. This must be started with /.
-
war: This is the WAR file or directory to use as the basis for this Web application.
-
config: This is the context XML file to use for this Web application.
If you’re using a context XML file this way, you must also use the war parameter and omit the path parameter. You can use the other two parameters by themselves.
The value of war can be in one of the following formats:
-
file:/absolute/path/to/a/directory: This specifies the absolute path to a directory where a Web application is present in an unpackaged form. This entire path is then added as the context path of the Web application in Tomcat’s configuration.
-
file:/absolute/path/to/a/webapp.war: This specifies the absolute path to a WAR file.
-
directory: This is a Web application directory in the host’s Web application base directory (webapps by default).
-
webapp.war: This is the name of a Web application WAR file in the host’s Web application base directory (webapps by default).
The value of config can be as follows:
-
file:/absolute/path/to/a/context.xml: This is the absolute path to a context XML file that contains the definition of this Web application’s context container.
The simplest way to use this command is to deploy a Web application from the application base directory, either using an expanded directory or a WAR file. The first line of the following deploys the Cat.war file to the /Catalog path, and the second line deploys the Cat directory to the /Catalog path:
http://localhost:8080/manager/deploy?path=/Catalog&war=Cat.war http://localhost:8080/manager/deploy?path=/Catalog&war=Cat
If you omit the path parameter, the application is given the name of the directory or WAR file as its path. For example, the following would deploy the bank.war file to the /bank path:
http://localhost:8080/manager/deploy?war=bank.war
You can use request parameters to deploy a Web application from anywhere on the server’s local machine, just as you could with the Web interface. The commands are similar to those shown previously:
http://localhost:8080/manager/deploy?path=/Catalog&war=file:C:/dev/Cat.war http://localhost:8080/manager/deploy?path=/Catalog&war=file:C:/dev/Cat
Note the absolute path to the WAR and directory. This creates a new context XML file in conf/[Engine_name]/[Host_name] for this Web application. This file is named after the context and contains a reference to the file you specified as the war parameter. Again, the path parameter is optional.
Using a context XML file is a slightly more complicated process. With Tomcat 5.0.x you must use both war and config but not the path parameter. (Using path won’t result in an error, but equally it won’t do anything else either.) This is because Tomcat 5.0.x makes the path attribute of <Context> mandatory, so it reads the context path from there. Tomcat 5.5 does use the path parameter with this command because you’re encouraged not to use the path attribute of <Context>. (It’s not mandatory in Tomcat 5.5.)
config should point to the XML file, and war should point to the application’s files, whether they’re in a directory or in a WAR. So, for Tomcat 5.0.x, you’d use http://localhost:8080/manager/deploy?config=file:C:/catalog.xml&war=file:C:/Catalog and http://localhost:8080/manager/deploy?config=file:C:/catalog.xml&war=file:C:/Catalog.war.
This copies the context XML to conf/[Engine_name]/[Host_name] and renames it after the context it configures. In other words, it’s named after the value of its <Context> element’s path attribute. For example, Listing 6-4 shows a context XML file called newwebapp.xml. However, it will be called form.xml once it’s copied to the server because its path attribute is form. Remember that all this applies only to Tomcat 5.0.x.
Listing 6-4: The newwebapp.xml File
<?xml version='1.0' encoding='utf-8'?> <Context path="/form" crossContext="false" debug="0" reloadable="true" > </Context>
Without the path attribute in a context definition in Tomcat 5.5, you must use the path parameter to deploy a Web application, like so:
http://localhost:8080/manager/deploy? config=file:C:/catalog.xml&war=file:C:/Catalog&path=/catalogue http://localhost:8080/manager/deploy? config=file:C:/catalog.xml&war=file:C:/Catalog.war&path=/catalogue
In both cases, the file will be renamed to the value of the path parameter. (In this example, this would be catalogue.xml.)
Deploying Web Applications from a Remote WAR File
The second section of the deploy section allows you to upload a WAR file to the server. This is particularly useful if you want to administer Tomcat remotely. The manager application will name the resultant Web application after the WAR file and receives the WAR file via the HTTP PUT method.
This method copies the WAR file to the server’s application base directory and expands it. This action has a request parameter version, but it can be used only with tools, such as Ant, that can send PUT data to a server. You’ll see this in the “Managing Applications with Ant” section.
Listing Resources
You can’t list the JNDI resources on the server using the Web interface. To do so, use request parameters as follows:
http://localhost:8080/manager/resources
This will list all the JNDI resources on the server, with the name of the resource followed by a comma, then the fully qualified Java language type. If you want only to see resources of a certain type, then use the type parameter, like so:
http://localhost:8080/manager/resources?type=java.lang.Integer
This will display JNDI resources of type java.lang.Integer only. You can use this command to list user databases, JNDI data sources, and serverwide constants.
Listing Security Roles
Listing security roles is another request parameter–only command and lists all the roles defined on the server.
http://localhost:8080/manager/roles
This lists the security role name and an optional description. There’s one security role listed per line, and the fields are separated by colons. Note that the roles are those defined in the user database for the manager application and may not be all the roles available to all Web applications.
Troubleshooting
A number of things could go wrong while working with the manager application. The possible causes of failure are as follows:
-
Application already exists at path {context_path}: The context path for each Web application must be unique, and this error indicates that another application with the same context path exists on the server. It’s possible that this is the same application and you’ve tried to deploy it twice. To fix this, either undeploy the previous application or choose a different context path.
-
Encountered exception: The Tomcat log files will have error messages relating to the specific error. Typical causes of errors are missing classes/JAR files while loading the application, invalid commands in the application’s web.xml file, and incorrect settings in a context XML file. For example, with Tomcat 5.0.x you may be trying to deploy from a <Context> element with no path attribute, and thus Tomcat can’t assign a context path.
-
Invalid context path specified: The context path must start with /, except when the ROOT Web application is being deployed, in which case the context path must be a zero-length string.
-
No context path specified: You must specify a context path for the command you’re attempting to run.
-
Document base does not exist or is not a readable directory: The value specified for the WAR file path/URL in the war parameter is incorrect. This parameter must point to an expanded Web application or an actual WAR file.
-
No context exists for path {context_path}: The context path is invalid, meaning there’s no Web application deployed under this context path.
-
Reload not supported on WAR deployed at path {context_path}: The Web application had been installed from a WAR file, instead of from an unpacked directory.
-
No global JNDI resources: No JNDI global resources are configured for this Tomcat instance.
-
Can’t resolve user database reference: There was an error looking up the appropriate user database.
-
No user database is available: The <ResourceLink> element hasn’t been configured properly in the manager.xml configuration file. See the earlier “Configuring the Manager Application” section for more information.
EAN: 2147483647
Pages: 94