| The ListBox and ComboBox controls are two of the most common list controls used in Windows applications. They can be used to allow the user to enter data by selecting an item from a list. The ListBox allows both single-selection and multiple-selection , while the ComboBox allows you to type text if you don't find the selection you desire in the list. The ComboBox control also has a DropDownStyle property that allows the control to be used in one of three modes: -
DropDown (the default) displays a textbox-like control with an arrow next to it that can be used to drop down the list. An item can be selected from the list or typed into the textbox-like control. -
Simple displays a textbox-like control with a list just below it that is always visible. An item can be selected from the list or typed into the textbox-like control. -
DropDownList displays a non-textbox-like control with an arrow next to it that can be used to drop down the list. An item must be selected from the list. Items can be added to a list box or combo box either statically (at design time) or dynamically (at runtime). These controls manage the list using the Items property. The Items property represents the collection of items in the list and can be used to access properties such as Count and Item , and methods such as Add , AddRange , Clear , Insert , Remove , and RemoveAt . Other properties that apply to the control itself, such as Enabled , SelectedIndex , Sorted , and Visible , belong to the ListBox or ComboBox class.  | In this section, we will add a list box to our Acme Travel Agency case study that displays all the hotels that have been added. We will also let the user select a hotel from the list box to edit or delete. If you want to follow along on the computer, you may continue in the Demos\HotelAdmin folder, or copy the code in HotelAdmin\Version 1 to a new folder. We will create Version 2 of this program. | You should begin by adding a few additional controls to your MainAdminForm . They are shown in Figure 7-31 and summarized in Table 7-6. Figure 7-31. Adding a ListBox control to a form. 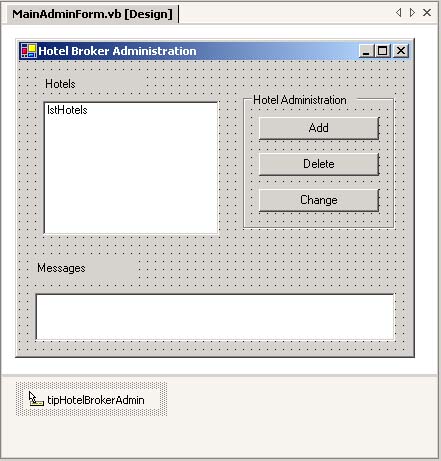 Table 7-6. Property Values for New Controls in HotelAdmin Main Form | Control Type | Name | Text | Other Properties | | Label | Label1 | Hotels | | | ToolTip | tipHotelAdmin | | | | ListBox | lstHotel | n/a | ToolTip: Lists city, hotel, # of rooms and rate | Step 1: Adding Data to a ListBox To add items dynamically at runtime, you must use the Items.Add method or the Items.Insert method. Add inserts at the end of the list (unless the Sorted property is true), whereas Insert allows you to specify the insertion position. List1.Items.Add("Mary") List1.Items.Insert(3,"Mark") If you have a large number of items to add to the list, you can turn off repainting of the control until all items have been added using the BeginUpdate and EndUpdate methods. List1.BeginUpdate() For I = 1 To 100 List1.Add("Item " & I) Next List1.EndUpdate() For HotelAdmin\Version 2 , we will write code to take the data that is in HotelBroker and display it in a list box. You must add the following helper procedure to your MainAdminForm class. It uses the Items.Add method to add to the list box. Private Sub ShowHotelList(ByRef array As ArrayList) lstHotels.Items.Clear() If array Is Nothing Then Return End If Dim hotel As HotelListItem For Each hotel In array Dim city As String = hotel.City.Trim() Dim name As String = hotel.HotelName.Trim() Dim rooms As String = hotel.NumberRooms.ToString() Dim rate As String = hotel.Rate.ToString() Dim str As String = city & "," & name & "," & rooms _ & "," & rate lstHotels.Items.Add(str) Next End Sub You must then modify both the Load event handler and the Click event handler for the Add button to call ShowHotelList as needed. Add the bolded code shown below to the specified procedures. Private Sub MainForm_Load(ByVal sender As System.Object, _ ByVal e As System.EventArgs) Handles MyBase.Load hotelBroker = New hotelBroker() ShowHotelList(hotelBroker.GetHotels()) End Sub Private Sub cmdAdd_Click(ByVal sender As System.Object, _ ByVal e As System.EventArgs) Handles cmdAdd.Click ... Dim status As DialogResult = dlg.ShowDialog() If status = DialogResult.OK Then Dim comment As String = hotelBroker.AddHotel(_ dlg.City, dlg.HotelName, dlg.NumberRooms, _ dlg.Rate) If comment = "OK" Then ShowHotelList(hotelBroker.GetHotels()) txtMessages.Text = "Hotel " & dlg.HotelName & _ " has been added" Else txtMessages.Text = comment End If End If End Sub You can now run the application, and you should see some test data provided in the HotelBroker class displayed in the list box, as illustrated in Figure 7-32. Figure 7-32. ListBox displays information about hotels. 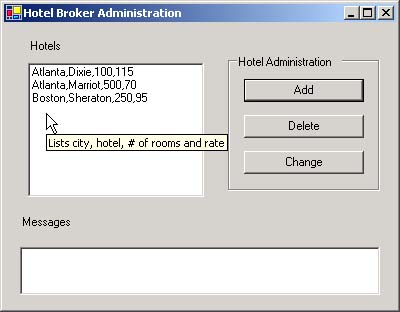 Step 2: Selecting an Item in a ListBox An item in a list is selected by clicking on the item. This action generates a SelectedIndexChanged event. The properties SelectedIndex and Selected-Item are set by the user's clicking action. When no item is selected, SelectedIndex is - 1. If the item is a multiple-selection listbox, the code is more complicated. The SelectedItems property maintains the collection of selected items. Its property Count identifies the number of items selected. These may then be accessed through the subscriptable property Item . For example: Dim s As String Dim index As Integer s = List1.SelectedItems.Item(0) For index = 1 To List1.SelectedItems.Count - 1 s &= ", " & List1.SelectedItems.Item(index) Next For HotelAdmin\Version 2 , we will write code to maintain a variable with information about the hotel that is currently selected in the list box. Recall that we already added the variable currHotel to the form: Public Class MainAdminForm Inherits System.Windows.Forms.Form Private hotelBroker As HotelBroker Private currHotel As HotelListItem ... We can then trap the SelectedIndexChanged event of lstHotels . In this handler procedure, we will use the SelectedItem property to extract the current hotel selection. We must parse the hotel information from the comma-delimited that SelectedItem returns. The Split method from the String class returns us a list of the individual strings that were separated by a specified delimiter . Add the following code to your demo: Private Sub lstHotels_SelectedIndexChanged(ByVal sender _ As System.Object, ByVal e As System.EventArgs) _ Handles lstHotels.SelectedIndexChanged If lstHotels.SelectedIndex <> -1 Then Dim selected As String = lstHotels.SelectedItem Dim sep As Char() = New Char() {","c} Dim fields() As String fields = selected.Split(sep) currHotel = New HotelListItem() currHotel.City = fields(0) currHotel.HotelName = fields(1) currHotel.NumberRooms = Convert.ToInt32(fields(2)) currHotel.Rate = Convert.ToDecimal(fields(3)) Else currHotel.HotelName = "" End If End Sub Step 3: Removing Data from a ListBox To remove items from a list, the Remove method is used to remove the first occurrence of a specified string. The RemoveAt method is used to remove the occurrence at a specified index. For example: List1.Items.Remove("Mary") List1.Items.RemoveAt(2) The Items.Clear method can be used to remove all items from the list box. For HotelAdmin\Version 2 , we will use the currently selected hotel in the implementation of our delete button. However, rather than remove an item from the list box, we will remove it from our HotelBroker object and then repopulate the list box. You must add the following code for the Click event of cmdDelete. It will remove the selected hotel and redisplay the list. If you re-examine the ShowAllHotels method, you will see that the first line of code clears the list box. Private Sub cmdDelete_Click(ByVal sender As _ System.Object, ByVal e As System.EventArgs) _ Handles cmdDelete.Click Dim comment As String = _ hotelBroker.DeleteHotel(currHotel.City, _ currHotel.HotelName) If comment = "OK" Then ShowHotelList(hotelBroker.GetHotels()) txtMessages.Text = "Hotel " & currHotel.HotelName & _ " has been deleted" Else txtMessages.Text = comment End If End Sub Step 4: Changing Hotel Data As a final step in our HotelAdmin example program, we implement the Change button, which allows the user to change the number of rooms and the rate of a selected hotel. Clicking the Change button brings up the dialog illustrated in Figure 7-33. Figure 7-33. Dialog for changing information about hotels. 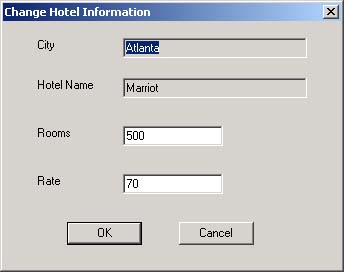 There are no new concepts illustrated by this feature, so we do not show the code here. You may examine it in the example code. The project at this point is stored in HotelAdmin\Version 2 . Acme Travel Agency Case Study (Step 3) The Acme Travel Agency case study was introduced in Chapter 5, where we used arrays as our data structures for storing lists of hotels, customers, and reservations . In Chapter 6, we changed the implementation to use collections in place of arrays. We provided a command-line user interface. In the CaseStudy folder of the present chapter, we provide a graphical user interface for the application that is implemented by using Windows Forms. We have already developed much of the basic hotel management functionality in this chapter via the HotelAdmin demos. The CaseStudy version uses a similar GUI with additional options. The Customers button on the MainAdminForm brings up a Customer Management dialog, which shows a list of currently registered customers. You may select a customer by clicking in the list box. The Reservation button on the MainAdminForm brings up a Hotel Reservations dialog. It allows you to: -
Make a reservation. Simply enter the customer's Id, check-in date, and the number of days they plan to stay. Specify the city and hotel by selecting from a listbox. Then click the Make Reservation button. -
Show all the reservations. Enter a particular customer Id, [2] and click Show Reservations. [2] A Customer Id of -1 will show the reservations for all customers. -
Clear reservations. You may clear the reservations list box by clicking the Clear Reservations button. -
Cancel a reservation. Simply enter a particular Reservation Id, which may either be typed in or selected by clicking in the Reservations list box. Then click the Cancel Reservations button. The Acme Travel Agency case study is used extensively in the following chapters, so you may wish to experiment with it at this point. The graphical user interface makes exercising the case study much easier than our previous command-line interface. On the other hand, the command-line interface and a simple global try block around the whole command loop made it easy to check for all exceptions. Such an approach is not feasible for a GUI program. In an industrial-strength application you should check for exceptions wherever they may occur. Our case study is simplified for instructional purposes, and we have not attempted to be thorough in catching exceptions. Another simplification we made is not checking that a Customer Id used in making a reservation corresponds to a real, registered customer. The database implementation in Chapter 13 does provide such a check.  | 