Calling COM Components from Managed Code The first interoperability scenario we will look at is managed code calling COM components. The .NET Framework makes it easy to create a Runtime Callable Wrapper (RCW), which acts as a bridge between managed and unmanaged code. The RCW is illustrated in Figure 17-1. Figure 17-1. A Runtime Callable Wrapper between managed and unmanaged code. 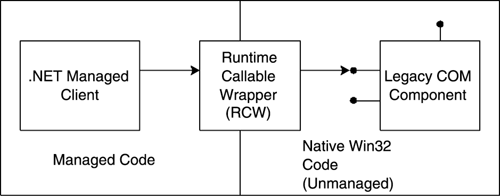 You could implement an RCW assembly yourself, using the PInvoke facility (described in a later section) to call into the necessary APIs, such as CoCreateInstance and the IUnknown methods directly. But that is not necessary, because the Tlbimp.exe tool can read type library information and automatically generate the appropriate RCW for you. Visual Studio .NET makes it even easier, as you can add a reference to a COM object in Solution Explorer. We will examine both of these facilities as we look at some examples of COM components and .NET clients . The Tlbimp.exe Utility The Tlbimp.exe utility (Type Library to .NET Assembly Converter) program is provided in the \Program Files\Microsoft.NET\FrameworkSDK\Bin directory. It is used to generate managed classes that wrap unmanaged COM classes. The resulting RCW is a .NET component (i.e., a managed DLL assembly) that managed client code can use to access the COM interface methods that are implemented in the COM component. The Tlbimp.exe tool is a command-line program that reads COM type library information, generates a managed wrapper class along with the associated metadata, and places the result into the RCW assembly. You can view the resulting contents in this assembly using the Ildasm.exe tool. The command line syntax for Tlbimp.exe is shown below. Tlbimp TypeLibName [options] Where options may contain the following: /out:FileName Assembly file name /namespace:Namespace Assembly Namespace /asmversion:Version Assembly version number /reference:FileName Reference assembly /publickey:FileName Public key file /keyfile:FileName Key pair file /keycontainer:FileName Key pair key container /delaysign Delay digital signing /unsafe Suppress security checks /nologo Suppress displaying logo /silent Suppress output except errors /verbose Display extra information /primary Make primary interop assembly /sysarray SAFEARRAY as System.Array /strictref Only /reference assemblies /? or /help Display help information When the Tlbimp.exe tool imports a COM type library, it creates a .NET namespace with the same name as the library defined in the type library (that is, the name of the actual library, not the name of the type library file that contains it). Tlbimp.exe coverts each COM coclass defined in the type library into a managed .NET wrapper class in the resulting .NET assembly that has one constructor with no parameters. Tlbimp.exe coverts each COM interface defined in the type library into a .NET interface in the resulting .NET assembly. Consider the typical COM IDL file library statement shown below, which would be used to create a type library using Midl.exe . The TLB or DLL file produced by this IDL file would cause Tlbimp.exe to generate an assembly containing metadata, including the namespace BANKDUALLib , a managed wrapper class named Account2 , and a managed interface named IAccount2 . library BANKDUALLib { importlib("stdole32.tlb"); importlib("stdole2.tlb"); [ uuid(04519632-39C5-4A7E-AA3C-3A7D814AC91C), helpstring("Account2 Class") ] coclass Account2 { [default] interface IAccount2; }; }; Once you have used Tlbimp.exe to generate the wrapper assembly, you can view its contents using the Ildasm.exe tool, as shown in Figure 17-2. Note that the namespace shown by Ildasm.exe is BANKDUALLib , the name of the interface is IAccount2 , and the wrapper class is named Account2 . Figure 17-2. Ildasm.exe showing contents of a COM wrapper assembly. 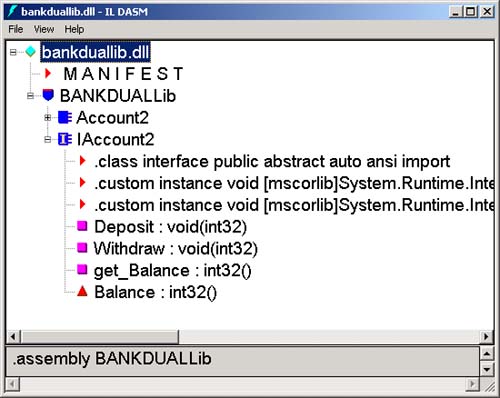 Demonstration: Wrapping a Legacy COM Server The best way to get a feel for how this wrapping process works is to perform the operations yourself. The .NET client program is in the directory NetClient . The directory LegacyComServer contains the following files: BankDual.dll COM server DLL BankDual.tlb Type library reg_bankdual.bat Batch file to register the server unreg_bankdual.bat Batch file to unregister the server BankConsole.exe Client executable file The source code for the client and server are in the directories ClientSource and ServerSource respectively. Both programs are written in Visual C++, and project files are provided for Visual C++ 6.0. Unless you have Visual C++ 6.0 installed on your system in addition to Visual Studio .NET, you will not be able to build these projects, but that will not prevent you from creating and running the .NET client that uses the C++ COM server BankDual.dll . We could also have implemented the legacy COM server and client programs using Visual Basic 6, and the code would have been much simpler. But to run the programs, you would need the Visual Basic 6 runtime installed on your computer. In this book we are only assuming that you have Visual Studio .NET installed on your computer, which includes the CLR as a runtime but not the VB6 runtime. In any event, the source code for the legacy server and client does not matter, because we are going to be coding a client program using VB.NET. This COM server implements a simple bank account class that has Deposit and Withdraw methods and a Balance property. The simple code [1] is shown in Account2.cpp in the ServerSource directory. [1] We will not discuss the somewhat intricate infrastructure code provided by this ATL-based COM server. Such "plumbing" is much easier with .NET. Our focus is on calling COM components, not implementing them. STDMETHODIMP CAccount2::get_Balance(long *pVal) { *pVal = m_nBalance; return S_OK; } STDMETHODIMP CAccount2::Deposit(long amount) { m_nBalance += amount; return S_OK; } STDMETHODIMP CAccount2::Withdraw(long amount) { m_nBalance -= amount; return S_OK; } Register the COM Server The first step is to register the COM server. You can do that by running the batch file reg_bankdual.bat , which executes the command regsvr32 bankdual.dll You can now see the registration entries using the Registry Editor ( regedit.exe ) or the OLE/COM Object Viewer ( oleview.exe ). The latter program is provided on the Tools menu of Visual Studio .NET. It groups related registry entries together, providing a convenient display. You can also perform other operations, such as instantiating objects. Figure 17-3 shows the entries for the Account2 class that is implemented by this server. We have clicked the little "+" in the left-hand pane, which instantiates an object and queries for the standard interfaces. You can release the object by right-clicking over the class and choosing Release Instance from the context menu. Figure 17-3. OLE/COM Object Viewer showing registry entries. 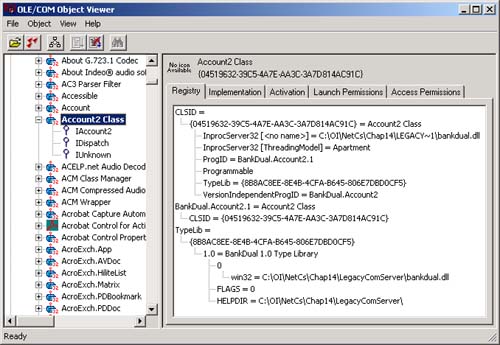 Run the Legacy COM Client You can now run the legacy COM client by double-clicking on BankConsole.exe in Windows Explorer. The starting balance is shown, followed by a withdrawal of 25, and the balance is shown again. Here is the legacy source code, in the file BankConsole.cpp in ClientSource . // BankConsole.cpp #include <stdio.h> #include <stdlib.h> #include <objbase.h> #include "bankdual.h" #include "bankdual_i.c" IAccount2* g_pAccount; void ShowBalance() { long balance; HRESULT hr = g_pAccount->get_Balance(&balance); printf("balance = %d\n", balance); } int main(int argc, char* argv[]) { // Initialize COM HRESULT hr = CoInitializeEx(NULL, COINIT_APARTMENTTHREADED); // Instantiate Account object, obtaining interface // pointer hr = CoCreateInstance(CLSID_Account2, NULL, CLSCTX_SERVER, IID_IAccount2, (void **) &g_pAccount); // First obtain and display initial balance ShowBalance(); // Deposit 25 and show balance hr = g_pAccount->Deposit(25); ShowBalance(); // Clean up g_pAccount->Release(); CoUninitialize(); printf("Press enter to quit: "); char buf[10]; gets(buf); return 0; } For simplicity, no error checking is done. Robust code should check the HRESULT that is returned from each of the COM calls. Here is the output from running the client program: balance = 150 balance = 125 Press Enter to quit: Import the Type Library (TlbImp.EXE) In order to call the COM component from managed code, we must create an RCW. We can do that by running the TlbImp.exe utility that we have discussed. Later, we will see how to accomplish the same thing by simply setting a reference to the BANKDUALLib library. We will now run the TlbImp.exe utility from the command line, in the directory NetClient , where we want the RCW assembly to wind up. We provide a relative path to the type library file [2] BankDual.tlb in the directory LegacyComServer . What we have to type is shown in bold. [2] The file BankDual.dll also contains the type library and could have been used in place of BankDual.tlb . tlbimp ..\legacycomserver\bankdual.tlb TlbImp - Type Library to .NET Assembly Converter Version 1.0.2914.16 Copyright (C) Microsoft Corp. 2001. All rights reserved. Type library imported to BANKDUALLib.dll The RCW assembly that is created is BANKDUALLib.dll , taking its name from the name of the type library, as discussed earlier. Implement the .NET Client Program It is now easy to implement the .NET client program. The code is in the file NetClient.vb in the NetClient example.  ' NetClient.vb Imports System Imports BANKDUALLib Module NetClient Public Sub Main() Dim acc As Account2 acc = New Account2() Console.WriteLine("balance = {0}", acc.Balance) acc.Withdraw(25) Console.WriteLine("balance = {0}", acc.Balance) End Sub End Module As with the COM client program, for simplicity we do no error checking. In the .NET version we should use exception handling to check for errors. The RCW uses the namespace BANKDUALLib , based on the name of the type library. You must add a reference to BANKDUALLib.dll . In the Visual Studio Solution Explorer you can right-click over References, choose Add Reference, and use the ordinary .NET tab of the Add Reference dialog. Build and run the project inside of Visual Studio. You should see the following output: balance = 150 balance = 125 Press any key to continue Once you have added a reference to an RCW, you have all the features of the IDE available for .NET assemblies, including Intellisense and the Object Browser. You can bring up the Object Browser from View Other Windows Object Browser. Figure 17-4 illustrates the information shown. Figure 17-4. Object Browser showing information about the RCW. 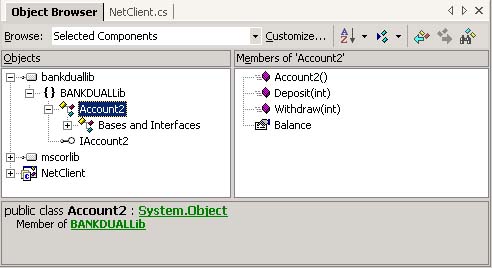 Import a Type Library Using Visual Studio When you are using Visual Studio, you can import a COM type library directly, without first running TlbImp.exe . To see how to do this, use Solution Explorer to delete the reference to BANKDUALLib.dll . In fact, delete the file itself, and delete the bin and obj directories of NetClient . Now right-click over References, choose Add Reference, and this time select the COM tab from the Add Reference dialog. The listbox will show all the COM components with a registered type library. Select BankDual 1.0 Type Library, as illustrated in Figure 17-5, click Select, and then click OK. Figure 17-5. Add a reference to a COM component in Visual Studio. 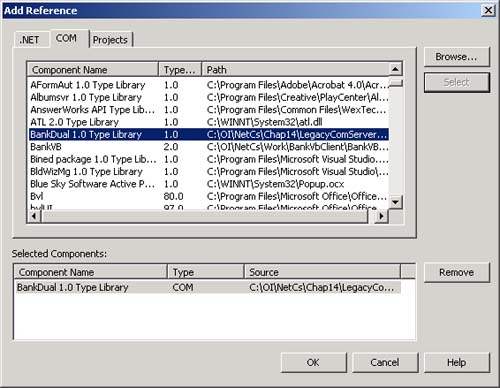 You will see a message telling you that a primary interop assembly is not registered for this type library. You will be invited to have a wrapper generated for you, as illustrated in Figure 17-6. Click Yes. The generated RCW is the file Interop.BANKDUALLib_1_0.dll in the directory bin\Debug . You should be able to build and run the .NET client program. Figure 17-6. Visual Studio will create a primary interop assembly.  The primary interop assembly that was created by Visual Studio is normally created by the publisher of the COM component. This can be done using the TlbImp.exe utility with the /primary option. Wrapping a COM Component with a Pure V-Table Interface Dual Interfaces Our example legacy COM component BankDual.dll had a dual interface IAccount2 . This means that the interface could be called by both an early-binding COM client using the v-table and also by a late-binding client using IDispatch . The IDL file BankDual.idl specifies the interface IAccount2 as dual. [ object, uuid(AAA19CDE-C091-47BF-8C96-C80A00989796), dual , helpstring("IAccount2 Interface"), pointer_default(unique) ] interface IAccount2 : IDispatch { [propget, id(1), helpstring("property Balance")] HRESULT Balance([out, retval] long *pVal); [id(2), helpstring("method Deposit")] HRESULT Deposit([in] long amount); [id(3), helpstring("method Withdraw")] HRESULT Withdraw([in] long amount); }; An example of late binding is VB Script code for client-side scripting on a Web page. The BankHtml example contains the file Bank.htm with an HTML form and VBScript code to exercise our bank account server. <!-- bank.htm --> <HTML> <HEAD> <TITLE>Bank test page for Account object</TITLE> <SCRIPT LANGUAGE="VBScript"> <!-- dim account Sub btnCreate_OnClick set account = createobject("BankDual.Account2.1") Document.Form1.txtAmount.Value = 25 Document.Form1.txtBalance.Value = account.Balance End Sub Sub btnDestroy_OnClick set account = Nothing Document.Form1.txtAmount.Value = "" Document.Form1.txtBalance.Value = "" End Sub Sub btnDeposit_OnClick account.Deposit(Document.Form1.txtAmount.Value) Document.Form1.txtBalance.Value = account.Balance End Sub Sub btnWithdraw_OnClick account.Withdraw(Document.Form1.txtAmount.Value) Document.Form1.txtBalance.Value = account.Balance End Sub --> </SCRIPT> <FORM NAME = "Form1" > Amount <INPUT NAME="txtAmount" VALUE="" SIZE=8> <P> Balance <INPUT NAME="txtBalance" VALUE="" SIZE=8> <P> <INPUT NAME="btnCreate" TYPE=BUTTON VALUE="Create"> <INPUT NAME="btnDestroy" TYPE=BUTTON VALUE="Destroy"> <INPUT NAME="btnDeposit" TYPE=BUTTON VALUE="Deposit"> <INPUT NAME="btnWithdraw" TYPE=BUTTON VALUE="Withdraw"> </FORM> </BODY> </HTML> The createobject function instantiates a COM object using late binding, referencing a program ID rather than a CLSID. This is perfectly legitimate , because BankDual.dll implements a dual interface on the Account2 object. Since this is client-side script, we can exercise it locally in Internet Explorer, simply double-clicking on bank.htm in Windows Explorer. This will bring up Internet Explorer and show the form. You can click the Create button and instantiate an object, [3] as shown in Figure 17-7. The starting balance of 150 is shown. You can then exercise Deposit and Withdraw, and when you are done, you can click Destroy. [3] Depending on your security settings, you may get a warning message about an ActiveX control on the page. Click Yes to allow the interaction. If you have trouble running the ActiveX control at all, check your security settings. Figure 17-7. Accessing a late-bound COM object in Internet Explorer. 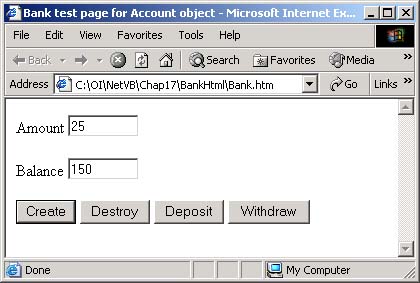 Pure V-Table Interface Dual interfaces are very common. The default in an ATL wizard-generated COM component is dual interface. Visual Basic 6.0 also creates COM components with dual interfaces. However, if there is no occasion for a COM component to be called by a late-binding client, it is more efficient to implement only a pure v-table interface. | | There is a slight issue in generating wrappers for COM components with a pure v-table interface that can depend on the threading model that you choose for your client program. To see the problem, consider the COM component the VtableComServer example. As with our LegacyComServer example, the top-level directory contains the DLL, the type library file, batch files to register and unregister the server, and a client test program. Source code for the COM server and client is provided in ServerSource and ClientSource respectively. We want to implement the managed client program VtableNetClient . | First, verify that the legacy COM client and legacy COM server work. All you have to do is run the batch file reg_bank.bat to register the server, and you can double-click on BankConsole.exe in Windows Explorer to run the client. Next , open up the solution VtableNetClient.sln in Visual Studio. Add a reference to the COM type library Bank 1.0 Type Library. You should get a clean build. But when you run the program, you get an exception: Unhandled Exception: System.InvalidCastException: QueryInterface for interface B ANKLib.IAccount failed. at BANKLib.AccountClass.GetBalance(Int32& pBalance) at VtableNetClient.VtableNetClient.ShowBalance() in C:\OI\NetVB\Chap17\Vtable NetClient\Module1.vb:line 12 at VtableNetClient.VtableNetClient.Main() in C:\OI\NetVB\Chap17\VtableNetClie nt\Module1.vb:line 29 The problem is that the .NET client is in a separate apartment due to the fact that the <MTAThread()> attribute is applied to the client's Main method, and it needs marshaling. You can use any of the following solutions: -
Mark the interface as dual . -
Mark the interface as oleautomation , and limit types used to oleautomation friendly types. -
Build and register the proxy/stub DLL for the interface. -
Mark the Main method in the VB.NET client with the <STAThread()> (or <MTAThread()> attribute if appropriate to the situation), to place it into the same threading model as the COM server. Examining the source code for VtableNetClient.vb , we see that we commented out the attribute <STAThread()> in front of Main . Uncomment it, and comment out the <MTAThread()> attribute, build, and run again. This time it should work! As an alternate solution, comment out <STAThread()> again. Now, in the server directory VtableComServer run the batch file reg_bankps.bat to register the proxy/stub DLL. Build and run the .NET client. Again, it should work! Notice another feature of this .NET client program. Rather than calling methods on a class object, we go through interface references. Also note that the assignment operator is the analog in .NET of QueryInterface in COM. | 