Flylib.com

Books Software


Previewing a Report


Previewing a Report

graphics/07inf34.jpg

graphics/one_icon.jpg

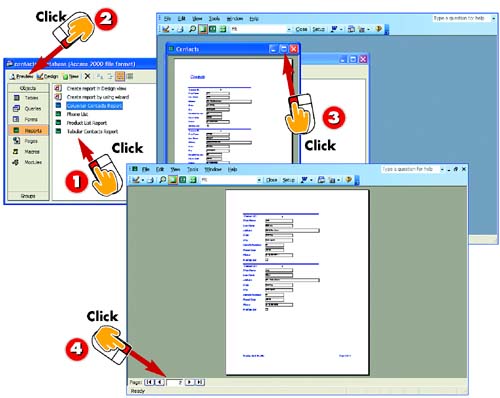
In the database window, click the report you want to preview to select it.

graphics/two_icon.jpg

Click the Preview button.

graphics/three_icon.jpg

The report is displayed onscreen. If necessary, maximize the window by clicking its Maximize button.

graphics/four_icon.jpg

Click the Page buttons to move to other pages in the report.

INTRODUCTION

When designing your report, it's hard to get a good sense of how all those controls will translate to the printed page. When you want to see how your report will look when printed or displayed, you can preview it. With reports , previewing is the same as opening.

graphics/07inf35.jpg

graphics/five_icon.jpg

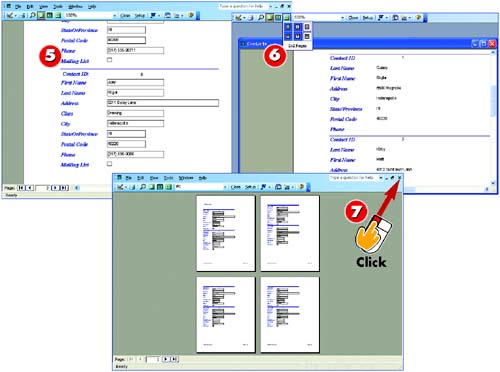
To zoom in, click the area of the report you want to view. Access zooms in on the area you clicked. To zoom back out, click anywhere in the preview.

graphics/six_icon.jpg

To view multiple pages side-by-side, click the Two Pages or Multiple Pages button. If you click Multiple Pages , drag across the palette to select the number of pages to display.

graphics/seven_icon.jpg

You see several pages displayed at once. Click the Close button to close the report.

TIP

Zooming In

You can also open the View menu and choose Zoom to zoom in (or out) by a certain percentage.

TIP

Using Design Layout View

Another view option is Design Layout view. When you are working in Design view, you can switch back and forth between Design view and Layout Preview as you work.

TIP

Choosing Print, Design, or Setup

You can print directly from the preview by clicking the Print button. To access the page setup options for the report, click the Setup button in the preview window.


Printing a Report

graphics/07inf36.jpg

graphics/one_icon.jpg

After you open the report you want to print, open the File menu and choose Print .

graphics/two_icon.jpg

The Print dialog box opens. To select a printer other than the default, click the down arrow next to the Name field and select a printer from the list that appears.

INTRODUCTION

Most reports are created with the purpose of printing them. After you have created and formatted your report, set up the page, and checked its appearance by previewing it, you are ready to print.

TIP

Previewing First

Because you can't really get a good idea of how the report will look from within Design view, it's a good idea to preview the report first. Make any necessary modifications, preview again, and then print.

graphics/07inf37.jpg

graphics/three_icon.jpg

In the Print Range area, specify the pages in the report that you want to print (the default setting is All ).

graphics/four_icon.jpg

To print more than one copy of the report, type the number of copies you want in the Number of Copies field.

graphics/five_icon.jpg

Click OK . The report is printed.

TIP

Printing Multiple Copies

If you select to print multiple copies of your report, you can opt to collate the pages by marking the Collate check box. If you uncheck this check box, Access will print the set number of copies of page 1, followed by the set number of copies of page 2, and so on.


Part 8. Managing Your Database

Now that you have learned how to create many different types of database objects, including forms, queries, tables, reports , and the like, it's time to step back and look at the database as a whole. This part covers common tasks you'll need to perform to maintain your database, including renaming an object, deleting an object, and securing your data with a password.

In addition, this part covers setting up relationships among the tables in your database. Access is a relational database and rather than include one huge table, you'll find it better to create several smaller, more focused tables, and then link or relate the tables together as needed. Using various tables, you can create queries, forms, and reports that pull data from several of these tables.

graphics/08inf01.jpg