Internet Content Filtering
Internet content filtering is essentially controlling everything going to and from the Internet with the exception of e-mail, which has its own unique filtering issues that we will discuss later in this chapter.
Although the Internet is a limitless pool of resources that can be used to research topics and provide a means for business-to-business communications, it is also a completely unmanaged and uncontrolled environment. I once heard the Internet referred to as the Wild West, and that is a pretty accurate representation. For all the good and value that it provides, a lot of danger seems to be waiting around the corner.
A good Internet content-filtering system can protect a network from numerous threats, including the following:
-
Misuse of resources
-
Preserving network bandwidth
-
Hostile work environment
-
Hostile web code (Java/ActiveX applets)
Misuse of Resources
Misuse of resources ranges from users surfing the Internet, to users frequenting newsgroups and chat rooms, to the rampant use of instant messaging software. Misuse of resources presents two distinct problems. First, it reduces an employee s productivity. Instead of working, employees will surf the Web and kill some time. Second, misuse of resources has the possibility of exposing the network to external threats through websites with active content or users downloading and installing software that is not permitted.
Preserving Network Bandwidth
The biggest culprit of bandwidth loss is the use of peer-to-peer file sharing applications such as Kazaa and Limewire. Streaming audio and video, for example, from people listening to Internet radio also can have a negative impact on Internet bandwidth. In addition, casual web browsing, if done enough, can have a detrimental effect on the company s productive Internet traffic.
Hostile Work Environment
The hostile work environment is perhaps the biggest problem that Internet content filtering needs to address. Companies can easily find themselves in the middle of costly litigation due to sexually explicit content that is on their network. Indeed, when you look at the numbers , it is really quite surprising what people are willing to do while at work and using work resources:
-
Twenty percent of men and 12.5 percent of women admit to using their work computers to access sexually explicit content on the Internet ”and these are just the ones that would admit it.
-
Over 25 percent of workers say that they receive sexually explicit e- mails .
-
Thirty-three percent of companies have terminated employees for abusing Internet access.
In today s litigious society, companies can and will find themselves liable for sexual harassment lawsuits due to a hostile work environment. In fact, one oil company paid a $2.2-million-dollar settlement as a direct result of content that was deemed to have created an unsafe work environment. This is especially true if it is found that the employer knew such activities were occurring and did nothing to prevent it.
Conversely, employers may establish an affirmative defense to a harassment claim by showing that they have an explicit policy concerning the use of corporate systems (an acceptable-use policy) as well as demonstrating that they have implemented a proactive system that seeks to prevent inappropriate content from appearing on corporate resources.
Hostile Web Code (Java/ActiveX Applets)
Since all Internet requests must go through the content filter to be permitted, your users can be protected from websites that may use Java or ActiveX applets to gain access to the user computer or surreptitiously install trojans or other applications.
Implementing Content Filtering
This section details the implementation of the following content-filtering solutions:
-
SurfControl Web Filter Version 4.5 with Virtual Control Agent, using the Microsoft MSDE database engine on Microsoft Windows 2000 with Service Pack 3
-
Websense version 5.1, integrated with Cisco Secure PIX Firewall version 6.3(1)
There are two primary objectives to implementing a content-filtering solution. The first is to block restricted content. You should approach blocking content as you do most security concepts, by taking a deny all first, then permit only position. By that you will design your initial blocking scheme to deny all traffic regardless of the source, the type, or who is attempting to generate the traffic. Once you have done that, you should go back and identify only the types of traffic you want to permit. For example, you might allow your administrators to access hacking- related sites while preventing your general user community from being able to do the same. You have to be prepared for configuring the initial ruleset to be a time-consuming process that involves making some mistakes. No matter how much you plan, you are going to block something that will need to be opened up. You need to set this expectation appropriately while at the same time planning as much as possible to minimize the chance of missing something.
The second objective is to be able to report on Internet usage. Although it is certainly nice to block access to restricted sites, you will also want to know what sites people are trying to go to. For example, do you have some people who are routinely trying to access blocked sites? If so, that could indicate a personnel problem that needs to be addressed. You also may have some people who are accessing permitted sites that your company may want to know about. For example, are people visiting a competitor s website? This may or may not be a problem, but either way it can be nice to know. Job-seeking websites are also good to track because this can indicate potential employee dissatisfaction, which might need to be addressed. If all the employees in a certain group seem to be looking for employment elsewhere, there might be something going on in that group that management needs to look into.
Unlike in most of the chapters in this book, because the configuration of these products is so unique, I am going to detail them in individual sections instead of detailing them inline with common concepts, as was done in other chapters.
SurfControl Web Filter Version 4.5
SurfControl is a server-based content-filtering architecture that does not require a firewall or gateway to be integrated with it to function. Because of this, SurfControl makes an excellent choice if you do not want a content-filtering solution that will tie you to a specific firewall or gateway.
The first step in installing SurfControl is ensuring that your network is configured properly to support monitoring. You can go about doing this in two ways. The first is to ensure that there is a hub that connects the firewall to the internal network. If that is the case, you can simply connect the SurfControl server to the hub, and it will be able to monitor all inbound and outbound Internet requests. However, if you have a switch that connects your firewall to the internal network, you need to configure the switch to mirror the firewall port to a NIC on the SurfControl server. This will allow the server to be able to monitor all activity. Because a mirrored port can only receive data, you will need a second NIC that connects to the switch so that the server can send any blocking packets and notify the user that their Internet access has been blocked.
You can configure mirrored ports, called Switched Port Analyzer (SPAN) , on a Cisco Catalyst 2950 series switch by running the following commands at the CLI:
switch02#configure terminal Enter configuration commands, one per line. End with CNTL/Z. ! In this case I specified fastethernet 0/1 as the source port switch02(config)#monitor session 1 source interface fa0/1 ! In this case I specified fastethernet 0/5 as the destination port switch02(config)#monitor session 1 destination interface fa0/5 switch02(config)#exit --! This line verifies that the SPAN has been configured correctly switch02#show monitor Session 1 Type : Local Session Source Ports: RX Only: None TX Only: None Both: Fa0/1 Source VLANs: RX Only: None TX Only: None Both: None Source RSPAN VLAN: None Destination Ports: Fa0/5 Encapsulation: Native Reflector Port: None Filter VLANs: None Dest RSPAN VLAN: None
In this example, the firewall is connected on port FastEthernet 0/1, and the SurfControl monitoring NIC will be connected to port FastEthernet 0/5. Once you have completed this, the next step is to configure the filtering rules.
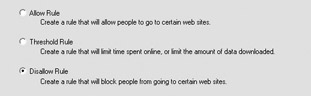
Filtering Content SurfControl uses a basic ruleset to filter content and has three basic filtering levels:
-
Allow The traffic is permitted.
-
Disallow The traffic is blocked.
-
Threshold The traffic is permitted up to a threshold (either a certain amount of time or a certain amount of traffic). A threshold filter is good for allowing certain content through (for example, sports content), while only allowing a user to view that content for a certain amount of time in a 24- hour period.
In addition, you can filter traffic based on who is browsing, to where/what they are attempting to browse, and when they are attempting to browse. The combination of all three allows you to be extremely granular in what you will and will not permit in your environment. The rules are processed in a top-to-bottom fashion, so rules at the top of the list take precedence over any rules lower down in the list.
Creating a rule is a relatively straightforward process. Start the SurfControl Rules Administrator from the Start menu and click the Rule Wizard button. This will cause the Rule Wizard to start. At the first screen of the Rule Wizard, click Next.
At the Rule Type screen, select the type of rule you want to create ”an allow rule, a disallow rule, or a threshold rule. In the following, I selected to create a disallow rule. Click Next to continue.
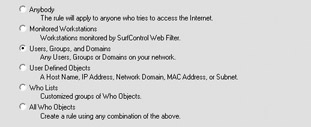
At the Who screen, select who to apply the rule to. You can select from six options:
-
Anybody This rule will apply to anyone who attempts to access the Internet. This rule is good for restricting access for individuals who do not log into the domain, such as contractors. If you are unsure about whether everyone should be controlled by a rule, select Anybody. You can always change it later to be less restrictive if required.
-
Monitored Workstations This rule will apply to any traffic coming from a monitored workstation. This is a good choice if you want to permit Internet browsing from kiosk systems (for example, in a break room) so that users can browse the Internet on their lunch hour or breaks.
-
Users, Groups, and Domains This rule will apply to the users or groups that you specify. This is an excellent method of granting certain departments or groups of users access to Internet resources.
-
User Defined Objects This rule will apply to any hostname, IP address, network name , MAC address, or subnet you define.
-
Who Lists Using this option, you can apply the rule to groups of the previously mentioned objects. For example, you could create a group that contains domain groups and monitored workstations and apply the rule to that who group.
-
All Who Objects Using this option, you can apply the rule to any combination of objects without needing to create a who list.
As shown next, I have decided to apply the rule to users, groups, and domains. When you re finished, click Next.
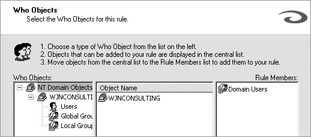
At the Who Objects screen, select the appropriate who objects from the list on the left. The objects you can select are listed in the central list. When you select an object, the Add button becomes available. Click it to add the object to the Rule Members list. You can select multiple objects, which allows you to have a single rule apply to multiple users or groups of users. Here, I have selected to apply the rule to domain users. When you are finished, click Next.
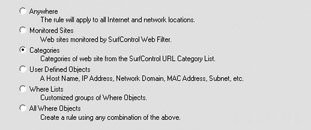
At the Where screen, you define where the rule will apply. You have the following six choices:
-
Anywhere This option will apply the rule to all traffic that the server monitors , both internal and external. For example, if the server was able to monitor traffic destined for an internal web server in addition to Internet traffic, selecting Anywhere would not only filter Internet traffic but would filter the traffic destined for the web server as well.
-
Monitored Sites This option will only apply the rule to all traffic going to or from websites that are monitored by the SurfControl web filter.
-
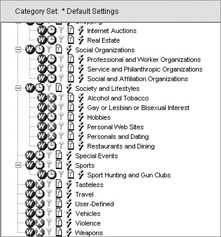
Categories This option will apply the rule based on traffic going to or from categories of websites. By default, SurfControl contains 39 categories of websites. Some examples of categories are Adult Content, Criminal Skills, and Drugs, Alcohol & Tobacco. You can find a comprehensive list of categories in Appendix A of the SurfControl Web Filter Administrator s Guide.
-
User Defined Objects This option will apply the rule on traffic going to or from a hostname, IP address, network domain, MAC address, or subnet that you define.
-
Where Lists This option will apply the rule on traffic going to or from groups of the previously mentioned objects. For example, you could create a group that contains monitored sites and categories and then apply the rule to that where list.
-
All Where Objects This option allows you to apply the rule to any combination of objects without needing to create a where list.
As shown next, I have decided to apply this rule to traffic based on a category. When you re finished, click Next.
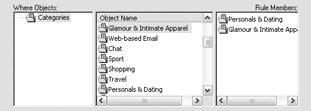
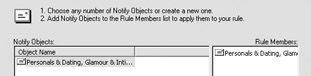
At the Where Objects screen, you can specify the where object you want to apply the rule to. Simply select the object name and click Add to add it to the rule membership. I have selected to apply the rule to Personals & Dating and Glamour & Intimate Apparel content in the screen shown next. I could also click New and create a new object that contains any one or multiple categories from the general list. When you are finished, click Next.
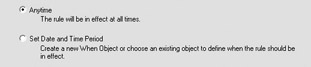
At the When screen, you can specify at what times the rule should be enforced. This is particularly valuable for filtering content that isn t offensive, but contributes to a loss of productivity. For example, sports websites can quickly erode employee productivity. However, you may want to permit that traffic during the lunch hour and after 6:00 P.M. for employees who want to check out the latest sports news on their lunch hour or when they are working late. Here, I have selected to apply the rule at all hours. Click Next to continue.
At the Notify screen, you can specify whether an e-mail notification should be sent in the event that a rule is triggered. Notifications are an important part of content filtering because they provide the means for a proactive notification of questionable activities.
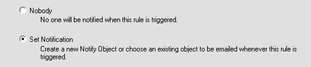
At the same time, you should be judicious in deciding what rules to notify on so that you are not inundated with e-mails for relatively innocuous occurrences. For example, it probably doesn t matter if you get notified that someone attempted to access a sports website. However, you probably want to know if someone has attempted to access a sexually explicit website. Another good option to implement with notification is when you have developed a rule for a certain group. In those cases, you can add that group s manager as a notification recipient, allowing them to track and manage their employees and allowing yourself to take a hands-off approach. Here, I have selected Set Notification. Click Next when you re finished.
At the Notify Objects screen, you can add the list of e-mail addresses to notify by clicking New. That will open the SMTP Email Notification Properties dialog box, which allows you to create a customized notification, as shown next.
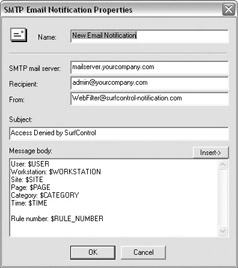
When you are finished with the e-mail notification, click OK. This will cause the new notify object to be created, as shown next. Select the object and click Add to add the object to the rule members list. When you are finished adding notify objects, click Next.
At the Http Deny Page screen, select whether you want to use the default deny page or to set a custom deny page. Here, I have selected the default deny page, though I have modified the HTML to add an explanation stating that the user can contact the helpdesk if they think they got this message in error. When you are finished, click Next.

At the Rule Status screen, select whether you want to activate the rule immediately. If you select to make it active, the rule will be enforced as soon as you finish the wizard. When you are finished, click Next.
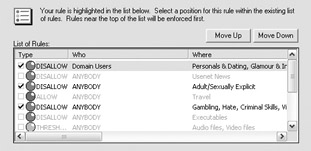
At the Rule Order screen, select where to apply the rule within the existing set of rules. Keep in mind that the rules are applied from the top down. If you have created a disallow rule, but you place it below an allow rule, the users will still be allowed to access the content. Conversely, if you create an allow rule and you place it below a disallow rule, the users will not be allowed to access the content. By default, the rule is placed at the top of the list and is highlighted. You can move the rule up or down using the Move Up or Move Down button, as shown next. When you are finished, click Next.
The Rule Wizard Finished screen will appear and present a summary of the rule. Verify that it is correct and click Finish to create the rule or click Back to go back and change the rule.
The final step is to commit the ruleset to the server so that it will be enforced. You can do this by clicking the Commit Changes button in the SurfControl Rules Administrator program, as shown here:
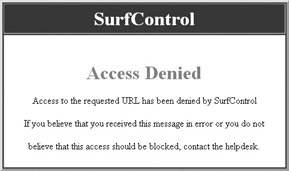
Once the rule has been applied and committed, any time a user defined in the rule attempts to access a location defined in the rule, the SurfControl server will apply the rule. For example, if I now try to access www.victoriassecret.com, which is a part of the Glamour & Intimate Apparel category that I blocked, I am presented with the following screen.
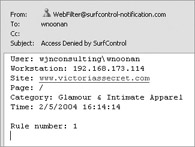
In addition, because I configured notification, I received the e-mail (shown at right) regarding the access attempt.
Although you will need to determine exactly what rules you should have in your environment, who they should apply to, and when they should be applied, I recommend that you start with the ruleset shown below. This ruleset will disallow most content that you do not need in your environment while providing access to certain leisure websites for up to 30 minutes per day. Finally, it will grant unrestricted access to other websites that rarely pose any threat to your network security or productivity.

Reporting on Activity In addition to filtering content, you also need to be able to report on what the company Internet activity is. This allows you to determine who is trying to do what, and it also illustrates where you may need to add or remove rules or change your acceptable-use policy.
By default, SurfControl will monitor all users and sites with no additional configuration required by you. This allows you to quickly and easily generate reports on virtually any aspect of your company s Internet access.
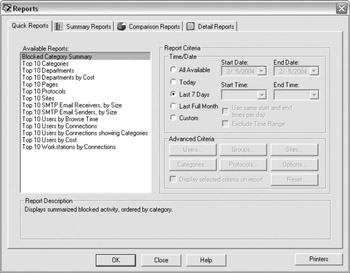
You can generate reports by running the SurfControl monitor from the Start menu. Next, click the Reports button:
This will open the Reports screen, shown next. From the Reports screen, you can create virtually any type of report you may want. Some of the more valuable reports are the user activity, bandwidth analysis, and cost analysis reports, which can be used to provide detailed cost analysis of your Internet connectivity for the purposes of charging departments based on their portion of Internet usage.
Websense Version 5.1 Integrated with Cisco Secure PIX Firewall
Websense integrates cleanly with the Cisco Secure PIX Firewall. The advantage of this type of implementation is that the firewall will not allow any traffic to pass to the Internet that has not been explicitly permitted. This prevents any chance of a sneak and peek occurring.
Once you have installed Websense, the next step is to configure the Cisco Secure PIX Firewall to use the Websense server for content filtering. This can be done by running the following commands at the CLI:
firewall# configure terminal firewall(config)# url-server (inside) vendor websense host 192.168.173.101 timeout 5 protocol TCP version 4 firewall(config)# filter url http 0 0 0 0 firewall(config)# filter ftp 21 0 0 0 0 firewall(config)# filter https 443 0 0 0 0
The first step is to configure the Cisco Secure PIX Firewall with the IP address of the Websense server and the interface that it is connected to, as just shown.
The last three commands configure the firewall to filter all HTTP, FTP, and HTTPS traffic.
Once you have completed this, the next step is to configure the filtering rules.
Filtering Content Websense uses a series of filter definitions for configuring its rulesets. The actual filter policies are contained in the Policies section. By default, there are three policies. The global policy is applied by default if no other filtering policy is specified. Websense determines which policy applies in the following order:
-
Policy assigned to the user
-
Policy assigned to the IP address of the machine being used
-
Policy assigned to groups that the user belongs to
-
The global policy
In the event that multiple group policies apply, Websense checks to see if they all have the same policy. If they do, Websense filters according to that request. If there is any difference between the policies, Websense filters according to the Use More Restrictive Blocking option at the server s Settings screen:
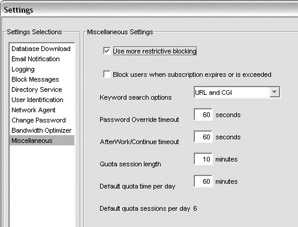
By default, this setting is unchecked. This means that if any group grants access, Websense will allow the connection. When the setting is checked, if any group denies access, Websense will block the connection. I recommend that you check this box for a more restrictive and secure content-filtering system.
Configuring content filtering for a new group of users is a fairly straightforward process. For example, let s assume that the Accounting group decides that they only want their users to be able to browse Business and Economy and News and Media sites (you can find a comprehensive list of all categories in Appendix A of the Websense Enterprise Version 5.1 Employee Internet Management Administrator s Guide).
The first step is to configure the Websense server to communicate with your directory service. This is done by right-clicking the server and selecting Settings. From the Settings screen, select Directory Service. Select the appropriate directory service (I selected Active Directory) and click Add:
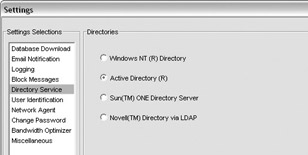
At the Domain Forest screen, enter the appropriate information to allow the Websense server to validate the domain and then click OK. Next, click OK to close the Settings screen.
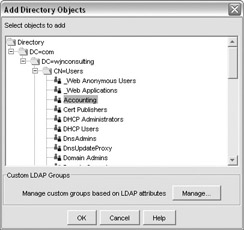
Now you want to create a new client to represent the group to which you want to apply the policy. You can do this by expanding the Clients tree, right-clicking Directory Object, and selecting the Add Directory Objects command.
At the Add Directory Objects screen, expand the directory objects until you locate the group for which you want to create a client, as shown next. Select the group and click OK. The client will be created.
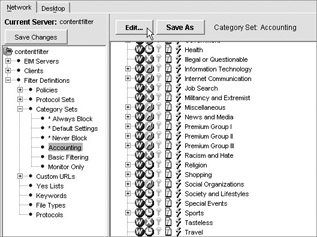
By default, the global policy is applied to the client. The next step is to create a new category set that contains the filtering rules you want to include in the policy. This can be done by right-clicking Category Sets and selecting Add Category Set.
When prompted, enter the appropriate category set name and click OK. When prompted for the category set model, select the category set to base the new category set on and then click OK. Next, select the new category set, as shown next, and click Edit. This will allow you to customize the category set.
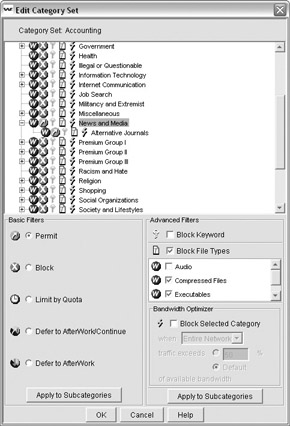
In the Edit Category Set screen, you can specify what traffic categories you will permit. In this case, we only want to permit Business and Economy and News and Media sites. First, select All Categories and select to block. The next step is to apply that setting to subcategories. This will cause all categories to be in a blocking state. Next, go back and permit the specific categories you want to grant access to by selecting them and clicking Permit. If there are subcategories, you need to select to permit them individually or select Apply to Subcategories, as shown here, to apply the setting from the parent value to all subcategories .
In addition to blocking sites, you should also click Block File Types and select Executables and Compressed Files. This will prevent people from being able to download any executables or ZIP files.
When you have completed editing the category set, click OK. The next step is to create a policy with the category set you want and apply it to the client. You can do this by expanding Filter Definitions tree and selecting Policies Add Policy.
When prompted, enter a policy name and click OK. When prompted with the Policy Model screen, select the existing policy to base the new policy on or select Create Empty Policy to start from scratch. (For this example, I selected the latter option.) Click OK. Once the new policy has been created, click the top-left Edit button, as shown next, to edit the policy. This will open the Edit Policy screen.

At the Edit Policy screen, enter a start and end time, the days that the policy should be applied, and the category set and protocol set to apply:
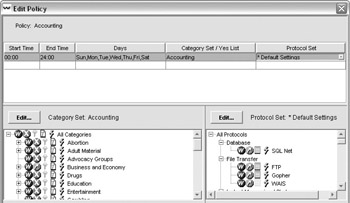
Next, you want to expand the client tree to select the client to which you want to apply the policy. Select the client and then select the policy from the Policy drop-down list:

When you have made all the changes you want to make, click the Save Changes button to apply the changes to the Websense server.
| |
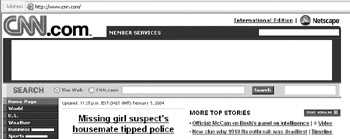
The category Premium Group 1 contains a filter that controls whether advertisements will be displayed. If you do not permit advertisements, websites such as www.cnn.com will not display properly or will appear to have missing sections in the web page due to Websense filtering out the advertisements. This could create a usability issue or generate helpdesk tickets by confused users. Keep this in mind if you decide to filter advertisements.
| |
Now, if a user to whom the filter policy applies attempts to access www.cnn.com, they will be permitted (notice the missing advertising banners):
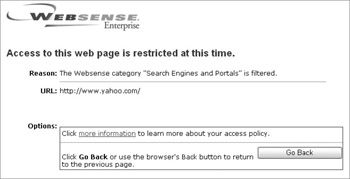
However, if they attempt to access www.yahoo.com, they will receive an access denied statement:
Although you will need to determine exactly which policies you should have in your environment, to whom they should apply, and when they should be applied, I recommend that you start with the default category set shown here:

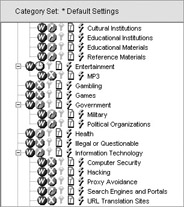

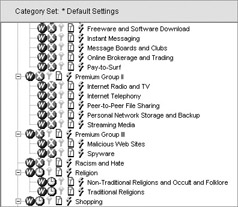
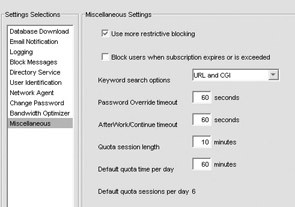
In this case, I am blocking all the content that could be considered harmful and setting a quota value for all casual or recreational browsing sites. The default quota time is 60 minutes per day in 10-minute session lengths. You can adjust this at the server s Settings screen, shown next.
The last step of hardening your default policy is to restrict all protocols except HTTPS:
This policy will disallow most content that you do not need in your environment while providing access to certain leisure websites for up to 60 minutes per day. Finally, it will grant unrestricted access to other websites that rarely pose any threat to your network s security or productivity.
| |
One easy method for trying to trick a content filter is to use URL obfuscation to mask the URL. This is typically done by trying to represent the URL in a format other than dotted decimal or DNS name. For example, one can convert the URL from dotted decimal notation to Hex, Octal, or Dword values and then use those values in place of the URL. An example would be using the URL http://0x40ec1074 to access www.cnn.com. When deciding which content filter you will use, make sure that people cannot use these methods to circumvent the content filter. For example, Websense is not susceptible to any of these types of URL obfuscation techniques.
| |
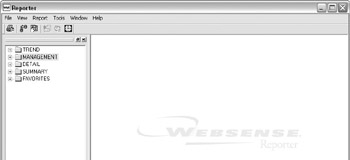
Reporting on Activity Like with SurfControl, in addition to simply filtering content, you need to be able to report on Internet usage with Websense. This can be done by installing the Websense Reporter program and then running the program from the Start menu. This will start the Websense Reporter:
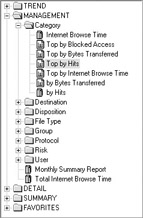
Websense uses canned reports for most circumstances to determine what kind of access is occurring on your network and who is responsible for the access. For example, if you wanted to determine what websites were being accessed, you could run the Top by Hits report under the MANAGEMENT Category section:
Double-click the report and you will be presented with the Report Criteria screen, shown next. Specify the options you want to base the report on (by default, all options are enabled to create a full report) and click Generate.
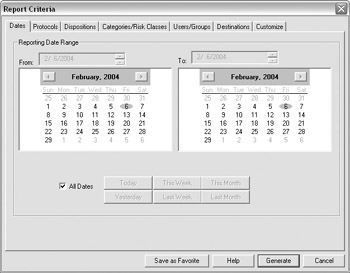
Figure 7-3 provides an example of what the Top Categories by Hits report looks like. If you notice that content such as Adult Material: Adult Content is frequently at the top of the list, you have a problem that needs to be addressed.
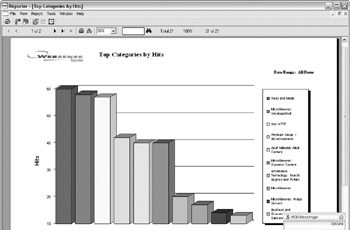
Figure 7-3: Top Categories by Hits report
You could then run a User Destination Summary report to determine which users might be responsible for the access, as shown in Figure 7-4. Notice how even though I tried using Octal, Hex, and Dword URL obfuscation, the attempts were still logged and blocked accordingly .
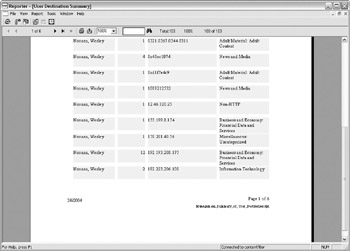
Figure 7-4: User Destination Summary report
EAN: N/A
Pages: 125