Tracks
Except for the HUD the game does not really look like a racing game right now. More like a fantasy RPG thanks to the glow and color-correction post-screen shaders. The road track and the car itself are currently missing to make it look like a racing game. Just putting the car somewhere in your landscape might look funny, but you don’t want to drive around on the ground, especially since the landscape does not look so good from this zooming level (1 landscape texel for 2x2 meter, so the whole car stays on 2 texels).
The idea for this game was to create some tracks like the ones from Trackmania, but after investigating Trackmania and the editor in the game you can see how complex the rendering process is in the game. Instead of just rendering the track as one piece and adding landscape objects like I wanted to do, Trackmania levels are constructed with many different road building blocks, which fit together perfectly. This way you can put three loopings after each other without having to paint or construct them yourself. The disadvantage of this technique is that you are limited by the available building blocks, and from the developer’s point of view you really will have a lot of work creating hundreds of these building blocks, not to mention all the levels you need to test them out.
So this idea was thrown out of the window in seconds. I returned to my original approach of creating just a simple 2D track and adding a little height to it through the landscape height map. I wanted to use a bitmap with the track painted on it as a white line and then import it into the game extracting all bitmap positions and building 3D vertices from it. But after playing around with this idea it was very clear that the track heavily depends on the landscape ground, and doing things like loopings, ramps, and crazy curves was just not possible or at least very hard to implement additionally to the bitmap track.
So again another idea flew out the window (hopefully I did not hit anyone with it). To get a better understanding of how a track might look I used 3D Studio Max and played around with the spline functions there to create a simple circle track with just four points (see Figure 12-12). Rotated by 90 degrees to the left, this looked almost like looping and much more appealing as a fun racer than the bitmap approach.
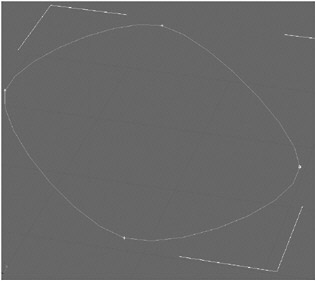
Figure 12-12
I had to get this spline data out of 3D Studio Max and somehow into my engine. This way I could make the creation process of the tracks very easy by just drawing a 3D spline in Max and exporting it into the racing game engine. The hard part would be to generate a useful track out of this data because each spline point is just a point, and not a road piece with orientation, a road width, and so on.
Before spending more time trying to figure out the best way to generate tracks and before you can start importing this spline data into your game, you should make sure that this idea even works.
Unit Testing to the Rescue
This is a great time again to do some heavy unit testing. Start with the first simple unit test of the new TrackLine class, called TestRenderingTrack, which just creates a simple spline like the one from 3D Studio Max and displays it on the screen:
public static void TestRenderingTrack() { TrackLine testTrack = new TrackLine( new Vector3[] { new Vector3(20, -20, 0), new Vector3(20, 20, 0), new Vector3(-20, 20, 0), new Vector3(-20, -20, 0), }); TestGame.Start( delegate { ShowGroundGrid(); ShowTrackLines(testTrack); ShowUpVectors(testTrack); }); } // TestRenderingTrack() ShowGroundGrid just displays some grid lines on the xy ground plane to help you see where the ground is. I wrote this method a while back for the models class; it is just reused here. ShowTrackLines is the important method here because it shows all the lines and interpolated points that have been generated for you through the constructor of the TrackLine class. Finally the ShowUpVectors method shows you in which direction the up vector points for every position on the track. Without the up vector you will not be able to generate the right and left side of the road correctly. For example, in curves the road should tilt and for loopings you need the up vectors pointing to the center of the loop and not just upward.
The ShowTrackLines helper method just shows each point of the track connected through white lines. When you execute the TestRenderingTrack unit test you can see a screen like the one in Figure 12-13.
public static void ShowTrackLines(TrackLine track) { // Draw the line for each line part for (int num = 0; num < track.points.Count; num++) BaseGame.DrawLine( track.points[num].pos, track.points[(num + 1)%track.points.Count].pos, Color.White); } // ShowTrackLines(track) 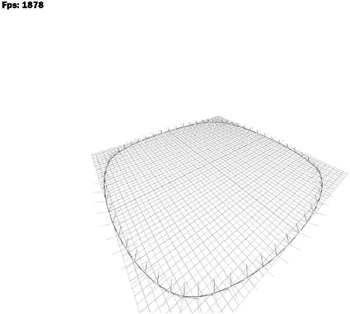
Figure 12-13
The track almost looks like a road thanks to the red up vectors and the green tangent vectors. All you have to do now is to tweak the track generation code and maybe test out a couple more splines. In the TrackLine class you can see several of my test tracks I created all by adding a couple of 3D points by hand, and more tracks are available through the Collada files used later to import track data from 3D Studio Max into your engine.
Before you take a look at the spline interpolation code in the constructor you can also test out a simple looping by just switching the x and z values of the track points (see Figure 12-14). To make the spline look more round I’ve also added four new points. The new TestRenderingTrack unit test now looks like the following:
public static void TestRenderingTrack() { TrackLine testTrack = new TrackLine( new Vector3[] { new Vector3(0, 0, 0), new Vector3(0, 7, 3), new Vector3(0, 10, 10), new Vector3(0, 7, 17), new Vector3(0, 0, 20), new Vector3(0, -7, 17), new Vector3(0, -10, 10), new Vector3(0, -7, 3), }); // [Rest stays the same] } // TestRenderingTrack() 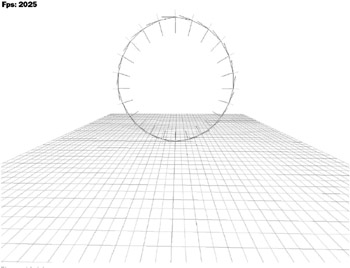
Figure 12-14
Interpolating Splines
You might ask how you even get all these points from just passing in four or eight input points and how these points are interpolated so nicely. It all happens in the TrackLine constructor, or to be more precise, in the protected Load method, which allows you to reload the track data anytime you need it to be regenerated. The Load method will not look very easy when you see it for the first time and it is the main method for all the track loading, track data validation, interpolation, and up and tangent vector generation. Even the tunnels and neutral landscape objects are generated here from the helpers you can pass to this method.
The Load method does the following things:
-
It allows reloading, which is important for loading levels and starting over. Any previous data is killed automatically if you call Load again.
-
All data is validated to make sure you can generate the track and use all the helpers.
-
Each track point is checked to see if it is above the landscape. If not, the point is corrected and the surrounding points are also lifted up a bit for a smoother road. This way you can easily generate a 3D track in Max without having to worry about the actual landscape height that is used later when the track is put on top of the landscape.
-
Loopings are simplified by just putting two spline points on top of each other. The loading code automatically detects this and replaces these two points with a full looping of nine points, which are interpolated to even more points to generate a very smooth and correct looking looping.
-
Then all track points are interpolated through a Catmull-Rom spline interpolation method. You take a closer look at that in a second.
-
Up and tangent vectors are generated and interpolated several times to make the road as smooth as possible. The tangent vectors especially should not suddenly change direction or flip to the other side, which would make driving on this road very hard. This code took the longest time to get it right.
-
Then all helpers are analyzed and the road width for each track position is saved and will be used later when the actual rendering happens in the Track class, which is based on the TrackLine class.
-
Texture coordinates for the road texture are also generated here because you store the track points as a TrackVertex array to make the rendering easier later. Only the u texture coordinate is stored here; the v texture coordinate is then later just set to 0 or 1 depending on whether you are on the left or right side of the road.
-
Then all the tunnel helpers are analyzed and the tunnel data is generated for you. Basically the code here just constructs a few new points for later use. They are used to draw the tunnel box with the tunnel material in the Track class.
-
Last but not least, all landscape models are added. They are also saved together with the track data to form a complete level with everything you need. Additional landscape objects are also automatically generated in the Track class; for example, palms and lanterns at the side of the road.
When I started developing the TrackLine class the constructor only generated the new interpolated points from the input points through the Catmull-Rom spline helper method. The code looked like this and can still be found in the Load method:
// Generate all points with help of catmull rom splines for (int num = 0; num < inputPoints.Length; num++) { // Get the 4 required points for the catmull rom spline Vector3 p1 = inputPoints[num-1 < 0 ? inputPoints.Length-1 : num-1]; Vector3 p2 = inputPoints[num]; Vector3 p3 = inputPoints[(num + 1) % inputPoints.Length]; Vector3 p4 = inputPoints[(num + 2) % inputPoints.Length]; // Calculate number of iterations we use here based // on the distance of the 2 points we generate new points from. float distance = Vector3.Distance(p2, p3); int numberOfIterations = (int)(NumberOfIterationsPer100Meters * (distance / 100.0f)); if (numberOfIterations <= 0) numberOfIterations = 1; Vector3 lastPos = p1; for (int iter = 0; iter < numberOfIterations; iter++) { TrackVertex newVertex = new TrackVertex( Vector3.CatmullRom(p1, p2, p3, p4, iter / (float)numberOfIterations)); points.Add(newVertex); } // for (iter) } // for (num)
More Complex Tracks
The unit tests are nice to get everything up and running, but the more complex the tracks get, the more difficult it is to even generate them by typing in the 3D position for each spline point. It would be much easier to use the data from exported splines of 3D Studio Max, which allows you to construct and modify the spline positions easier.
Take a look at the expert track for the expert level in the XNA Racing Game in Figure 12-15. The track alone contains about 85 points, which are interpolated to about 2,000 track points resulting in about 24,000 polygons for the road alone. Additional data for the guard rails and additional road 3D models are also generated later in the game. Constructing a track like this one and tweaking it is just not possible without a nice editor and you can be glad that you can use Max for that. Maybe in the future I will implement a little track editor for the game that at least allows you to create simple tracks directly in the game.
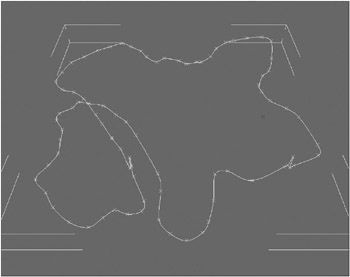
Figure 12-15
Exporting this data was not as easy as I initially thought. .X files do not support splines and .FBX files also do not help. Even if they would export the splines you would still have to do a lot of work extracting the track data before you could use it in the game because it is not possible to get any vertex data from imported models in XNA. I decided to go with the currently very popular Collada format, which was built to allow exporting and importing 3D content and 3D scenes from one application to the next. The main advantage of Collada over other formats is the fact that everything is stored as xml data and you can quickly see which data is used for what purpose just by looking at the exported file. You don’t even need to look at any documentation; just search for the data you need and extract it (in this case you are looking for the spline and helper data, the rest is not important for you).
Collada is not really a good export format for a game because it usually stores way too much information and the file sizes are a lot bigger than binary file formats because xml data is just a bunch of text. For that reason and because I was not allowed to use any external data formats for the XNA Starter Kit, all the Collada data is converted to the internal level data format in the TrackImporter class. Using your own data format speeds up the loading process and makes sure no one can figure out how to construct his own levels. Hey, wait a second; don’t you want people to create their own tracks? Damn, I really want this to be easier and it is not good that you even need 3D Studio Max to construct or change the levels. I really have to implement some other way to import or build tracks in the game later.
Importing the Track Data
To make the loading of Collada files a little bit easier several helper classes are used. First of all the XmlHelper class (see Figure 12-16) really helps you out with loading and managing xml files.
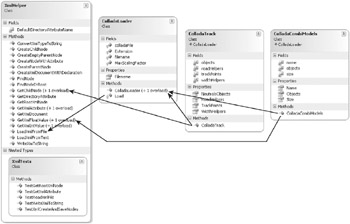
Figure 12-16
The ColladaLoader class is just a very short class that loads the Collada file (which is just an xml file) for you and lets the derived classes use the XmlHelper methods more easily.
-
ColladaTrack is used to load the track itself (trackPoints), but also all helper objects like the widthHelpers to make the road bigger and smaller and the roadHelpers for tunnels, palms, lanterns, and other objects on the side of the road. Finally all additional landscape objects are loaded to be displayed as you drive close enough to them (because there can be a lot of landscape objects in the scene).
-
ColladaCombiModels is a little helper class to load and display multiple models at once by just setting one combo model that contains up to 10 models with relative positions and rotation values in them. For example, if you want to set a city block of nine buildings, just use the Buildings.CombiModel file or if you need a bunch of palms plus a few stone models use the Palms.CombiModel file.
To learn more about the loading process you can use the unit tests in the TrackLine and Track classes, but more importantly check out the ColladaTrack constructor itself:
public ColladaTrack(string setFilename) : base(setFilename) { // Get spline first (only use one line) XmlNode geometry = XmlHelper.GetChildNode(colladaFile, "geometry"); XmlNode visualScene = XmlHelper.GetChildNode(colladaFile, "visual_scene"); string splineId = XmlHelper.GetXmlAttribute(geometry, "id"); // Make sure this is a spline, everything else is not supported. if (splineId.EndsWith("-spline") == false) throw new Exception("The ColladaTrack file " + Filename + " does not have a spline geometry in it. Unable to load " + "track!"); // Get spline points XmlNode pointsArray = XmlHelper.GetChildNode(geometry, "float_array"); // Convert the points to a float array float[] pointsValues = StringHelper.ConvertStringToFloatArray( pointsArray.FirstChild.Value); // Skip first and third of each input point (MAX tangent data) trackPoints.Clear(); int pointNum = 0; while (pointNum < pointsValues.Length) { // Skip first point (first 3 floating point values) pointNum += 3; // Take second vector trackPoints.Add(MaxScalingFactor * new Vector3( pointsValues[pointNum++], pointsValues[pointNum++], pointsValues[pointNum++])); // And skip thrid pointNum += 3; } // while (pointNum) // Check if we can find translation or scaling values for our // spline XmlNode splineInstance = XmlHelper.GetChildNode( visualScene, "url", "#" + splineId); XmlNode splineMatrixNode = XmlHelper.GetChildNode( splineInstance.ParentNode, "matrix"); if (splineMatrixNode != null) throw new Exception("The ColladaTrack file " + Filename + " should not use baked matrices. Please export again " + "without baking matrices. Unable to load track!"); XmlNode splineTranslateNode = XmlHelper.GetChildNode( splineInstance.ParentNode, "translate"); XmlNode splineScaleNode = XmlHelper.GetChildNode( splineInstance.ParentNode, "scale"); Vector3 splineTranslate = Vector3.Zero; if (splineTranslateNode != null) { float[] translateValues = StringHelper.ConvertStringToFloatArray( splineTranslateNode.FirstChild.Value); splineTranslate = MaxScalingFactor * new Vector3( translateValues[0], translateValues[1], translateValues[2]); } // if (splineTranslateNode) Vector3 splineScale = new Vector3(1, 1, 1); if (splineScaleNode != null) { float[] scaleValues = StringHelper.ConvertStringToFloatArray( splineScaleNode.FirstChild.Value); splineScale = new Vector3( scaleValues[0], scaleValues[1], scaleValues[2]); } // if (splineTranslateNode) // Convert all points with our translation and scaling values for (int num = 0; num < trackPoints.Count; num++) { trackPoints[num] = Vector3.Transform(trackPoints[num], Matrix.CreateScale(splineScale) * Matrix.CreateTranslation(splineTranslate)); } // for (num) // [Now Helpers are loaded here, the loading code is similar] } // ColladaTrack(setFilename) Getting the spline data itself is not very hard, but getting all the translation, scaling, and rotation values is a little bit of work (and even more complicated for the helpers), but after you have written and tested this code (there are several unit tests and test files that were used to implement this constructor) it is very easy to create new tracks and get them into your game.
Generating Vertices from the Track Data
Just getting the track points and helpers imported is only half the story. You already saw how complex the TrackLine constructor loading is and it really helps you out generating the interpolated track points, and building up vectors and the tangents. Even the texture coordinates and all the helpers and landscape models are handled here. But you still only have a bunch of points and no real road your car can drive on. To render a real road with the road textures (see Figure 12-17) you need to construct renderable vertices first for all the 3D data that forms your final road, including all the other dynamically created objects like the guard rails. The most important texture is the road texture itself, but without the normal map it looks boring in the game. The normal map adds a sparkly structure to the road and makes it shiny when looking toward the sun. The other road textures for the road sides and background (RoadBack.dds) and for the tunnels (RoadTunnel.dds) are also important, but you won’t see them that often.
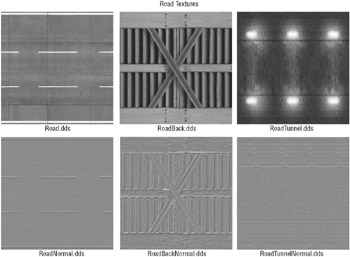
Figure 12-17
The class that handles all these textures as road materials, as well as all the other road data like the road cement columns, the guard rails, and the checkpoint positions, is the Track class, which is based on the TrackLine class. The Landscape class is used to render the track and all the landscape objects together with the landscape, which is finally everything you need to put the car on the road and start driving straight ahead. You still need physics to stay on the road and to collide with the guard rails, but that is covered in the next chapter.
So the Track class is responsible for all the road materials, generating all vertices as well as the vertex and index buffers, and finally for rendering all the track vertices with the help of the shaders you use in the game. Most materials use the Specular20 technique of the NormalMapping shader for a nice shiny road, but the Diffuse20 technique is also quite popular for the tunnels and other non-shiny road materials.
The unit test to render the track is quite simple; all you want to do is to render the track. There is not much else you have to verify here:
public static void TestRenderTrack() { Track track = null; TestGame.Start( delegate { track = new Track("TrackBeginner", null); }, delegate { ShowUpVectors(track); track.Render(); }); } // TestRenderingTrack() As you can see you can still use the protected ShowUpVectors helper method from the TrackLine class because you derived the Track class from it. The Render method is also similar to the first render code you had in the previous chapter for the landscape rendering in the Mission class.
public void Render() { // We use tangent vertices for everything here BaseGame.Device.VertexDeclaration = TangentVertex.VertexDeclaration; // Restore the world matrix BaseGame.WorldMatrix = Matrix.Identity; // Render the road itself ShaderEffect.normalMapping.Render( roadMaterial, "Specular20", delegate { BaseGame.Device.Vertices[0].SetSource(roadVb, 0, TangentVertex.SizeInBytes); BaseGame.Device.Indices = roadIb; BaseGame.Device.DrawIndexedPrimitives( PrimitiveType.TriangleList, 0, 0, points.Count * 5, 0, (points.Count - 1) * 8); }); // [etc. Render rest of road materials] } // Render() Well, that does not look very complicated. Take a look at the code that generates the road vertex and index buffers. The private GenerateVerticesAndObjects helper method is where all the magic happens:
private void GenerateVerticesAndObjects(Landscape landscape) { #region Generate the road vertices // Each road segment gets 5 points: // left, left middle, middle, right middle, right. // The reason for this is that we would have bad triangle errors if the // road gets wider and wider. This happens because we need to render // quads, but we can only render triangles, which often have different // orientations, which makes the road very bumpy. This still happens // with 8 polygons instead of 2, but it is much better this way. // Another trick is to not do so many iterations in TrackLine, which // causes this problem. Better to have a not so round track, but at // least the road up/down itself is smooth. // The last point is duplicated (see TrackLine) because we have 2 sets // of texture coordinates for it (begin block, end block). // So for the index buffer we only use points.Count-1 blocks. roadVertices = new TangentVertex[points.Count * 5]; // Current texture coordinate for the roadway (in direction of // movement) for (int num = 0; num < points.Count; num++) { // Get vertices with the help of the properties in the TrackVertex // class. For the road itself we only need vertices for the left // and right side, which are vertex number 0 and 1. roadVertices[num * 5 + 0] = points[num].RightTangentVertex; roadVertices[num * 5 + 1] = points[num].MiddleRightTangentVertex; roadVertices[num * 5 + 2] = points[num].MiddleTangentVertex; roadVertices[num * 5 + 3] = points[num].MiddleLeftTangentVertex; roadVertices[num * 5 + 4] = points[num].LeftTangentVertex; } // for (num) roadVb = new VertexBuffer( BaseGame.Device, typeof(TangentVertex), roadVertices.Length, ResourceUsage.WriteOnly, ResourceManagementMode.Automatic); roadVb.SetData(roadVertices); // Also calculate all indices, we have 8 polygons for each segment // with 3 vertices each. We have 1 segment less than points because // the last point is duplicated (different tex coords). int[] indices = new int[(points.Count - 1) * 8 * 3]; int vertexIndex = 0; for (int num = 0; num < points.Count - 1; num++) { // We only use 3 vertices (and the next 3 vertices), // but we have to construct all 24 indices for our 4 polygons. for (int sideNum = 0; sideNum < 4; sideNum++) { // Each side needs 2 polygons. // 1. Polygon indices[num * 24 + 6 * sideNum + 0] = vertexIndex + sideNum; indices[num * 24 + 6 * sideNum + 1] = vertexIndex + 5 + 1 + sideNum; indices[num * 24 + 6 * sideNum + 2] = vertexIndex + 5 + sideNum; // 2. Polygon indices[num * 24 + 6 * sideNum + 3] = vertexIndex + 5 + 1 + sideNum; indices[num * 24 + 6 * sideNum + 4] = vertexIndex + sideNum; indices[num * 24 + 6 * sideNum + 5] = vertexIndex + 1 + sideNum; } // for (num) // Go to the next 5 vertices vertexIndex += 5; } // for (num) // Set road back index buffer roadIb = new IndexBuffer( BaseGame.Device, typeof(int), indices.Length, ResourceUsage.WriteOnly, ResourceManagementMode.Automatic); roadIb.SetData(indices); #endregion // [Then the rest of the road back, tunnel, etc. vertices are // generated here and all the landscape objects, checkpoints, palms, // etc. are generated at the end of this method] } // GenerateVerticesAndObjects(landscape) Good thing I wrote so many comments when I wrote this code. The first part generates a big tangent vertex array with five times as many points as the track vertices you get from the TrackLine base class. This data is directly passed into the vertex buffer for the road and then used to construct the polygons in the index buffer. Each road piece gets eight polygons (four parts with two polygons each) and therefore the index buffer needs 24 times as many indices as you have track points. To make sure you are still able to properly access all these indices you have to use int values here instead of short values I would usually use for index buffers because they reduce the memory size by half. But in this case for the roads you can have many more than just 32,000 indices (2000 road pieces from the expert track example times 24 is already 48,000 indices). You need many iteration points for your road because it is not hand-crafted, but automatically generated, which can lead to overlapping errors if you don't have enough iterations and don't generate the road smoothly enough (see Figure 12-18).
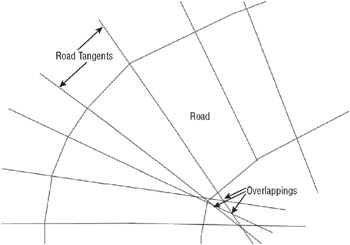
Figure 12-18
You might ask why four parts are generated for each road segment, and the reason for that was not because I enjoy throwing more polygons at the poor GPU. This technique is used to improve the visual quality of the road, especially in curves.
Figure 12-19 explains this problem much better than I can do with words. As you can see two polygons that form an uneven quad are not always the same size, but they still use the same amount of texels. On the right you can see an extreme situation where the bottom-right part of the road is heavily distorted and does not look good anymore.
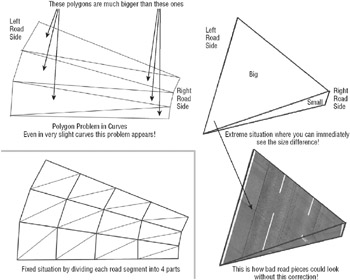
Figure 12-19
This problem can be fixed by dividing the road into multiple parts. You use four parts for each segment in the racing game to make the road look much better.
Final Result
That was really a lot of work to get the landscape and road rendering right, but now you have a really good portion of the game ready; at least the graphical parts are good to go. There are of course many smaller tricks and tips you can find in the classes of the Tracks namespace. Please check out the unit tests to learn more about rendering the road back sides, the loopings, and tunnels.
Figure 12-20 shows the final result of the TestRenderTrack unit test of the Track class.
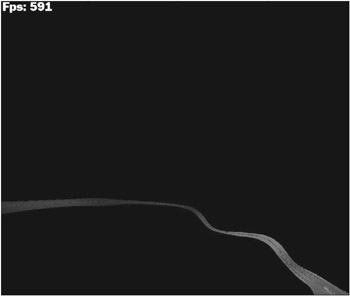
Figure 12-20
Together with the landscape rendering from the first part of this chapter you have a pretty nice rendering engine now. Together with the pre-screen sky cube mapping shader for the background, the landscape and the road rendering looks quite good (see Figure 12-21). The post-screen glow shader of the game also makes everything fit together even better, especially if you have many landscape objects in the scene too.
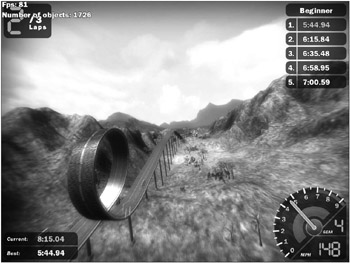
Figure 12-21
EAN: 2147483647
Pages: 138