Game Screens
In Figure 10-2 you already saw an example for a simple main menu, but your games contain more than just the game screen itself and a menu. You will usually need a credits screen to make you famous, have an options screen to let the user comfortably set all settings and change the screen resolution, and it is always good to have a help screen in the game explaining the basic game principle (see Figure 10-3).
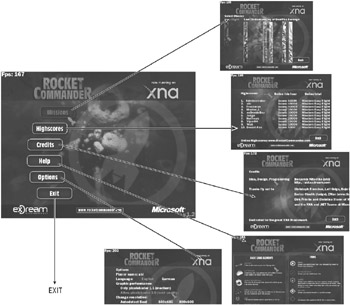
Figure 10-3
Most game screens use a special background texture to show most of the information on the screen. In the Mission selection screen you can select one of the four missions and then start the game. The other screens just show some information and only the options screen allows the user to change anything. All game screens return to the main menu after you press Back.
To handle all game screens automatically you use a stack of game screens in your main game class (see Figure 10-4). This allows you to use even more complex menu systems with several levels where you can always return to the previous screen. In case you want to return to the main menu, just remove all entries on the stack except for the last one. Another trick I often use for demos is to add another game screen before the main menu is added just to show a demo “buy this game now” screen when the user exits the game. The class itself is only a couple of lines and you only need to add one extra line to your main class. Most game screen classes are very simple too.
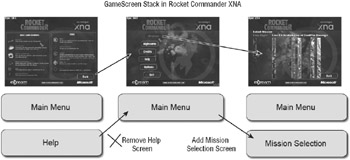
Figure 10-4
Why is this game screen stack so great? Well, all you have to do is to derive all your game screen classes from IGameScreen (see Figure 10-5) and then you can use the following code to render and handle them automatically. The Render method of each game screen class returns true if you are finished with it and you will return to the previous screen. After all game screens have been removed you can exit the game.

Figure 10-5
// No more game screens? if (gameScreens.Count == 0) { // Then quit Exit(); return; } // if (gameScreens.Count) // Handle current screen if (gameScreens.Peek().Render()) { // Play sound for screen back Sound.Play(Sound.Sounds.ScreenBack); gameScreens.Pop(); } // if (gameScreens.Peek)
Help Screen
As a very simple example for a game screen class, here is the complete code of the Help class in the GameScreens namespace. Other game screen classes are not much more complex except for the Mission class, which handles the whole game.
/// <summary> /// Help /// </summary> class Help : IGameScreen { #region Properties /// <summary> /// Name of this game screen /// </summary> /// <returns>String</returns> public string Name { get { return "Help"; } // get } // Name #endregion #region Run /// <summary> /// Run game screen. Called each frame. /// </summary> /// <param name="game">Form for access to asteroid manager</param> public bool Run(RocketCommanderGame game) { // Render background game.RenderMenuBackground(); // Show helper screen texture game.helpScreenTexture.RenderOnScreen( new Rectangle(0, 174 * BaseGame.Height / 768, BaseGame.Width, 510 * BaseGame.Height / 768), new Rectangle(0, 0, 1024, 510)); if (game.RenderMenuButton(MenuButton.Back, new Point(1024 - 210, 768 - 140)) || Input.KeyboardEscapeJustPressed) return true; return true; } // Run(game) } // class Help That’s it. Looks pretty simple, doesn’t it? Please take a look at the game screen classes yourself if you want to learn more about them. Some of them also have unit tests to show the behavior and use cases of each game screen.
In-Game User Interface
In this section I want you to follow all the steps I took to make the In-Game UI for the XNA Shooter game. The UI is not very complex, but you will encounter several issues anyway. The following elements are displayed in the shoot-’em-up game:
-
Mission Time: Minutes and Seconds showing you how long you played
-
Current Score: You get points for shooting, killing, and collecting items and weapons
-
Highscore you have to beat to become number one
-
Your current health; if you lose all of it, you die
-
Current weapon you are firing with and number of EMP bombs you can throw
Figure 10-6 shows all of these elements together on the screen with help of the following textures:
-
HudTop.png for the top bar on the screen, showing time, score, and highscore
-
HudButtom.png for the bottom counterpart, showing health and the current weapons
-
GameFont.png, the game font you already used in several games in this book
-
NumbersFont.png for the numbers on the top part; looks cooler than the default font
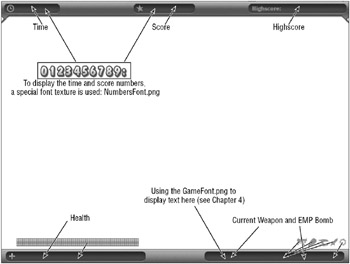
Figure 10-6
After the new class to display the numbers from the NumbersFont.png texture was implemented, and thanks to the Texture class and the RenderOnScreen methods, adding the In-Game UI isn’t too hard anymore.
The NumbersFont.png texture is handled in the NumbersFont class and it is very similar to the TextureFont class from Chapter 4, but much simpler because you only have 11 rectangles here, 10 for the numbers 0 to 9 and one for the column for displaying times.
private void RenderHud() { // Render top hud part hudTopTexture.RenderOnScreenRelative4To3(0, 0, hudTopTexture.GfxRectangle); // Time BaseGame.NumbersFont.WriteTime( BaseGame.XToRes(73), BaseGame.YToRes(8), (int)Player.gameTimeMs); // Score BaseGame.NumbersFont.WriteNumberCentered( BaseGame.XToRes(485), BaseGame.YToRes(8), Player.score); // Highscore BaseGame.NumbersFont.WriteNumberCentered( BaseGame.XToRes(920), BaseGame.YToRes(8), Highscores.TopHighscore); // Render bottom hud part Rectangle bottomHudGfxRect = new Rectangle(0, 24, 1024, 40); hudBottomTexture.RenderOnScreenRelative4To3(0, 768 - 40, bottomHudGfxRect); // Health Rectangle healthGfxRect = new Rectangle(50, 0, 361, 24); hudBottomTexture.RenderOnScreenRelative4To3(50, 768 - 31, new Rectangle(healthGfxRect.X, healthGfxRect.Y, (int)(healthGfxRect.Width * Player.health), healthGfxRect.Height)); // Weapon and Emps! Rectangle weaponMgGfxRect = new Rectangle(876, 0, 31, 24); Rectangle weaponGattlingGfxRect = new Rectangle(909, 0, 27, 24); Rectangle weaponPlasmaGfxRect = new Rectangle(939, 0, 33, 24); Rectangle weaponRocketsGfxRect = new Rectangle(975, 0, 24, 24); Rectangle weaponEmpGfxRect = new Rectangle(1001, 0, 23, 24); TextureFont.WriteText(BaseGame.XToRes(606), BaseGame.YToRes(768 - 20) - TextureFont.Height / 3, "Weapon: "); // Show weapon icon! Rectangle weaponRect = Player.currentWeapon == Player.WeaponTypes.MG ? weaponMgGfxRect : Player.currentWeapon == Player.WeaponTypes.Gattling ? weaponGattlingGfxRect : Player.currentWeapon == Player.WeaponTypes.Plasma ? weaponPlasmaGfxRect : weaponRocketsGfxRect; hudBottomTexture.RenderOnScreenRelative4To3( 715, 768 - 31, weaponRect); // And weapon name TextureFont.WriteText(BaseGame.XToRes(717+weaponRect.Width), BaseGame.YToRes(768 - 20) - TextureFont.Height / 3, Player.currentWeapon.ToString()); TextureFont.WriteText(BaseGame.XToRes(864), BaseGame.YToRes(768 - 20) - TextureFont.Height / 3, "EMPs: "); // Show emp icons if we have any for (int num = 0; num < Player.empBombs; num++) hudBottomTexture.RenderOnScreenRelative4To3( 938 + num * 23, 768 - 31, weaponEmpGfxRect); } // RenderHud() This solution works fine on the PC, but as soon as you start the game (or the TestHud unit test I wrote before even writing the RenderHud method) on the Xbox 360 connected to a TV screen you will see that the HUD is not completely visible, or worse, almost not visible at all.
If you have never developed a game on a console connected to a TV set before, this may be a new issue for you because on a PC monitor you can always use 100% of the visible area since there is no safe region. Well, on most TV screens you do not see 100% of the screen, more like 90%, which means about 10% of the width and height are not visible at the screen borders (see Figure 10-7).
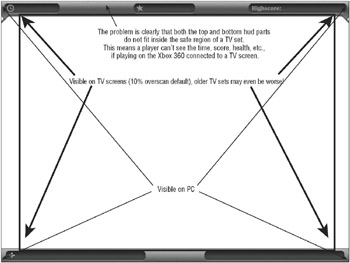
Figure 10-7
You might ask why XNA does not put everything inside this safe region automatically. Well, it is not that easy. The TV set receives the full signal, and depending on the input cables and the model of the TV set, you see different results. These are some examples I have encountered:
-
PC connected to a monitor with a VGA or DVI cable lets you see 100%
-
Xbox 360 connected through a VGA cable to a PC monitor lets you see 100% too (or close to 100% if the resolution is not the native one)
-
Xbox 360 connected to an old-style monitor with SCART: around 92% visible
-
Xbox 360 connected through Component cables to my new Dell 24” Monitor (yeah HDTV): around 93%–95% visible (depends on the resolution)
-
Some old TV sets (according to the XNA docs and tips on the Web) have a save region of 80%–90%, but I never saw the 80% case; that is probably the worst-case scenario
As you can see it is not just 90% on the Xbox 360 and you don’t have to worry about it. The results on the screen can be very different in many different situations, which can neither be checked by your game nor the XNA Framework. The only thing for sure is that on the PC you can be sure that 100% of all screen pixels are visible, which is the reason why many PC games use the borders of the screen to display UI elements and other information. If you take a look at Xbox 360 (or any console games for that matter) you will notice that they often have a simpler interface and they never show any information at the very screen borders.
You can’t just put the HUD bars in the 90% safe region because if the user sees more it will look very wrong because you have no graphic behind the 90% region, and if the user sees even less you still have the same problem as before. Instead of continuing to work around this issue you should stop here and rethink the problem. It is just not a good idea to have UI elements as shown in Figure 10-6 for an Xbox 360 game. The best solution is to change the UI graphics and put them in the safe region if running the game in a situation where the user cannot see 100% of the screen like starting it on the Xbox 360. Figure 10-8 shows how to change the HUD graphics to have them work on both the PC, where you put them at the screen borders, and on the Xbox 360, where they are put in the inner 92% (still visible with a safe region of 90%, gets hard to read if only 85% or less are visible, but I never saw this worst-case scenario; most TV sets are around 90%–95%).
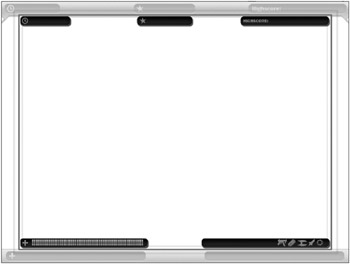
Figure 10-8
Figure 10-9 shows the final screen layout of XNA Shooter after going through all the steps of this chapter. Please check out the RenderHud method in the Mission class for more details. It was mainly developed for widescreen resolutions and to look good on the Xbox 360, but even with smaller resolutions on the PC it looks ok like on the screenshot. To test the menu and game screens from this chapter run the sample game project for this chapter, which is still based on the XnaGraphicEngine project you started in Chapter 5, but you have some new and updated game classes now.
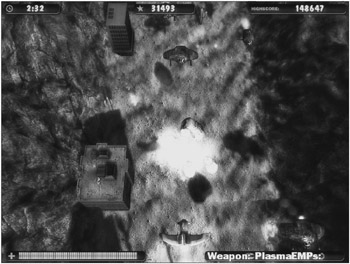
Figure 10-9
Tips
From my experience there are a couple of things you have to remember when developing XNA games on the Xbox 360. All of these issues are not a big deal on the PC, but they can cost some extra time until you get them right. One of the main problems is that if you develop your game on the PC only and then test it on the Xbox 360 only at the end, a lot of things may go wrong (bad performance on the .NET Compact Framework; UI elements at the border of the screen, which are just not visible on some TVs; bad Xbox 360 controller support, which is the main input device for Xbox 360s; and so on). Please read more about these issues on my blog if you are interested.
-
Test, test, and test. This is the most important tip. Write unit tests and constantly test them on your PC and your Xbox 360. I keep two projects open at the same time (both of them use the same files, but I only develop the PC solution and use the Xbox 360 solution for deploying and testing only). Almost all of my classes have unit tests and I constantly test them until they are completed.
-
Don’t use foreach loops, especially not in tight render loops. This may sound a little crazy because it does not matter on a PC game and today’s CPUs are fast enough to handle the creation and deletion of many thousands of objects each frame, which most games don’t even need. But on the compact framework you will spam the memory even with things like foreach loops because a new enumerator instance is created every time you start a foreach loop. After a while there will be a lot of dead objects, which have to be collected. This can take some time and slow down your game immensely. The PC version might run at over 200 frames, but your Xbox 360 version is stuck at something like 30–40 frames. Avoiding creation of new data each frame and avoiding foreach loops (just replace them with normal for loops; it is mostly just one line of extra code) can improve your performance by a factor of 100% or more.
-
In Arena Wars (the first .NET game I developed), I never created any data during the game. All objects were created at the beginning of each mission and they were reused (which was no big deal since the game principle did not allow an infinite number of units; it always stayed around the same because you get your money back from dead units to build new units). This approach was taken to reduce the Garbage Collector performance impact that could happen on slow computers in .NET 1.1. In later projects I did not care so much about creating new objects and I coded just the easy way because unit tests drive you into a direction to quickly develop solutions, which work and are tested, but may not be the best in other situations like for the Xbox 360 .NET Compact Framework. That is ok because you can now use the unit tests to check if other solutions work just they way you expect them to work. For XNA Shooter and XNA Racer (and a couple of other new game projects) I now make sure that most of the game data is created at the beginning of each level and not dynamically during the game. This makes writing the code far easier and allows you to refactor it much more freely allowing you to improve both the overall code design and the execution speed. I advise you to always take the “clean code” approach first and think about optimizations in the beginning, but do not evolve important code around ugly optimized code that is hard to manage early in the project. Thanks to many improvements that have been made in .NET 2.0 the performance of the Garbage Collector, reusing existing objects and Exception Handling is now much better while we also have much faster computers today.
-
Save-Regions on TVs can be problematic. Just Google for Xbox 360 screenshots and you will notice that the GUI (graphical user interface) looks a lot different from most PC games. PC games often have UI at the screen border showing you tips, little buttons, and other not so important things. If you do that in your Xbox 360 game all of these UI elements may be cut off on a regular TV. For the XNA Shooter I had to rework all the UI elements because they just did not fit on a TV screen and it was not practical to put them in a bar (like the Windows task bar) because it looks so different on the PC and certain TV monitors. Instead I put all UI elements in floating bars, which will be adjusted depending on the screen the user is looking at.
The important thing is to keep the important UI element in this inner 90% (or 93% if you want to be close to the edges) rectangle. This means instead of using a full 1920x1080 pixel resolution you only use 90% of it (1728x945). Or just start rendering UI elements at about 5% of the screen (x coordinate: 96, y coordinate: 54). These pixel locations obviously depend on the screen resolution; just calculate them in your main class and use them whenever you render UI.
For more information about the .NET Compact Framework and how it is best used for the XNA Framework on the Xbox 360, please read the following great article by the .NET compact framework team, which you’ll find at http://blogs.msdn.com/netcfteam/archive/2006/12/22/managed-code-performance-on-xbox-360-for-the-xna-framework-1-0.aspx.
EAN: 2147483647
Pages: 138