More Post-Screen Shaders
Changing the screen border, adding the sky in the background, and inverting or gray-scaling your scene map is nice, but there are many more possibilities and way more powerful post-screen shaders possible. The Rocket Commander game uses a pretty complex glow shader by faking HDR lighting in the alpha channel and performing several passes, adding radial motion blur by mixing the result with the scene map result from the last frame and doing a lot of glow effects.
The shader is called PostScreenGlow and it can be found in the Rocket Commander game (both the DirectX and the XNA version). Figure 8-13 shows the basic functionality; the shader is even more complex than that because it supports multiple Shader Models (1.1 and 2.0) and there are some optimizations built in to improve the performance for slow computers. In the Rocket Commander game the Shader Model can be chosen or you can disable the post-screen shader for very slow computers, but the game is only half the fun without the cool effects.
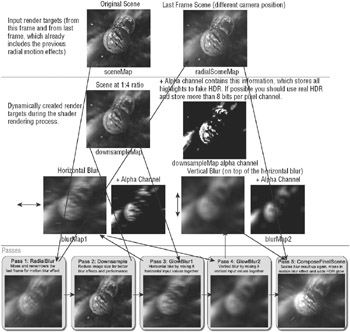
Figure 8-13
Well, that does look a little bit complicated and it is quite a lot of work to get it right, but there are many good shader books available and you can often achieve something quickly by taking a shader from someone else and playing around with it.
The effect of this shader becomes most apparent if you hold two images right beside each other with and without the post-screen glow shader (see Figure 8-14).
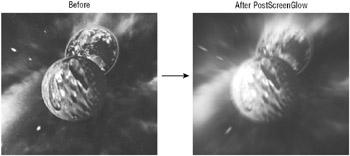
Figure 8-14
Motion Blur
You already saw a simple way to do motion blur with post-screen shaders in the PostScreenGlow example. It may not seem simple to you, but the motion blur effect is the easiest part of the glow and it can be extended quite a bit by using the so-called “Per Pixel Motion Blur” effect. To do per pixel motion blur you have to save the velocity for every pixel in the scene with the help of a special shader. You don’t have to render the full geometry with all the shaders; just render the objects that are moving and leave the rest of this special texture black (unused).
Then in the motion blur post-screen shader you take each pixel and determine how far it should be blurred based on the current direction the player is looking and overall velocity as well as the per pixel velocity and direction. Several newer racing games implemented this technique and also some upcoming game engines are able to do such effects, but it is not easy to implement and it also costs a lot of performance to render the special texture and then a lot of shader instructions to get it to work in the post-screen shader.
The way motion blur was implemented earlier this chapter works only with such big motion blur values because you always reuse the last screen. This means you only have to add 10% new motion blur and reuse 90% of the motion blur from the last screen. Per pixel motion blur could do that too, but it will be a lot harder to track if everything is moving (you, many objects in the scene, and so on) and therefore it is probably best to calculate the whole motion blur with many pixels trailing after each object in the per pixel motion blur shader.
One relatively simple trick is to divide the screen quad you are going to render for the post-screen shader into 10×10 grid pieces and then render them like the big quad, but allow the vertex shader to use different weights depending on how strong the motion blur should be for each vertex. See Figure 8-15 for a comparison between rendering motion blur with just a screen quad and using a 5×5 grid as an example. Using a 10×10 grid looks even a little bit better.
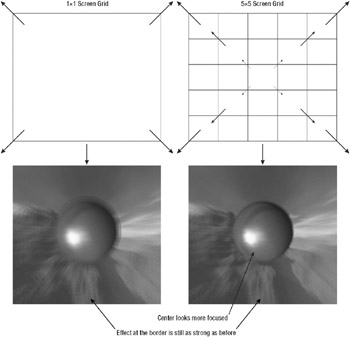
Figure 8-15
Color Correction
I often use color correction in my post-screen shaders because they are easy to use and can greatly influence the way the final output looks. It also helps you to make all textures look more equal and more realistic because the color correction affects all pixels, like real lighting situations in the outside world. For example, if you stay in a cave it is probably dark inside and only a little light comes from the outside world. But if you have some bright stone material it might look a lot brighter than the rest of materials in the cave. Using color correction shaders on the rendered scene will not fix this problem (because you should really put better objects in your cave that fit together in a better way), but it makes the scene a little bit better by changing all the color values a bit. For example, if you give the whole scene a dark look (brightness down), and add a little blue color to each pixel, then all materials will fit together better because the color values are more similar (see Figure 8-16). The scene in the figure is from a prototype game I coded one year ago. It was developed without any color correction shader and one day I said hey, why not do it like in the movies, where everyone uses a lot of color correction and contrast adjustment shaders. The result was pretty good and all new games I do will always have a color correction shader.
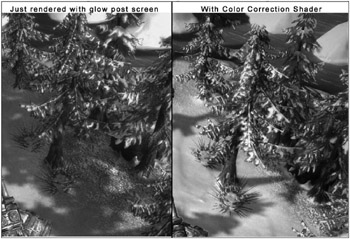
Figure 8-16
The basic code to do brightness effects is to just multiply the color with a constant (or variable if you want to change it dynamically). For example, 0.5 makes the whole image half dark, 2.0 makes it two times brighter, 0.0 makes it completely black, and so on. The following line costs only one shader instruction and you could even combine it with the color correction shader we will do later in this chapter and it will still only cost one shader instruction. Figure 8-17 shows the brightness effect in action.

Figure 8-17
return brightness * originalColorValue; Changing the contrast is a little bit trickier. A value of 1.0 should let everything stay the same way, 0.0 should make the image completely gray (no more contrast left), and higher values should make the image a lot sharper. To achieve this effect you have to subtract 0.5 from each color channel first and then multiply the result with the contrast value and finally add 0.5 to each color channel again.
This way values below 1.0 make the image lose a lot of color and 0.0 makes it completely gray (because only the 0.5 you add at the end is used; the rest is canceled out). Higher values give the image more contrast by darkening dark values down and bright light color values up (see Figure 8-18).
return (originalColorValue-float3(0.5, 0.5, 0.5)) * contrast + float3(0.5, 0.5, 0.5); 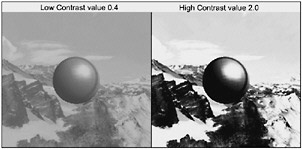
Figure 8-18
To achieve the effect in Figure 8-16 use only very dense values close to 1 for the brightness and contrast. I used values like 0.96 for brightness and 1.2 for contrast. Additionally you can change the color by adding a little color to each resulting pixel.
Be aware that the green color is more visible than blue or red and as soon as you add or subtract more than 0.1 to any color channel, the final output will look way too colorful; use very small values between 0.01 and 0.05. The following code makes the output image more bluish and removes a little bit of the red color. It was used for an arctic world. In the desert you want probably orange tones, for a Vulcan world you might use more red colors, and so on.
inputColor = float3( inputColor.r-0.04f, inputColor.g, inputColor.b+0.05f); This is only a very easy way to change the colors; if you want to do more complex operations or even optimize the color correction part of your shader you can use a matrix for each operation and then precalculate the result of all these matrices combined, and then you would only have to modify each pixel once. Here are some example matrices:
brightnessMatrix = float4x4( brightness, 0, 0, 0, 0, brightness, 0, 0, 0, 0, brightness, 0, 0, 0, 0, 1); contrastMatrix = float4x4( 1, 0, 0, 0, 0, 1, 0, 0, 0, 0, 1, 0, -0.5, -0.5, -0.5, 1); contrastMatrix *= float4x4( contrast, 0, 0, 0, 0, contrast, 0, 0, 0, 0, contrast, 0, 0, 0, 0, 1); contrastMatrix *= float4x4( 1, 0, 0, 0, 0, 1, 0, 0, 0, 0, 1, 0, +0.5, +0.5, +0.5, 1); addColorMatrix = float4x4( 1, 0, 0, 0, 0, 1, 0, 0, 0, 0, 1, 0, -0.04, 0.0, +0.05, 1); You can obviously do a lot more things with matrices like rotations or only scaling one row, and so on. Rotations can be useful to change the colors completely and switch color channels; scaling rows differently can be used to do a luminance effect you saw earlier. Feel free to play around.
Menu Effects
In the last game of this book you will also use a menu post-screen effect, which is pretty similar to the PostScreenGlow shader you saw earlier. It does not glow as strong, but the glow effect is still visible. More importantly it adds a film-like effect like in old movies, which looks funny when you see it animated. It might not fit into every game, but it was quite cool for the racing game and it fits to the menu music.
The basic idea here is to take a noise texture and go through it very slowly and power up the values so much that only the brightest points get used. Then the whole effect is stretched from the top to the bottom and several other effects are added on top of it (see Figure 8-19).
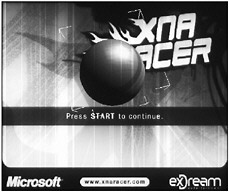
Figure 8-19
There are many more possibilities with post-screen shaders and sometimes you don’t even want to do anything in the post-screen space, but it is just easier to remember and mark some pixel data in the rendering process and then later use it in a post-screen shader to show some effects with it. Not only can this be a lot faster than doing complicated calculations for each pixel, but in the post-screen space it is easier to do things like mixing neighboring pixels together, moving around a few pixels, and changing colors. For example, for shadow mapping shaders you first render the scene into a special shadow map rendered from the lights perspective and then you render the scene again and use the shadow map for comparisons. It works great, but if you have a lot of different shaders you need to modify all of them and often the shaders, especially for Pixel Shader 1.1, are at the instruction limit and you can’t just add more instructions. Then you have to add another pass and render the geometry again.
Another approach is to render the shadowed scene again, but this time just for a scene shadow map, which is later used in a post-screen shader to mix in the normally rendered scene without any special shadow shaders with the shadows. Thanks to the screen space you can then also easily blur the shadow or change the intensity of the shadow without much trouble.
For more information about shaders, post-screen shaders, shadow mapping, and rendering techniques for today’s hardware I recommend that you read one of the many good advanced books about shaders (yes, you are an advanced shader guy now if you read through all this) such as Shader X, GPU Gems, Game Programming Gems, and many vertex and Pixel Shader books you can easily find on sites like Amazon. I also recommend downloading the Nvidia SDK and checking out the many sample shaders.
EAN: 2147483647
Pages: 138