ShaderEffect Class
To render the shader you will use the ShaderEffect class introduced two chapters ago. All the basics were covered in the last chapter; the only thing you are going to add here is more shader parameters, and the rest of the functionality stays the same (see Figure 7-13). You also use the Render method to render 3D data with the shader like in the line manager class in Chapter 5.
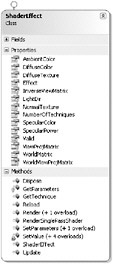
Figure 7-13
To render 3D data you do not only need the 3D geometry or the 3D render code, but also the material parameters, which include the material color values and textures, just like in FX Composer. To manage this data a little new helper class is introduced just to store all this material data in one place: Material.cs (see Figure 7-14).
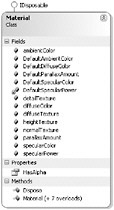
Figure 7-14
The ShaderEffect SetParameters method accepts the Material class as a parameter, which can also be passed in the Render method. This way you can easily assign materials without having to set all the effect parameters yourself.
With the new classes you can now easily write a new unit test to change the apple model from the previous chapter to support your new NormalMapping.fx shader. Additionally you change the material to the asteroid material by loading the asteroid diffuse and Normal Map to test out your new Material class.
TangentVertex Format
Before you can write the unit test to test out the Normal Mapping shader you need the same VertexInput structure from the .fx file in your code too. Unlike the VertexPositionNormalTexture structure from Chapter 6 there is no predefined structure that contains tangent data. You have to define it yourself. The following TangentVertex class (see Figure 7-15) is used to define the VertexInput structure used by NormalMapping.fx and all the shaders that you will write in this book from this point on.
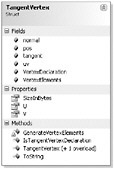
Figure 7-15
Defining the fields of this structure is nothing special; just define the four types you need: pos, normal, tangent, and UV texture coordinates:
/// <summary> /// Position /// </summary> public Vector3 pos; /// <summary> /// Texture coordinates /// </summary> public Vector2 uv; /// <summary> /// Normal /// </summary> public Vector3 normal; /// <summary> /// Tangent /// </summary> public Vector3 tangent; Some methods for vertex buffers require that you specify the size of this structure. In MDX you could use a Direct3DX method or you could use unsafe code to use the sizeof method. In XNA it is not that easy; just define the size yourself.
/// <summary> /// Stride size, in XNA called SizeInBytes. /// </summary> public static int SizeInBytes { get { // 4 bytes per float: // 3 floats pos, 2 floats uv, 3 floats normal and 3 float tangent. return 4 * (3 + 2 + 3 + 3); } // get } // StrideSize The rest of the structure is pretty straightforward; the only other field that you need externally is the Vertex Declaration, which has to be generated by custom code:
#region Generate vertex declaration /// <summary> /// Vertex elements for Mesh.Clone /// </summary> public static readonly VertexElement[] VertexElements = GenerateVertexElements(); /// <summary> /// Vertex declaration for vertex buffers. /// </summary> public static VertexDeclaration VertexDeclaration = new VertexDeclaration(BaseGame.Device, VertexElements); /// <summary> /// Generate vertex declaration /// </summary> private static VertexElement[] GenerateVertexElements() { VertexElement[] decl = new VertexElement[] { // Construct new vertex declaration with tangent info // First the normal stuff (we should already have that) new VertexElement(0, 0, VertexElementFormat.Vector3, VertexElementMethod.Default, VertexElementUsage.Position, 0), new VertexElement(0, 12, VertexElementFormat.Vector2, VertexElementMethod.Default, VertexElementUsage.TextureCoordinate, 0), new VertexElement(0, 20, VertexElementFormat.Vector3, VertexElementMethod.Default, VertexElementUsage.Normal, 0), // And now the tangent new VertexElement(0, 32, VertexElementFormat.Vector3, VertexElementMethod.Default, VertexElementUsage.Tangent, 0), }; return decl; } // GenerateVertexElements() #endregion VertexElement takes the following parameters to define in which order the 3D data is declared:
-
Stream (first parameter): Usually just 0, use it only if you have multiple vertex buffer streams, which is complicated stuff.
-
Offset (second parameter): Offset from the start of the stream in bytes. Just calculate how far you are in the structure in bytes. Floats and integers and dwords take 4 bytes.
-
Vertex element format (third parameter): Defines which type of data is used; this is the same name as defined in the VertexInput format in the shader. Usually you will use Vector2, Vector3, and Vector4 here. Integer numbers or other floating-point values are usually only used for skinning and skeletal animation.
-
Vertex element method: Just use default. Allows also UV and Lookup, but that’s not really required often.
-
Vertex element usage: How should this data type be used? This is similar to the semantics value you defined in the shader. You should always set this to the data type that is used because even if the order is not the same as in the shader, the data will be reordered based on this usage type. If you don’t specify tangent here, the VertexInput data might be completely messed up and XNA usually complains if the format does not fit.
-
Finally you can also specify the usage index, but again you probably will never need this value; just leave it to 0.
Normal Mapping Unit Test
Normally you would write the unit test first, but you already have a unit test for shaders from the previous chapter and you need to define how your new shader works first to figure out which classes are required. Now it is much easier to write shader unit tests again. Please note that you should not write any unit tests in the ShaderEffect class because once ShaderEffect gets called all shaders get initialized, which should not happen before the device is initialized!
Take a look at the Normal Mapping shader unit test:
public static void TestNormalMappingShader() { Model testModel = null; Material testMaterial = null; TestGame.Start("TestNormalMappingShader", delegate { testModel = new Model("apple"); testMaterial = new Material( Material.DefaultAmbientColor, Material.DefaultDiffuseColor, Material.DefaultSpecularColor, "asteroid4~0", "asteroid4Normal~0", "", ""); }, delegate { // Render model BaseGame.WorldMatrix = Matrix.CreateScale(0.25f, 0.25f, 0.25f); BaseGame.Device.VertexDeclaration = TangentVertex.VertexDeclaration; ShaderEffect.normalMapping.Render(testMaterial, "Specular20", delegate { // Render all meshes foreach (ModelMesh mesh in testModel.XnaModel.Meshes) { // Render all mesh parts foreach (ModelMeshPart part in mesh.MeshParts) { // Render data our own way BaseGame.Device.Vertices[0].SetSource( mesh.VertexBuffer, part.StreamOffset, part.VertexStride); BaseGame.Device.Indices = mesh.IndexBuffer; // And render BaseGame.Device.DrawIndexedPrimitives( PrimitiveType.TriangleList, part.BaseVertex, 0, part.NumVertices, part.StartIndex, part.PrimitiveCount); } // foreach } // foreach }); }); } // TestNormalMappingShader() The model is loaded like in the unit test from the previous chapter, but instead of loading a texture you now load a complete material with several color values and the diffuse and Normal Maps of your asteroid4 model. In the render loop you just make sure that the world matrix is set like before and then you set your new TangentVertex structure. The render code itself is the same as in SimpleShader RenderModel and just goes through all the meshes and renders everything with the new asteroid material. Figure 7-16 shows the result of this unit test.
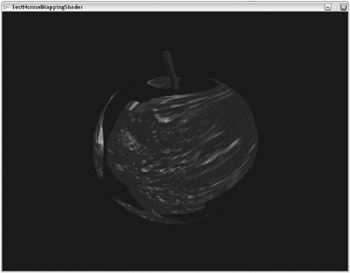
Figure 7-16
The apple is still there, but it is very dark and the Normal Map does not look good yet and certainly not the way it looked in FX Composer. Well, it is the tangent issue again. You are telling XNA how to use the input data, but the tangent data is still missing and has to be generated before the model lands in your content pipeline.
Adding Tangent Data with a Custom Processor
It is not easy to get this tangent problem right, and writing a custom processor is also not an easy task. The basic steps are described here. If you want to know more about writing custom processors or how to write a whole new content importer class, you should refer to the XNA documentation and additional samples on the Web.
First you have to create a new DLL project; just add it to the existing solution and choose XNA DLL or C# DLL as the type. Now make sure that the XNA Framework and XNA pipeline DLLs are added in the references section of this new project (see Figure 7-17).

Figure 7-17
Now write the following code into the main class of the DLL. You are deriving from the ModelProcessor class and extending the default behavior of XNA models. The code just calls CalculateTangentFrames for each mesh in the model. The code in the project for this chapter is much more complex and also fixes several other things and prepares the model for complex highly optimized rendering.
/// <summary> /// XnaGraphicEngine model processor for x files. Loads models the same /// way as the ModelProcessor class, but generates tangents and some /// additional data too. /// </summary> [ContentProcessor(DisplayName = "XnaGraphicEngine Model (Tangent support)")] public class XnaGraphicEngineModelProcessor : ModelProcessor { #region Process /// <summary> /// Process the model /// </summary> /// <param name="input">Input data</param> /// <param name="context">Context for logging</param> /// <returns>Model content</returns> public override ModelContent Process( NodeContent input, ContentProcessorContext context) { // First generate tangent data because x files don't store them GenerateTangents(input, context); // And let the rest be processed by the default model processor return base.Process(input, context); } // Process #endregion #region Generate tangents /// <summary> /// Generate tangents helper method, x files do not have tangents /// exported, we have to generate them ourselfs. /// </summary> /// <param name="input">Input data</param> /// <param name="context">Context for logging</param> private void GenerateTangents( NodeContent input, ContentProcessorContext context) { MeshContent mesh = input as MeshContent; if (mesh != null) { // Generate trangents for the mesh. We don't want binormals, // so null is passed in for the last parameter. MeshHelper.CalculateTangentFrames(mesh, VertexChannelNames.TextureCoordinate(0), VertexChannelNames.Tangent(0), null); } // if // Go through all childs foreach (NodeContent child in input.Children) { GenerateTangents(child, context); } // foreach } // GenerateTangents(input, context) #endregion } // class The MeshHelper class is only available in the content pipeline here; there are several methods that help you out if you want to modify the incoming data. The method GenerateTangents generates the tangent frames from the first set of texture coordinates and it ignores the creation of binormal values. Though it is nice to finally have some generated tangents, they will often look wrong, especially if the model was created a while ago. Newer versions of 3D Studio Max (8 and 9) use the so-called Rocket Mode (named after the Rocket model in Rocket Commander) for Normal Map creation, but older versions and other tools might generate rounded Normal Maps, which will be messed up by the auto-tangent creation of XNA (or MDX for that matter). In the original XNA game I implemented my own tangent processor and generator, but in XNA this is not that easy. You don’t have direct access to the vertex data of the model, but there are some helper methods. It still would be a lot of work to extract all data and put it back together.
It would probably be easier to write a completely new content importer than to mess with an existing format if you really need a lot of changes and additional features for your 3D model data. For example, many 3D models exist in many different formats; md3 or md5 are quite popular in the Quake/Doom world and often people write their own importers just to get some cool looking models from other games to be shown in their own graphics engine. Please refer to the XNA documentation for how to write your own custom content importer. Additionally there will hopefully be a lot of user-written custom content importers on the Web in the future. The easiest format to import in my opinion is the Collada format if you don’t want to mess with .x or .fbx files. It requires some custom code, but once you have done that it is quite easy to extend your importer, add new features, and change the behavior completely in whatever way you like.
But you are happy with your custom model processor for now. It generates tangent data and that is all you need for your Normal Mapping shaders. To get a custom processor working in your XNA project you have to select it yourself by opening each content file properties. Before you can even select your own custom model processor you have to make sure the content pipeline knows it exists; for now you just created a DLL file somewhere on the disk. To include your processor open up your project properties (right-click in the Solution Explorer on the XnaGraphicEngine .csproj file on the top, right below the XnaGraphicEngine solution, and select Properties here). The last option in the project properties is called Content Pipeline and this is where you can select additional content importers and processors (see Figure 7-18). If you click Add… you can select the XnaGraphicEngineContentProcessors.dll file by browsing two levels up and then selecting its bin\Debug\ directory. For release mode you probably want to select bin\Release\.
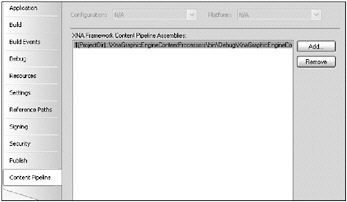
Figure 7-18
After the new content pipeline assembly is loaded you should now be able to select “XnaGraphicEngine Model (Tangent support)” for each .x file model you have in your project. You can also select multiple .x files in the Solution Explorer and then change the model content processor for all of them (see Figure 7-19).
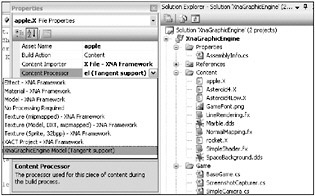
Figure 7-19
With all that heavy lifting behind you, you can now start your last unit test again and check out what has changed. Please note that you did not change a single line of code in your project for the new content processor support; it is all done in the processor DLL. If you made any mistake in the content processor or one of the content files does not contain valid data, you will get a warning or error before the project is started because the content pipeline builds all the content before you start the project. Once the content is built with your new processor it does not change anymore and it does not have to be rebuilt again. XNA will skip that automatically for you.
As you can see in Figure 7-20, your apple with the asteroid material now looks much better and you can even assign different materials on it (just for fun). Please note that the internal structure of the apple is different from your own TangentVertex format. If you set the apple material directly on it, make sure the correct vertex declaration from the mesh is used and not your own, or else the texture coordinates will not match (but that does not matter for your testing; none of the textures fit).
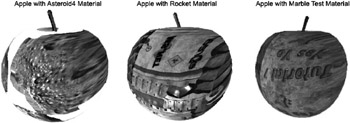
Figure 7-20
You might notice that both the rocket and the marble test textures seem to be mirrored. This is normal because the apple model was generated for DirectX and uses a left-handed matrix. You could export all models again with a right-handed mode (which the Panda DirectX Exporter in 3D Studio Max luckily supports) or you could just ignore this issue because it does not matter so much in Rocket Commander. If you have text on textures in your game or you want the textures to fit and not to be mirrored, make sure that everything is aligned the correct way from day one. It is always important to use the same format in the modeling program your artists use and in your graphics engine. If it does not fit, either adjust your engine or convert the content the way you need it to be.
Final Asteroid Unit Test
You did not need all this knowledge just to display a simple asteroid model, because the following unit test shows it is possible to just load the model and use the shader that was selected in 3D Studio automatically. The problem with this approach becomes apparent when you try to render 1000 asteroids per frame. It is just way too slow and impractical to start a new shader for every single asteroid, set all the parameters all over again, and then use the unoptimized mesh draw method.
Instead you are going to start your own shader class in the future and then initialize the material and shader settings only once and render a lot of models as fast as possible. In this way you can achieve great performance in the Rocket Commander game.
public static void TestAsteroidModel() { Model testModel = null; TestGame.Start("TestNormalMappingShader", delegate { testModel = new Model("asteroid4"); }, delegate { // Render model testModel.Render(Matrix.CreateScale(10.25f, 10.25f, 10.25f)); }); } // TestAsteroidModel() If the asteroid4 model (by the way, you can also use asteroid4Low for testing here) uses the correct model processor with tangent support you should be able to see it correctly in 3D (see Figure 7-21) with the parallax mapping effect on it (which is the same as Normal Mapping, it just uses an additional height texture to move the output texture around a little bit for a fake displacement effect). One problem with the asteroid model is that there are visible raw edges on it. It seems like the texture mapping does not match, but if you disable the Normal Mapping effect, it looks ok. So the problem comes from the tangent data. The Normal Map is correct as you can see in the DirectX version of Rocket Commander (fits perfectly thanks to the custom way tangent data is re-generated, which is sadly not possible in XNA for .x files). Other models like the rocket and future models created for XNA games look fine, but this is still an unfixable problem with older models and a limitation of XNA. You have to live with it.
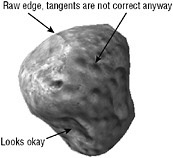
Figure 7-21
It probably would be possible to somehow fix all asteroids, re-export them, make sure all data is correct, and maybe even re-generate the Normal Map to fit correctly. But that is a lot of work and the asteroid looks good enough now. The original Rocket Commander game still exists and shows how it is done; for the XNA port you can live with some minor glitches.
For a native XNA game this should not happen, and in the next games for this book you will make sure that all models are exported and displayed correctly. Please note that it can be a lot of work working with 3D models, exporting them correctly, importing them again into your engine, writing all the shaders required to make them look the way the artist intended them to look, and so on. Sometimes you will be better off by just using an existing engine (like the one you develop in this book) and use it for a while until you see your custom needs and start writing your own 3D code anyway. But don’t spend all your time just developing a 3D engine without writing a game. XNA is about game development and a common mistake in the DirectX world was that everyone wrote his own engine, but only very few people made games out of their engines. Be smarter than them.
EAN: 2147483647
Pages: 138