Section 22.2. The NetBeans IDE
22.2. The NetBeans IDEWe can't have a meaningful discussion of beans without spending a little time talking about the builder environments in which they are used. In this chapter, we use the NetBeans IDE Version 4.0 to demonstrate our beans. NetBeans is a popular, pure Java development environment. In this case, the "integrated" in "integrated development environment" means that NetBeans offers powerful source and visual editor capabilities, templates that aid in the creation of various types of Java classes, and the ability to compile, run, and debug applications, all in one tool. In particular, we'll be using the visual development environment of NetBeans to glue together our Java beans and try them out. Other IDEs offer similar capabilities. See Appendix A for a brief comparison of NetBeans and the Eclipse IDE. Because NetBeans is a full-blown production development environment, it has many features we don't use in these examples. For that reason, we can't really provide a full introduction to it here. We will provide only bare-bones directions here for demonstrating the Java beans in this chapter. But we hope that once you get into the tool and start looking around, you will want to learn more. 22.2.1. Installing and Running NetBeansYou have to install Java 5.0 before you can install NetBeans. If you installed the JDK from Sun's web site, you may have downloaded a combined JDK and NetBeans bundle, so you may already have it installed. Both the JDK and NetBeans are included on the CD-ROM that accompanies this book (view CD content online at http://examples.oreilly.com/learnjava3/CD-ROM/). They can also be downloaded from http://java.sun.com/j2se/ and http://www.netbeans.org, respectively. Follow the simple installation instructions for those packages (you may have to reboot if you installed Java). During the NetBeans installation, it may prompt you for the version of the JDK to use. Choose the Java 5.0 version. When you're all set, launch NetBeans. When you first start NetBeans, a welcome screen appears. Close it for now by clicking the small x on its tab. (If you want to return to this welcome screen later to take the NetBeans tutorials, choose Help 22.2.1.1 Installing our example beansBefore we get started, we'll have to add the example beans used in this chapter to the NetBeans palette. NetBeans installs Java beans in a central location that can be used by multiple projects in the editor. Unfortunately, this obscures the location of the real classes. NetBeans keeps these classes and other configuration information in a directory called .netbeans in your home directory (on Windows, the location is /Documents and Settings/<Username>/.netbeans). If at any time you feel that you've really hosed your environment and want to start fresh, just remove this directory and relaunch NetBeans to get back to square one. To install our beans, grab our demo beans JAR file, magicbeans.jar, from the accompanying CD-ROM or from this book's web site at http://www.oreilly.com/catalog/learnjava3/. Save the file locally and then select Tools Now, we must create a new project to hold our work. Normally, we'd suggest that you import the examples from the CD or online. In this case, we're going to be doing visual layout and all the action is in the actions, so to speak, so we'll just walk through them as we go. To create a new project, select New Project from the File menu. In the Categories pane of the wizard, select General and in the Projects pane, select Java Application, then click Next. You give your project a name, for example, LearningJava, and specify a location or you can leave the defaults. Uncheck the box labeled Create Main Class since we won't be needing one in our project, then click Finish to complete our empty project. If this is the first time you've created a project in NetBeans, you may see a message that says that NetBeans is scanning project classpaths; this takes a few minutes. Next, we need to create a class file to put into our project. Select New File from the File menu. NetBeans prompts you with a wizard. In the Categories pane, select Java GUI Forms and in the File Types pane, select JFrame Form. Choosing JFrame Form gives us a Java class file extending JFrame with the basic structure of a GUI application already set up for us. Click Next, then give the file a name, such as LearningJava1. You may leave the package set to the default package if you wish. Now click Finish and the screen looks like Figure 22-1. Figure 22-1 shows the NetBeans application. The screen has three main areas with a toolbar at the top. The left area is the explorer window. Tabs in the explorer window can show a Java package and class-oriented view of our project, a filesystem view, or a runtime environment view. With the Files tab selected, the explorer should reveal our LearningJava1.java class. In the center area is our workspace with tabs for each open file (currently one). Since we selected a GUI-type file, NetBeans has placed us into GUI editing mode and shows us an empty box where we will place our beans. Click alternately on the Source and Design buttons to switch between the Java source code and this view (try it now). On the right side is a Palette pane, an Inspector pane, and a Properties pane, which currently shows no properties (that makes sense since we have not yet placed a bean in the workspace). The Palette shows buttons for different groups of beans. The Swing group includes all the standard Swing components. AWT holds AWT components. Layouts holds Java layout managers. Inspector shows a GUI container view of our class, and Properties will show us the configurable features of our beans. Properties changes its contents based on the bean currently selected in the workspace. Under Palette, select Swing (it may be selected by default) to see some of the available Swing components (they appear as icons at the top of the window). Now select Beans to see the beans we imported earlier. You should see the friendly Dial component bean from Chapter 18, along with a tiny person bean. The rest of our beans have no pretty icons and can't easily be distinguished. That's because these simple example beans aren't packaged as completely as the others. (We'll talk about packaging later in the chapter.) For now, right-click on one of the beans, and select Show Component Names to display the class names of all the beans in the palette. (You may want to resize the pane so you can see more of the beans). Figure 22-2 shows the bean palette. To place a bean into the workspace, click on it and then click in the workspace. Before you do that, though, you may want to set an appropriate layout manager. The Inspector holds a tree that shows all the components (visible and invisible) in the project. By Figure 22-2. The bean palette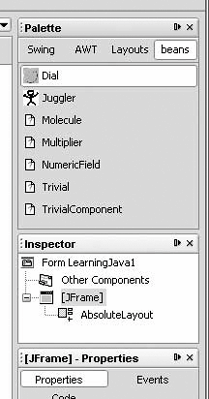 right-clicking on the JFrame (our top-level container) in either the workspace or the tree, you can select Set Layout to specify the layout manager for the frame. For now, try using AbsoluteLayout, provided by NetBeans. This allows you to arbitrarily place and move beans within the container. You wouldn't want to do this in general, but for our examples it will make life a bit easier. The other layout managers are easy enough to use, but we'll refer you to NetBeans tutorials for that information. |
 Welcome Screen.)
 Palette Manager to add the beans. Click Add from Jar, then select the
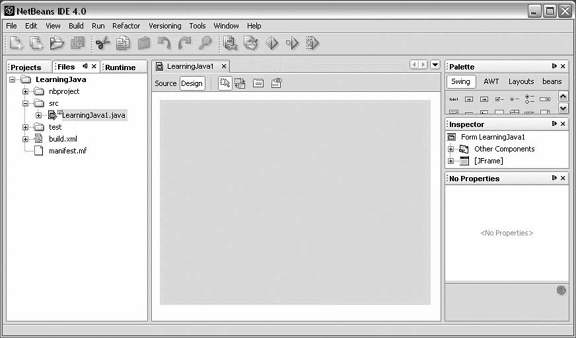
EAN: 2147483647
Pages: 262