Chapter 3. Tools of the Trade
| CONTENTS |
- 3.1 The Java Interpreter
- 3.2 The Classpath
- 3.3 Policy Files
- 3.4 The Java Compiler
- 3.5 Java Archive (JAR) Files
There are many options for Java development environments, from the traditional text-editor-and-command-line tools to full blown IDEs such as Sun's Forte for Java, WebGain's Visual Caf , and Inprise's JBuilder. The examples in this book were developed using the Solaris and Windows versions of the standard Java Software Development Kit (SDK), so we will describe those tools here. When we refer to the compiler or interpreter, we'll be referring to the command-line versions of these tools, so the book is a bit biased toward those of you who are working in a Unix or DOS-like environment with a shell and filesystem. However, the basic features we'll be describing for Sun's Java interpreter and compiler should be applicable to other Java environments as well.
In this chapter, we'll describe the tools you'll need to compile and run Java applications. The last part of the chapter discusses how to pack Java class files into Java archives (JAR files). Chapter 22 also describes the ability to "sign" classes within a JAR file and to give greater privileges to classes with a signature that you trust.
3.1 The Java Interpreter
A Java interpreter is software that implements the Java virtual machine and runs Java applications. It can be a standalone application like the java program that comes with the SDK or part of a larger application like a browser. It's likely the interpreter itself is written in a native, compiled language for a particular platform. Other tools, such as Java compilers and IDEs, are often being implemented directly in Java to maximize their portability. Sun's Forte for Java (called NetBeans in the open source version included on this book's CD-ROM) is one example of a pure-Java IDE (view CD content online at http://examples.oreilly.com/learnjava2/CD-ROM/).
The Java interpreter performs all the activities of the Java runtime system. It loads Java class files and interprets the compiled String. It verifies compiled classes loaded from untrusted sources. In an implementation that supports dynamic, or just-in-time, compilation, the interpreter also serves as a specialized compiler that turns Java String into native machine instructions.
Throughout most of this book, we'll be building standalone Java programs, but we'll make frequent references to Java applets as well. Both are kinds of Java applications run by a Java interpreter. The difference is that a standalone Java application has all its parts; it's a complete program that runs independently. An applet is more like an embeddable program module. The Java interpreter can't run an applet directly because it is used as part of a larger application. To run an applet, you can use a web browser or the appletviewer tool that comes with the SDK. HotJava, a web browser written in Java, and the appletviewer are standalone Java applications run directly by the Java interpreter; these programs implement the additional structure needed to run Java applets.
For a standalone Java application, there must be at least one class that contains a method called main(), which contains the statements to be executed upon startup. To run the application, start the interpreter, specifying that class as an argument.You can also specify options to the interpreter as well as arguments to be passed to the application. Sun's Java interpreter is called java:
% java [interpreter options ] class_name [program arguments ]
The class should be specified as a fully qualified class name, including the package name, if any. Note, however, that you don't include the .class file extension. Here are a few examples:
% java animals.birds.BigBird % java MyTest
The interpreter searches for the class in the classpath, a list of directories where packages of classes are stored. We'll discuss the classpath in detail in the next section. The classpath is typically specified by an environment variable, which you can override with the command-line option -classpath.
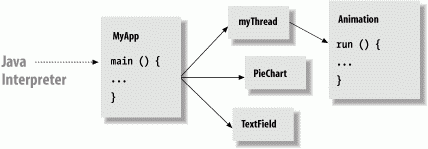
After loading the class specified on the command line, the interpreter executes the class's main() method. From there, the application can start additional threads, reference other classes, and create its user interface or other structures, as shown in Figure 3-1.
Figure 3-1. Starting a Java application
The main() method must have the right method signature. A method signature is the set of information that defines the method. It includes the method's name, arguments and return type, as well as type and visibility modifiers. The main() method must be a public, static method that takes an array of String objects as its argument and does not return any value (void):
public static void main ( String [] myArgs )
Because main() is a public and static method, it can be accessed directly from another class using the name of the class that contains it. We'll discuss the implications of visibility modifiers such as public and the meaning of static in Chapter 4 through Chapter 6.
The main() method's single argument, the array of String objects, holds the command-line arguments passed to the application. The name that we give the parameter doesn't matter; only the type is important. In Java, the content of myArgs is a true array. There's no need for an argument count parameter because myArgs knows how many arguments it contains and can happily provide that information:
int argc = myArgs.length;
myArgs[0] is the first command-line argument, and so on. Note that this differs from C/C++, where argument zero is the name of the application. If you're accustomed to parsing C command-line arguments, you'll need to be careful not to trip over this difference.
The Java interpreter continues to run until the main()method of the initial class file returns and until any threads that it starts are complete. Special threads designated as "daemon" threads are silently killed when the rest of the application has completed.
3.1.1 System Properties
Java does not directly provide access to "environment variables" from the host operating system. But it does allow any number of system property values to be passed to the application when the interpreter is started. System properties are simply name-value string pairs that are available to the application through the static System.getProperty() method. You can use these properties as an alternative to command-line arguments to pass configuration information to your application at runtime. Each value is passed to the interpreter using the -D option followed by name=value. For example:
% java -Dstreet=sesame -Dscene=alley animals.birds.BigBird
The value of the street property is then accessible this way:
String street = System.getProperty("street"); 3.2 The Classpath
The concept of a path should be familiar to anyone who has worked on a DOS or Unix platform. It's an environment variable that provides an application with a list of places to look for some resource. The most common example is a path for executable programs. In a Unix shell, the PATH environment variable is a colon-separated list of directories that are searched, in order, when the user types the name of a command. The Java CLASSPATH environment variable, similarly, is a list of locations that can be searched for packages containing Java class files. Both the Java interpreter and the Java compiler use CLASSPATH when searching for packages and classes on the local host.
An element of the classpath can be a directory name or the name of an archive file. Java supports archives of class files in its own Java archive (JAR) format, and in the conventional ZIP format. JAR and ZIP are really the same format, but JAR archives include extra files that describe each archive's contents. JAR files are created with the Java development kit's jar utility; many tools for creating ZIP archives are publicly available. The archive format enables large groups of classes and their resources to be distributed in a single file; the Java interpreter automatically extracts individual class files from an archive, as needed.
The precise means and format for setting the classpath vary from system to system. On a Unix system, you set the CLASSPATH environment variable with a colon-separated list of directories and class archive files:
CLASSPATH=/home/vicky/Java/classes:/home/josh/oldstuff/foo.jar:. export CLASSPATH
This example specifies a classpath with three locations: a directory in the user's home, a JAR file in another user's directory, and the current directory, which is always specified with a dot (.). The last component of the classpath, the current directory, is useful when tinkering with classes, but as a general rule, it's bad practice to put the current directory in any kind of path.
On a Windows system, the CLASSPATH environment variable is set with a semicolon-separated list of directories and class archive files:
set CLASSPATH=D:\users\vicky\Java\classes;.
The Java interpreter and the other command-line tools also know how to find the core classes, which are the classes included in every Java installation. The classes in the java.lang, java.io, java.net, and javax.swing packages, for example, are all core classes. You don't need to include these classes in your classpath; the Java interpreter and the other tools can find them by themselves.
To find other classes, the Java interpreter searches the locations on the classpath in order. The search combines the path location and the fully qualified class name. For example, consider a search for the class animals.birds.BigBird. Searching the classpath directory /usr/lib/java means the interpreter looks for an individual class file at /usr/lib/java/animals/birds/BigBird.class. Searching a ZIP or JAR archive on the classpath, say /home/vicky/Java/utils/classutils.jar, means that the interpreter looks for component file animals/birds/BigBird.class in that archive.
For the Java interpreter, java, and the Java compiler, javac, the classpath can also be specified with the -classpath option:
% javac -classpath /pkg/sdk/lib/classes.zip:/home/pat/java:. Foo.java If you don't specify the CLASSPATH environment variable, it defaults to the current directory (.); this means that the files in your current directory are normally available. If you change the classpath and don't include the current directory, these files will no longer be accessible.
3.2.1 javap
A useful tool to know about is the javap command. With javap, you can print a description of a compiled class. You don't have to have the source code, and you don't even have to know exactly where it is, only that it is in your classpath. For example:
% javap java.util.Stack
prints the information about the java.util.Stack class:
Compiled from Stack.java public class java.util.Stack extends java.util.Vector { public java.util.Stack( ); public java.lang.Object push(java.lang.Object); public synchronized java.lang.Object pop( ); public synchronized java.lang.Object peek( ); public boolean empty( ); public synchronized int search(java.lang.Object); } This is very useful if you don't have other documentation handy and can also be helpful in debugging classpath issues. If you are feeling really adventurous you can try javap with the -c option, which causes it to also print the JVM instructions for each method in the class!
3.3 Policy Files
One of the truly novel things about Java is that security is built into the language. As described in Chapter 1, the Java VM can verify class files and Java's security manager can impose limits on what classes do. In early versions of Java, it was necessary to implement security policies programmatically by writing a Java security manager class and using it in your application. A major shift occurred in Java 1.2, when a new declarative security system was added. This system allows you to write policy files text-based descriptions of permissions which are much simpler and don't require code changes. These policy files tell the security manager what to allow and disallow and for whom.
With security policies you can answer questions such as: "If I download a program from somewhere on the Internet, how can I prevent it from stealing information on my computer and sending it back to someone else?" "How can I prevent a malicious program from disabling my computer or erasing data on my disk?" Most computing platforms have no answer for these questions.
In early versions of Java, much of the buzz had to do with the security of applets. Applets generally run with security restrictions that prevent them from doing questionable things such as reading from or writing to the disk or contacting arbitrary computers on the network. With security policy files, it's just as easy to apply applet-style security to any application without modifying it. Furthermore, it's easy to fine-tune the access you grant. For example, you can allow an application to access the disk, but only in a specific directory, or you can allow network access to certain addresses.
Understanding security and security policies is important, so we'll cover it here. However, in practice, you probably won't use this facility yourself, unless you are writing a framework for running applications from many unknown sources. The Java Web Start facility is an example of such a framework. It installs and updates Java applications over the Web with user-definable security restrictions.
3.3.1 The Default Security Manager
By default, no security manager is installed when you launch a Java application locally. You can turn on security using an option of the java interpreter to install a default security manager. The default security policy enforces many of the same rules as for applets. To see how this works, let's write a little program that does something questionable, making a network connection to some computer on the Internet. (We cover the specifics of network programming in Chapter 12 and Chapter 13.)
//file: EvilEmpire.java import java.net.*; public class EvilEmpire { public static void main(String[] args) throws Exception{ try { Socket s = new Socket("207.46.131.13", 80); System.out.println("Connected!"); } catch (SecurityException e) { System.out.println("SecurityException: could not connect."); } } } If you run this program with the Java interpreter, it makes the network connection:
C:\> java EvilEmpire Connected!
But since this program is "evil," let's install the default security manager, like this:
C:\> java -Djava.security.manager EvilEmpire SecurityException: could not connect.
That's better, but suppose that the application actually has a legitimate reason to make its network connection. We'd like to leave the default security manager in place, just to be safe, but we'd like to grant this application permission to make a network connection.
3.3.2 The policytool Utility
To permit our EvilEmpire example to make a network connection, we need to create a policy file that contains the appropriate permission. A handy utility called policytool, included with the SDK, helps make policy files. Fire it up from a command line like this:
C:\> policytool
You may get an error message when policytool starts up about not finding a default policy file. Don't worry about this; just click OK to make the message go away.
We now add a network permission for the EvilEmpire application. The application is identified by its origin, also called a codebase, described by a URL. In this case, it is a file: URL that points to the location of the EvilEmpire application on your disk.
If you started up policytool, you should be looking at its main window, shown in Figure 3-2. Click on Add Policy Entry. Another window pops up, like the one shown in Figure 3-3 (but with the fields empty).
Figure 3-2. The policytool window
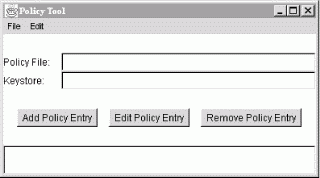
Figure 3-3. Adding a policy entry
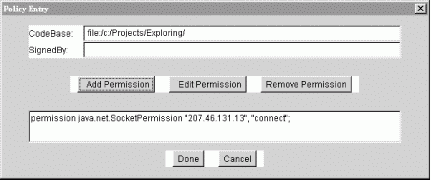
First, fill in the codebase with the URL of the directory containing EvilEmpire as shown in the figure. Then click on Add Permission. Yet another window pops up, shown in Figure 3-4.
Figure 3-4. Creating a new permission
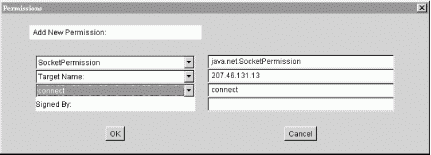
Choose SocketPermission from the first combo box. Then fill out the second text field on the right side with the network address that EvilEmpire will connect to. Finally, choose connect from the third combo box. Click on OK; you should see the new permission in the policy entry window, as shown in Figure 3-3.
Click on Done to finish creating the policy. Then choose Save As from the File menu and save the policy file as something memorable, like EvilEmpire.policy. You can quit policytool now; we're all done with it.
There's nothing magical about the policy file you just created. Take a look at it with a text editor, which shows the simple syntax of the policy we just created:
grant codeBase "file:/c:/Projects/Exploring/" { permission java.net.SocketPermission "207.46.131.13", "connect"; }; You can eschew policytool entirely and just create policy files with a text editor, if you're more comfortable that way.
3.3.3 Using a Policy File with the Default Security Manager
Now that we've gone to the trouble of creating a policy file, let's use it. You can tell the default security manager to use the policy file with another command-line option to the java interpreter:
C:\> java -Djava.security.manager -Djava.security.policy=EvilEmpire.policy EvilEmpire Connected!
EvilEmpire can now make its socket connection because we have explicitly granted it permission with a policy file. The default security manager still protects us in other ways, however. EvilEmpire cannot write or read files on the disk except in the directory it came from, and it cannot make connections to any other network addresses except the one we specified. Take a moment and bask in this warm fuzzy feeling.
Later, in Chapter 22, you'll see policytool again when we explain signed applets. In this chapter, codebases are identified by URLs, which isn't the most secure option. Through tricky network shenanigans, a clever forger may be able to give you code that appears to be from somewhere it's not. Cryptographically signed code is even more trustworthy; see Chapter 22 for details.
3.4 The Java Compiler
In this section, we'll say a few words about javac, the Java compiler in the SDK. (If you are happily working in another development environment, you may want to skip ahead to the next section.) The javac compiler is written entirely in Java, so it's available for any platform that supports the Java runtime system.
javac turns Java source code into a compiled class that contains Java virtual machine String. By convention, source files are named with a .java extension; the resulting class files have a .class extension. Each source code file is a single compilation unit. As you'll see in Chapter 6, classes in a given compilation unit share certain features, such as package and import statements.
javac allows one public class per file and insists the file have the same name as the class. If the filename and class name don't match, javac issues a compilation error. A single file can contain multiple classes, as long as only one of the classes is public. Avoid packing many classes into a single source file. Including nonpublic classes in a .java file is one easy way to tightly couple such classes to a public class. But you might also consider using inner classes (see Chapter 6).
Now for an example. Place the following source code in file BigBird.java:
package animals.birds; public class BigBird extends Bird { ... } Now compile it with:
% javac BigBird.java
Unlike the Java interpreter, which takes just a class name as its argument, javac needs a filename to process. The previous command produces the class file BigBird.class in the same directory as the source file. While it's useful to have the class file in the same directory as the source for testing a simple example, for most real applications, you need to store the class file in an appropriate place in the classpath.
You can use the -d option to javac to specify an alternative directory for storing the class files it generates. The specified directory is used as the root of the class hierarchy, so .class files are placed in this directory or in a subdirectory below it, depending on whether the class is contained in a package. (The compiler creates intermediate subdirectories automatically, if necessary.) For example, we can use the following command to create the BigBird.class file at /home/vicky/Java/classes/animals/birds/BigBird.class:
% javac -d /home/vicky/Java/classes BigBird.java
You can specify multiple .java files in a single javac command; the compiler creates a class file for each source file. But you don't need to list source files for other classes your class references, as long as the other classes have already been compiled. During compilation, Java resolves other class references using the classpath. If our class refers to other classes in animals.birds or other packages, the appropriate paths should be listed in the classpath at compile time, so that javac can find the appropriate class files.
The Java compiler is more intelligent than your average compiler, replacing some of the functionality of a make utility. For example, javac compares the modification times of the source and class files for all referenced classes and recompiles them as necessary. A compiled Java class remembers the source file from which it was compiled, so as long as the source file is in the same directory as the class file, javac can recompile the source if necessary. If, in the previous example, class BigBird references another class, animals.furry.Grover, javac looks for the source file Grover.java in an animals.furry package and recompiles it if necessary to bring the Grover.class class file up to date.
By default, however, javac checks only source files that are referenced directly from other source files. This means that if you have an out-of-date class file that is referenced only by an up-to-date class file, it may not be noticed and recompiled. You can force javac to walk the entire graph of objects using the -depend option, but this can increase compilation time significantly. And this technique still won't help if you want to keep class libraries or other collections of classes up to date even if they aren't being referenced at all. For that you should consider a make utility.
Finally, it's important to note that javac can compile an application even if only the compiled versions of referenced classes are available. You don't need source code for all your objects. Java class files contain all the data type and method signature information that source files contain, so compiling against binary class files is as type-safe (and exception-safe) as compiling with Java source code.
3.5 Java Archive (JAR) Files
Java archive files (JAR files) are Java's suitcases. They are the standard and portable way to pack up all the parts of your Java application into a compact bundle for distribution or installation. You can put whatever you want into a JAR file: Java class files, serialized objects, data files, images, sounds, etc. As we'll see in Chapter 22, a JAR file can carry one or more digital signatures that attest to its integrity and authenticity. A signature can be attached to the file as a whole or to individual items in the file.
The Java runtime system understands JAR files and can load class files directly from an archive. So you can pack your application's classes in a JAR file and place it in your CLASSPATH, as described earlier. You can do the equivalent for applets by listing the JAR file in the ARCHIVE attribute of the HTML <APPLET> tag. Nonclass files (data, images, etc.) contained in your JAR file can also be retrieved from the classpath using the getResource() method (described in Chapter 11). Using this facility your code doesn't have to know whether any resource is in a plain file or a member of a JAR archive. Whether a given class or data file is an item in a JAR file, an individual file on the classpath, or an applet on a remote server, you can always refer to it in a standard way and let Java's class loader resolve the location.
3.5.1 File Compression
Items stored in JAR files are compressed with the standard ZIP file compression.[1] Compression makes downloading classes over a network much faster. A quick survey of the standard Java distribution shows that a typical class file shrinks by about 40% when it is compressed. Text files such as arbitrary HTML or ASCII containing English words often compress by as much as 75% to one-quarter their original size. (On the other hand, image files don't get smaller when compressed; most of the common image formats have compression built in.)
Compression is not the only advantage that a JAR file has for transporting files over a network. Placing all the classes in a single JAR file enables them to be downloaded in a single transaction. Eliminating the overhead of making HTTP requests is likely to be a big savings, since individual class files tend to be small, and a complex applet could easily require many of them. On the downside, startup time could be increased if a large JAR file must be downloaded over a slow connection before the applet can start up.
3.5.2 The jar Utility
The jar utility provided with the SDK is a simple tool for creating and reading JAR files. Its user interface isn't particularly friendly. It mimics the Unix tar (tape archive) command. If you're familiar with tar, you'll recognize the following incantations:
- jar -cvf jarFile path [ path ] [ ... ]
-
Create jarFile containing path(s)
- jar -tvf jarFile [ path ] [ ... ]
-
List the contents of jarFile, optionally showing just path(s)
- jar -xvf jarFile [ path ] [ ... ]
-
Extract the contents of jarFile, optionally extracting just path(s)
In these commands, the letters c, t, and x tell jar whether it is creating an archive, listing an archive's contents, or extracting files from an archive. The f means that the next argument will be the name of the JAR file on which to operate. The v tells jar to be more verbose when displaying information about files. In verbose mode, you can get information about file sizes, modification times, and compression ratios.
Subsequent items on the command line (i.e., anything aside from the letters telling jar what to do and the file on which jar should operate) are taken as names of archive items. If you're creating an archive, the files and directories you list are placed in it. If you're extracting, only the filenames you list are extracted from the archive. (If you don't list any files, jar extracts everything in the archive.)
For example, let's say we have just completed our new game, spaceblaster. All the files associated with the game are in three directories. The Java classes themselves are in the spaceblaster/game directory, spaceblaster/images contains the game's images, and spaceblaster/docs contains associated game data. We can pack all this in an archive with this command:
% jar cvf spaceblaster.jar spaceblaster
Because we requested verbose output, jar tells us what it is doing:
adding:spaceblaster/ (in=0) (out=0) (stored 0%) adding:spaceblaster/game/ (in=0) (out=0) (stored 0%) adding:spaceblaster/game/Game.class (in=8035) (out=3936) (deflated 51%) adding:spaceblaster/game/Planetoid.class (in=6254) (out=3288) (deflated 47%) adding:spaceblaster/game/SpaceShip.class (in=2295) (out=1280) (deflated 44%) adding:spaceblaster/images/ (in=0) (out=0) (stored 0%) adding:spaceblaster/images/spaceship.gif (in=6174) (out=5936) (deflated 3%) adding:spaceblaster/images/planetoid.gif (in=23444) (out=23454) (deflated 0%) adding:spaceblaster/docs/ (in=0) (out=0) (stored 0%) adding:spaceblaster/docs/help1.html (in=3592) (out=1545) (deflated 56%) adding:spaceblaster/docs/help2.html (in=3148) (out=1535) (deflated 51%)
jar creates the file spaceblaster.jar and adds the directory spaceblaster, in turn adding the directories and files within spaceblaster to the archive. In verbose mode, jar reports the savings gained by compressing the files in the archive.
We can unpack the archive with this command:
% jar xvf spaceblaster.jar
Likewise, we can extract an individual file or directory with:
% jar xvf spaceblaster.jar filename
But you normally don't have to unpack a JAR file to use its contents; Java tools know how to extract files from archives automatically. We can list the contents of our JAR with the command:
% jar tvf spaceblaster.jar
Here's the output; it lists all the files, their sizes, and creation times:
0 Thu May 15 12:18:54 PDT 1997 META-INF/ 1074 Thu May 15 12:18:54 PDT 1997 META-INF/MANIFEST.MF 0 Thu May 15 12:09:24 PDT 1997 spaceblaster/ 0 Thu May 15 11:59:32 PDT 1997 spaceblaster/game/ 8035 Thu May 15 12:14:08 PDT 1997 spaceblaster/game/Game.class 6254 Thu May 15 12:15:18 PDT 1997 spaceblaster/game/Planetoid.class 2295 Thu May 15 12:15:26 PDT 1997 spaceblaster/game/SpaceShip.class 0 Thu May 15 12:17:00 PDT 1997 spaceblaster/images/ 6174 Thu May 15 12:16:54 PDT 1997 spaceblaster/images/spaceship.gif 23444 Thu May 15 12:16:58 PDT 1997 spaceblaster/images/planetoid.gif 0 Thu May 15 12:10:02 PDT 1997 spaceblaster/docs/ 3592 Thu May 15 12:10:16 PDT 1997 spaceblaster/docs/help1.html 3148 Thu May 15 12:10:02 PDT 1997 spaceblaster/docs/help2.html
3.5.2.1 JAR manifests
Note that the jar command automatically adds a directory called META-INF to our archive. The META-INF directory holds files describing the contents of the JAR file. It always contains at least one file: MANIFEST.MF. The MANIFEST.MF file can contain a "packing list" naming the files in the archive along with a user-definable set of attributes for each entry.
The manifest is a text file containing a set of lines in the form keyword: value. In Java 1.2 and later, the manifest is by default empty and contains only JAR file version information:
Manifest-Version: 1.0 Created-By: 1.2.1 (Sun Microsystems Inc.)
In Chapter 22, we'll discuss signed JAR files. When you sign a JAR file with a digital signature digest (checksum) information is added to the manifest for each item in the archive. It looks like this:
Name: com/oreilly/Test.class SHA1-Digest: dF2GZt8G11dXY2p4olzzIc5RjP3= ...
In the case of a signed JAR, the META-INF directory holds digital signature files for items in the archive. In Java 1.1, digest information was always added to the JAR. But since it's really necessary only for signed JAR files, it is omitted by default when you create an archive in Java 1.2 and later.
You can add your own information to the manifest descriptions by specifying your own, supplemental, manifest file when you create the archive. This is a good place to store other simple kinds of attribute information about the files in the archive, perhaps version or authorship information.
For example, we can create a file with the following keyword: value lines:
Name: spaceblaster/images/planetoid.gif RevisionNumber: 42.7 Artist-Temperament: moody
To add this information to the manifest in our archive, place it in a file called myManifest.mf and give the following jar command:
% jar -cvmf myManifest.mf spaceblaster.jar spaceblaster
We included an additional option with the command, m, which specifies that jar should read additional manifest information from the file given on the command line. How does jar know which file is which? Because m is before f, it expects to find the manifest information before the name of the JAR file it will create. If you think that's awkward, you're right; get the names in the wrong order, and jar will do the wrong thing. Be careful.
Although these attributes aren't automatically available to the application code, it's easy to retrieve them from a JAR file using the java.util.jar.Manifest class.
We'll see more examples of adding information to the JAR manifest later in Chapter 21. The JavaBeans APIs use manifest information to designate which classes are "beans" using a Java-Bean attribute. This information is used by IDEs which work with JavaBeans and load them from the JAR files.
3.5.2.2 Making a JAR file runnable
Aside from attributes, there are a few special values you can put in the manifest file. One of these, Main-Class, allows you to specify the class containing the primary main() method for an application contained in the JAR:
Main-Class: com.oreilly.Game
If you add this to your JAR file manifest (using the m option described earlier), you can run the application directly from the JAR:
% java -jar spaceblaster.jar
More importantly, under Windows and other GUI environments you can simply click on the JAR file to launch the application. The interpreter looks for the Main-Class value in the manifest. It then loads the named class as the application's initial class.
| CONTENTS |
EAN: 2147483647
Pages: 30
- The Four Keys to Lean Six Sigma
- Key #3: Work Together for Maximum Gain
- Making Improvements That Last: An Illustrated Guide to DMAIC and the Lean Six Sigma Toolkit
- The Experience of Making Improvements: What Its Like to Work on Lean Six Sigma Projects
- Six Things Managers Must Do: How to Support Lean Six Sigma