7.3. Command-Line Processing
| < Day Day Up > |
| We've seen how the shell uses read to process input lines: it deals with single quotes (`'), double quotes (""), and backslashes (\); it separates lines into words, according to delimiters in the environment variable IFS; and it assigns the words to shell variables. We can think of this process as a subset of the things the shell does when processing command lines. We've touched upon command-line processing throughout this book; now is a good time to make the whole thing explicit. Each line that the shell reads from the standard input or a script is called a pipeline; it contains one or more commands separated by zero or more pipe characters (|). For each pipeline it reads, the shell breaks it up into commands, sets up the I/O for the pipeline, then does the following for each command (Figure 7-1): Figure 7-1. Steps in command-line processing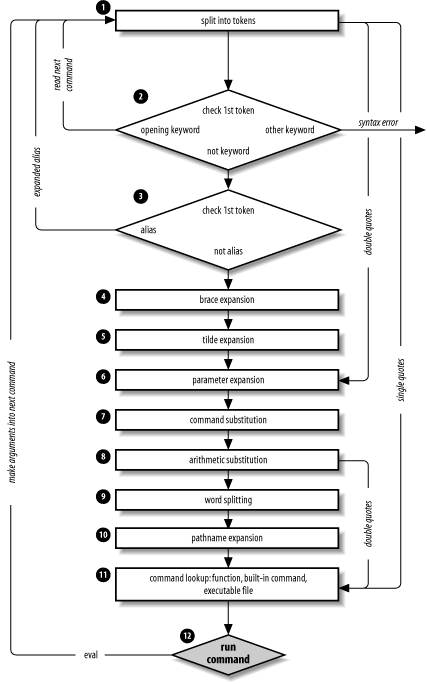
That's a lot of steps and it's not even the whole story! But before we go on, an example should make this process clearer. Assume that the following command has been run: alias ll="ls -l" Further assume that a file exists called .hist537 in user alice's home directory, which is /home/alice, and that there is a double-dollar-sign variable $$ whose value is 2537 (we'll see what this special variable is in the next chapter). Now let's see how the shell processes the following command: ll $(type -path cc) ~alice/.*$(($$%1000)) Here is what happens to this line:
Although this list of steps is fairly straightforward, it is not the whole story. There are still five ways to modify the process: quoting; using command, builtin, or enable; and using the advanced command eval. 7.3.1. QuotingYou can think of quoting as a way of getting the shell to skip some of the 12 steps above. In particular:
Table 7-7 has simple examples to show how these work; they assume the statement person=hatter was run and user alice's home directory is /home/alice. If you are wondering whether to use single or double quotes in a particular shell programming situation, it is safest to use single quotes unless you specifically need parameter, command, or arithmetic substitution.
7.3.2. command, builtin, and enableBefore moving on to the last part of the command-line processing cycle, we'll take a look at the command lookup order that we touched on in Chapter 4 and how it can be altered with several shell built-ins. The default order for command lookup is functions, followed by built-ins, with scripts and executables last. There are three built-ins that you can use to override this order: command, builtin, and enable. command removes alias and function lookup.[9] Only built-ins and commands found in the search path are executed. This is useful if you want to create functions that have the same name as a shell built-in or a command in the search path and you need to call the original command from the function. For instance, we might want to create a function called cd that replaces the standard cd command with one that does some fancy things and then executes the built-in cd:
cd ( ) { #Some fancy things command cd }In this case we avoid plunging the function into a recursive loop by placing command in front of cd. This ensures that the built-in cd is called and not the function. command has some options, listed in Table 7-8.
The -p option is a default path which guarantees that the command lookup will find all of the standard UNIX utilities. In this case, command will ignore the directories in your PATH.[10]
builtin is very similar to command but is more restrictive. It looks up only built-in commands, ignoring functions and commands found in PATH. We could have replaced command with builtin in the cd example above. The last command enables and disables shell built-ins it is called enable. Disabling a built-in allows a shell script or executable of the same name to be run without giving a full pathname. Consider the problem many beginning UNIX shell programmers have when they name a script test. Much to their surprise, executing test usually results in nothing, because the shell is executing the built-in test, rather than the shell script. Disabling the built-in with enable overcomes this.[11]
Table 7-9 lists the options available with enable.[12] Some options are for working with dynamically loadable built-ins. See Appendix C for details on these options, and how to create and load your own built-in commands.
Of these options, -n is the most useful; it is used to disable a built-in. enable without an option enables a built-in. More than one built-in can be given as arguments to enable, so enable -n pushd popd dirs would disable the pushd, popd, and dirs built-ins.[13]
You can find out what built-ins are currently enabled and disabled by using the command on its own, or with the -p option; enable or enable -p will list all enabled built-ins, and enable -n will list all disabled built-ins. To get a complete list with their current status, you can use enable -a. The -s option restricts the output to POSIX `special' built-ins. These are :, ., source, break, continue, eval, exec, exit, export, readonly, return, set, shift, trap, and unset. 7.3.3. evalWe have seen that quoting lets you skip steps in command-line processing. Then there's the eval command, which lets you go through the process again. Performing command-line processing twice may seem strange, but it's actually very powerful: it lets you write scripts that create command strings on the fly and then pass them to the shell for execution. This means that you can give scripts "intelligence" to modify their own behavior as they are running. The eval statement tells the shell to take eval's arguments and run them through the command-line processing steps all over again. To help you understand the implications of eval, we'll start with a trivial example and work our way up to a situation in which we're constructing and running commands on the fly. eval ls passes the string ls to the shell to execute; the shell prints a list of files in the current directory. Very simple; there is nothing about the string ls that needs to be sent through the command-processing steps twice. But consider this: listpage="ls | more" $listpage Instead of producing a paginated file listing, the shell will treat | and more as arguments to ls, and ls will complain that no files of those names exist. Why? Because the pipe character "appears" in Step 6 when the shell evaluates the variable, after it has actually looked for pipe characters. The variable's expansion isn't even parsed until Step 9. As a result, the shell will treat | and more as arguments to ls, so that ls will try to find files called | and more in the current directory! Now consider eval $listpage instead of just $listpage. When the shell gets to the last step, it will run the command eval with arguments ls, |, and more. This causes the shell to go back to Step 1 with a line that consists of these arguments. It finds | in Step 2 and splits the line into two commands, ls and more. Each command is processed in the normal (and in both cases trivial) way. The result is a paginated list of the files in your current directory. Now you may start to see how powerful eval can be. It is an advanced feature that requires considerable programming cleverness to be used most effectively. It even has a bit of the flavor of artificial intelligence, in that it enables you to write programs that can "write" and execute other programs.[14] You probably won't use eval for everyday shell programming, but it's worth taking the time to understand what it can do.
As a more interesting example, we'll revisit Task 4-1, the very first task in the book. In it, we constructed a simple pipeline that sorts a file and prints out the first N lines, where N defaults to 10. The resulting pipeline was: sort -nr $1 | head -${2:-10}The first argument specified the file to sort; $2 is the number of lines to print. Now suppose we change the task just a bit so that the default is to print the entire file instead of 10 lines. This means that we don't want to use head at all in the default case. We could do this in the following way: if [ -n "$2" ]; then sort -nr $1 | head -$2 else sort -nr $1 fi In other words, we decide which pipeline to run according to whether $2 is null. But here is a more compact solution: eval sort -nr \$1 ${2:+"| head -\$2"}The last expression in this line evaluates to the string | head -\$2 if $2 exists (is not null); if $2 is null, then the expression is null too. We backslash-escape dollar signs (\$) before variable names to prevent unpredictable results if the variables' values contain special characters like > or |. The backslash effectively puts off the variables' evaluation until the eval command itself runs. So the entire line is either: eval sort -nr \$1 | head -\$2 if $2 is given, or: eval sort -nr \$1 if $2 is null. Once again, we can't just run this command without eval because the pipe is "uncovered" after the shell tries to break the line up into commands. eval causes the shell to run the correct pipeline when $2 is given. Next, we'll revisit Task 7-2 from earlier in this chapter, the start script that lets you start a command in the background and save its standard output and standard error in a logfile. Recall that the one-line solution to this task had the restriction that the command could not contain output redirectors or pipes. Although the former doesn't make sense when you think about it, you certainly would want the ability to start a pipeline in this way. eval is the obvious way to solve this problem: eval "$@" > logfile 2>&1 & The only restriction that this imposes on the user is that pipes and other such special characters be quoted (surrounded by quotes or preceded by backslashes). Here's a way to apply eval in conjunction with various other interesting shell programming concepts.
make is known primarily as a programmer's tool, but it seems as though someone finds a new use for it every day. Without going into too much extraneous detail, make basically keeps track of multiple files in a particular project, some of which depend on others (e.g., a document depends on its word processor input file(s)). It makes sure that when you change a file, all of the other files that depend on it are processed. For example, assume you're using the troff word processor to write a book. You have files for the book's chapters called ch1.t, ch2.t, and so on; the troff output for these files are ch1.out, ch2.out, etc. You run commands like troff chN.t > chN.out to do the processing. While you're working on the book, you tend to make changes to several files at a time. In this situation, you can use make to keep track of which files need to be reprocessed, so that all you need to do is type make, and it will figure out what needs to be done. You don't need to remember to reprocess the files that have changed. How does make do this? Simple: it compares the modification times of the input and output files (called sources and targets in make terminology), and if the input file is newer, then make reprocesses it. You tell make which files to check by building a file called makefile that has constructs like this: target : source1 source2 ... commands to make target This essentially says, "For target to be up to date, it must be newer than all of the sources. If it's not, run the commands to bring it up to date." The commands are on one or more lines that must start with TABs: e.g., to make ch7.out: ch7.out : ch7.t troff ch7.t > ch7.out Now suppose that we write a shell function called makecmd that reads and executes a single construct of this form. Assume that the makefile is read from standard input. The function would look like the following code. makecmd ( ) { read target colon sources for src in $sources; do if [ $src -nt $target ]; then while read cmd && [ $(grep \t* $cmd) ]; do echo "$cmd" eval ${cmd#\t} done break fi done }This function reads the line with the target and sources; the variable colon is just a placeholder for the :. Then it checks each source to see if it's newer than the target, using the -nt file attribute test operator that we saw in Chapter 5. If the source is newer, it reads, prints, and executes the commands until it finds a line that doesn't start with a TAB or it reaches end-of-file. (The real make does more than this; see the exercises at the end of this chapter.) After running the commands (which are stripped of the initial TAB), it breaks out of the for loop, so that it doesn't run the commands more than once. As a final example of eval, we'll look again at procimage, the graphics utility that we developed in the last three chapters. Recall that one of the problems with the script as it stands is that it performs the process of scaling and bordering regardless of whether you want them. If no command-line options are present, a default size, border width, and border color are used. Rather than invent some if then logic to get around this, we'll look at how you can dynamically build a pipeline of commands in the script; those commands that aren't needed simply disappear when the time comes to execute them. As an added bonus, we'll add another capability to our script: image enhancement. Looking at the procimage script you'll notice that the NetPBM commands form a nice pipeline; the output of one operation becomes the input to the next, until we end up with the final image. If it weren't for having to use a particular conversion utility, we could reduce the script to the following pipeline (ignoring options for now): cat $filename | convertimage | pnmscale | pnmmargin |\ pnmtojpeg > $outfile Or, better yet: convertimage $filename | pnmscale | pnmmargin | pnmtojpeg \ > $outfile As we've already seen, this is equivalent to: eval convertimage $filename | pnmscale | pnmmargin |\ pnmtojpeg > $outfile And knowing what we do about how eval operates, we can transform this into: eval "convertimage" $filename " | pnmscale" " | pnmmargin" \ " | pnmtojpeg " > $outfile And thence to: convert='convertimage' scale=' | pnmscale' border=' | pnmmargin' standardise=' | pnmtojpeg eval $convert $filename $scale $border $standardise > $outfile Now consider what happens when we don't want to scale the image. We do this: scale="" while getopts ":s:w:c:" opt; do case $opt in s ) scale=' | pnmscale' ;; ... eval $convert $filename $scale $border $standardise > $outfile In this code fragment, scale is set to a default of the empty string. If -s is not given on the command line, then the final line evaluates with $scale as the empty string and the pipeline will "collapse" into: $convert $filename $border $standardise > $outfile Using this principle, we can modify the previous version of the procimage script and produce a pipeline version. For each input file we need to construct and run a pipeline based upon the options given on the command line. Here is the new version: # Set up the defaults width=1 colour='-color grey' usage="Usage: $0 [-s N] [-w N] [-c S] imagefile..." # Initialise the pipeline components standardise=' | pnmtojpeg -quiet' while getopts ":s:w:c:" opt; do case $opt in s ) size=$OPTARG scale=' | pnmscale -quiet -xysize $size $size' ;; w ) width=$OPTARG border=' | pnmmargin $colour $width' ;; c ) colour="-color $OPTARG" border=' | pnmmargin $colour $width' ;; \? ) echo $usage exit 1 ;; esac done shift $(($OPTIND - 1)) if [ -z "$@" ]; then echo $usage exit 1 fi # Process the input files for filename in "$@"; do case $filename in *.gif ) convert='giftopnm' ;; *.tga ) convert='tgatoppm' ;; *.xpm ) convert='xpmtoppm' ;; *.pcx ) convert='pcxtoppm' ;; *.tif ) convert='tifftopnm' ;; *.jpg ) convert='jpegtopnm -quiet' ;; * ) echo "$0: Unknown filetype '${filename##*.}'" exit 1;; esac outfile=${filename%.*}.new.jpg eval $convert $filename $scale $border $standardise > $outfile doneThis version has been simplified somewhat from the previous one in that it no longer needs a temporary file to hold the converted file. It is also a lot easier to read and understand. To show how easy it is to add further processing to the script, we'll now add one more NetPBM utility. NetPBM provides a utility to enhance an image and make it sharper: pnmnlfilt. This utility is an image filter that samples the image and can enhance edges in the image (it can also smooth the image if given the appropriate values). It takes two parameters that tell it how much to enhance the image. For the purposes of our script, we'll just choose some optimal values and provide an option to switch enhancement on and off in the script. To put the new capability in place all we have to do is add the new option (-S) to the getopts case statement, update the usage line, and add a new variable to the pipeline. Here is the new code: # Set up the defaults width=1 colour='-color grey' usage="Usage: $0 [-S] [-s N] [-w N] [-c S] imagefile..." # Initialise the pipeline components standardise=' | pnmtojpeg -quiet' while getopts ":Ss:w:c:" opt; do case $opt in S ) sharpness=' | pnmnlfilt -0.7 0.45' ;; s ) size=$OPTARG scale=' | pnmscale -quiet -xysize $size $size' ;; w ) width=$OPTARG border=' | pnmmargin $colour $width' ;; c ) colour="-color $OPTARG" border=' | pnmmargin $colour $width' ;; \? ) echo $usage exit 1 ;; esac done shift $(($OPTIND - 1)) if [ -z "$@" ]; then echo $usage exit 1 fi # Process the input files for filename in "$@"; do case $filename in *.gif ) convert='giftopnm' ;; *.tga ) convert='tgatoppm' ;; *.xpm ) convert='xpmtoppm' ;; *.pcx ) convert='pcxtoppm' ;; *.tif ) convert='tifftopnm' ;; *.jpg ) convert='jpegtopnm -quiet' ;; * ) echo "$0: Unknown filetype '${filename##*.}'" exit 1;; esac outfile=${filename%.*}.new.jpg eval $convert $filename $scale $border $sharpness $standardise > $outfile doneWe could go on forever with increasingly complex examples of eval, but we'll settle for concluding the chapter with a few exercises. The questions in Exercise 3 are really more like items on the menu of food for thought.
|
| < Day Day Up > |
EAN: 2147483647
Pages: 139