Cropping
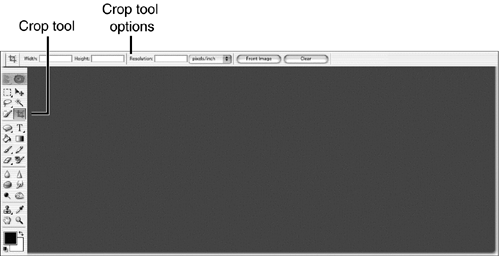
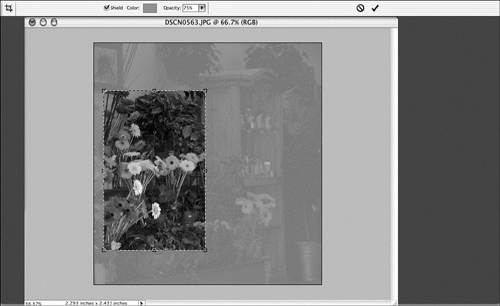
| Cropping is the artistic term for trimming away unwanted parts of a picture. You can think of it as a specialized kind of selection, which is probably why the people who created Elements put the Crop tool in the same toolbox section as the Selection Marquees (see Figure 23.22). Figure 23.22. You can use the Crop tool to remove unwanted parts of an image. To crop part of an image, click the Crop tool. You can specify the width and/or height of the final image and its resolution by entering those values in the Options bar. To enter the values of the current image so that the final cropped image will use the same dimensions, click Front Image. Then click in the image and drag downward and to the right to select the area you want to crop. When you've selected the part of the image you want to keep, the Options bar changes, as you can see in Figure 23.23. Figure 23.23. After cropping, the Option bar changes. If needed, click Shield on the tool Options bar to make the uncropped area go dark, so that it's easier to see what will remain . You can adjust the color and opacity of the shield using the Options bar. Drag any of the boxes (handles) located around the edges of the selection to adjust the size of the cropped area. Rotate the selection by moving the mouse pointer outside the selection and dragging. You can also click in the middle of the selection to adjust its position on the image. To crop the image, click the button labeled with a check mark.
Task: Crop a PictureTo crop a picture, open any image and follow these steps:
Remember, if you crop too much of the picture, you can undo what you have just done. If it's too late to undo because you have already done something else, just go back to the Undo History palette and click the uncropped picture. You can also choose File, Revert to go back to the last saved version of your picture. As long as you don't close the file, you can keep cropping and undoing it as much as you want. |
EAN: 2147483647
Pages: 349
- ERP System Acquisition: A Process Model and Results From an Austrian Survey
- The Second Wave ERP Market: An Australian Viewpoint
- The Effects of an Enterprise Resource Planning System (ERP) Implementation on Job Characteristics – A Study using the Hackman and Oldham Job Characteristics Model
- Context Management of ERP Processes in Virtual Communities
- A Hybrid Clustering Technique to Improve Patient Data Quality

